PowerShell 脚本可在您的环境中准备所有配置设置。当您通过运行 PowerShell 脚本来部署 Unified Access Gateway 时,该解决方案会在第一次系统引导时为生产做好准备。

重要事项: 在 PowerShell 部署中,您可以在 INI 文件中提供所有设置,以便 Unified Access Gateway 实例在引导后可直接用于生产。如果您不想在部署后更改任何设置,则无需提供管理 UI 密码。

但是,如果在部署过程中未提供管理 UI 密码,则管理 UI 和 API 都将不可用。

注:
  • 如果在部署时未提供管理 UI 密码,则以后将无法通过添加用户来启用对管理 UI 或 API 的访问权限。如果您想要添加管理 UI 用户,则必须使用有效的密码重新部署 Unified Access Gateway 实例。
  • Unified Access Gateway 3.5 及更高版本包含一个可选的 sshEnabled INI 属性。PowerShell INI 文件中 [General] 部分的 sshEnabled=true 设置会自动在部署的设备上启用 ssh 访问。VMware 通常建议不要在 Unified Access Gateway 上启用 ssh,某些特定情况及可以限制访问的情况除外。此功能主要适用于备用控制台访问不可用的 Amazon AWS EC2 部署。
    注: 有关 Amazon AWS EC2 的详细信息,请参阅 Unified Access Gateway PowerShell 到 Amazon Web Services 的部署

    如果 sshEnabled=true 未指定或设置为 false,则不会启用 ssh

    对于 vSphere、Hyper-V 或 Microsoft Azure 部署,通常不需要在 Unified Access Gateway 上启用 ssh 访问,因为在这些平台中可以使用控制台访问。如果 Amazon AWS EC2 部署需要 root 控制台访问,则设置 sshEnabled=true。如果启用 ssh,必须在防火墙或安全组中将 TCP 端口 22 访问限制为单个管理员的源 IP 地址。EC2 支持在与 Unified Access Gateway 网络接口关联的 EC2 安全组中实施此限制。

前提条件

  • 如果是 Hyper-V 部署并且要使用静态 IP 来升级 Unified Access Gateway,请在部署新的 Unified Access Gateway 实例之前删除旧设备。
  • 验证满足使用此脚本的相应系统要求。

    以下是可来于在您的环境中部署 Unified Access Gateway 的示例脚本。

    图 1. PowerShell 示例脚本
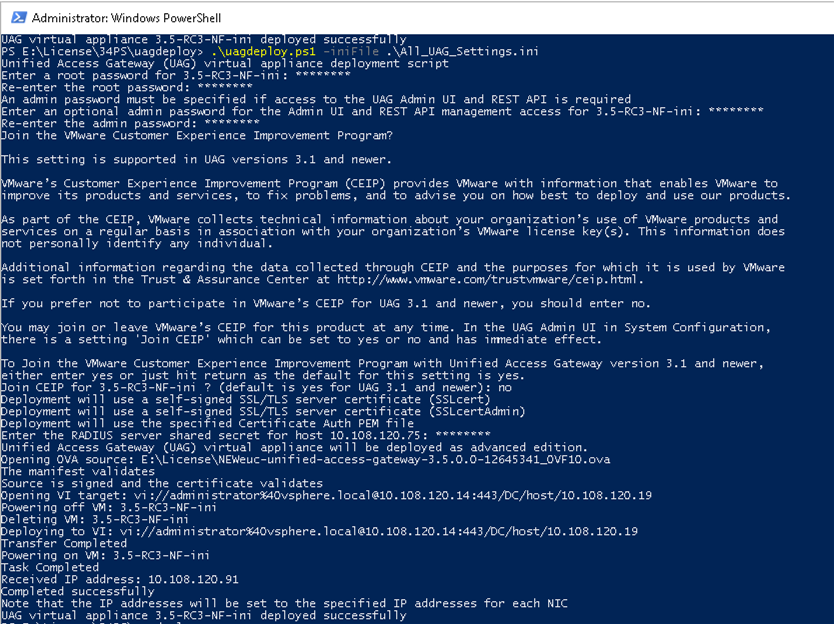
过程

  1. 将 My VMware 上的 Unified Access Gateway OVA 下载到您的 Windows 计算机中。
  2. uagdeploy-XXX.zip 文件下载到 Windows 计算机上的某个文件夹中。
    https://communities.vmware.com/docs/DOC-30835 中提供了该 ZIP 文件。
  3. 打开 PowerShell 脚本,将目录修改为您脚本所在的位置。
  4. Unified Access Gateway 虚拟设备创建一个 INI 配置文件。
    例如:部署新的 Unified Access Gateway 设备 AP1。配置文件命名为 ap1.ini。此文件中包含 AP1 的所有配置设置。您可以使用 apdeploy.ZIP 文件中的示例 INI 文件创建 INI 文件,并相应地修改设置。
    注:
    • 您可以为环境中的多个 Unified Access Gateway 部署创建唯一的 INI 文件。您必须在 INI 文件中相应地更改 IP 地址和名称参数才能部署多个设备。
    要修改的 INI 文件示例。
    [General]
    netManagementNetwork=
    netInternet=
    netBackendNetwork=
    name=
    dns = 192.0.2.1 192.0.2.2
    dnsSearch = example1.com example2.com
    ip0=10.108.120.119
    diskMode=
    source=
    defaultGateway=10.108.120.125
    target=
    ds=
    deploymentOption=onenic
    authenticationTimeout=300000
    fipsEnabled=false
    uagName=UAG1
    locale=en_US
    ipModeforNIC3=DHCPV4_DHCPV6
    tls12Enabled=true
    ipMode=DHCPV4_DHCPV6
    requestTimeoutMsec=10000
    ipModeforNIC2=DHCPV4_DHCPV6
    tls11Enabled=true
    clientConnectionIdleTimeout=180
    tls10Enabled=false
    adminCertRolledBack=false
    honorCipherOrder=false
    cookiesToBeCached=none
    healthCheckUrl=/favicon.ico
    quiesceMode=false
    syslogUrl=10.108.120.108:514
    isCiphersSetByUser=false
    tlsPortSharingEnabled=true
    ceipEnabled=true
    bodyReceiveTimeoutMsec=15000
    monitorInterval=60
    cipherSuites=TLS_ECDHE_RSA_WITH_AES_128_CBC_SHA256,TLS_ECDHE_RSA_WITH_AES_128_CBC_SHA,TLS_RSA_WITH_AES_128_CBC_SHA
    adminPasswordExpirationDays=90
    httpConnectionTimeout=120
    isTLS11SetByUser=false
    sessionTimeout=36000000
    ssl30Enabled=false
    snmpEnabled= TRUE | FALSE
    ntpServers=ipOrHostname1 ipOrHostname2
    fallBackNtpServers=ipOrHostname1 ipOrHostname2
    
    [WebReverseProxy1]
    proxyDestinationUrl=https://10.108.120.21
    trustedCert1=
    instanceId=view
    healthCheckUrl=/favicon.ico
    userNameHeader=AccessPoint-User-ID
    proxyPattern=/(.*)
    landingPagePath=/
    hostEntry1=10.108.120.21 HZNView.uagqe.auto.com
    
    [Horizon]
    proxyDestinationUrl=https://enterViewConnectionServerUrl
    trustedCert1=
    gatewayLocation=external
    disableHtmlAccess=false
    healthCheckUrl=/favicon.ico
    proxyDestinationIPSupport=IPV4
    smartCardHintPrompt=false
    queryBrokerInterval=300
    proxyPattern=(/|/view-client(.*)|/portal(.*)|/appblast(.*))
    matchWindowsUserName=false
    windowsSSOEnabled=false
    
    [Airwatch]
    tunnelGatewayEnabled=true
    apiServerUsername=domain\apiusername
    apiServerPassword=*****
    proxyDestinationUrl=https://null
    ntlmAuthentication=false
    healthCheckUrl=/favicon.ico
    organizationGroupCode=
    apiServerUrl=https://null
    airwatchOutboundProxy=false
    outboundProxyHost=1.2.3.4
    outboundProxyPort=3128
    outboundProxyUsername=proxyuser
    outboundProxyPassword=****
    reinitializeGatewayProcess=false
    airwatchServerHostname=tunnel.acme.com
    trustedCert1=c:\temp\CA-Cert-A.pem
    hostEntry1=1.3.5.7 backend.acme.com
    
    [AirwatchSecureEmailGateway]
    memConfigurationId=abc123
    apiServerUsername=domain\apiusername
    healthCheckUrl=/favicon.ico
    apiServerUrl=https://null
    outboundProxyHost=1.2.3.4
    outboundProxyPort=3128
    outboundProxyUsername=proxyuser
    outboundProxyPassword=****
    reinitializeGatewayProcess=false
    airwatchServerHostname=serverNameForSNI
    apiServerPassword=****
    trustedCert1=c:\temp\CA-Cert-A.pem
    pfxCerts=C:\Users\admin\My Certs\mycacerts.pfx
    hostEntry1=1.3.5.7 exchange.acme.com
    
    [AirWatchContentGateway]
    cgConfigId=abc123
    apiServerUrl=https://null
    apiServerUsername=domain\apiusername
    apiServerPassword=*****
    outboundProxyHost=
    outboundProxyPort=
    outboundProxyUsername=proxyuser
    outboundProxyPassword=*****
    airwatchOutboundProxy=false
    hostEntry1=192.168.1.1 cgbackend.acme.com
    trustedCert1=c:\temp\CA-Cert-A.pem
    ntlmAuthentication=false
    reinitializeGatewayProcess=false
    airwatchServerHostname=cg.acme.com
    
    [SSLCert]
    pemPrivKey=
    pemCerts=
    pfxCerts=
    pfxCertAlias=
    
    [SSLCertAdmin]
    pemPrivKey=
    pemCerts=
    pfxCerts=
    pfxCertAlias=
    
    [JWTSettings1]
    publicKey1=
    publicKey2=
    publicKey3=
    name=JWT_1
    
    [JWTSettings2]
    publicKey1=
    publicKey2=
    name=JWT_2
  5. 要确保脚本执行不受限制,请输入 PowerShell set-executionpolicy 命令。
    set-executionpolicy -scope currentuser unrestricted
    您只需执行一次即可除去限制。
    1. (可选) 如果出现脚本警告,请运行以下命令以取消阻止该警告:unblock-file -path .\uagdeploy.ps1
  6. 运行以下命令开始部署。如果未指定 .INI 文件,则脚本默认使用 ap.ini
    .\uagdeploy.ps1 -iniFile uag1.ini
  7. 在提示时输入凭据,然后完成脚本。
    注: 如果提示您为目标设备添加指纹,请输入 yes
    Unified Access Gateway 设备已部署并且可以用于生产。

结果

有关 PowerShell 脚本的详细信息,请参阅 https://communities.vmware.com/docs/DOC-30835

下一步做什么

如果要在保留现有设置的同时升级 Unified Access Gateway,请编辑 .ini 文件以将源引用更改为新版本,然后重新运行 .ini 文件: uagdeploy.ps1 uag1.ini。此过程最多可能需要 3 分钟的时间。
[General]
name=UAG1
source=C:\temp\euc-unified-access-gateway-3.2.1-7766089_OVF10.ova

如果要在没有服务中断的情况下进行升级,请参阅零停机时间升级