您可以在要进行迁移的联合分段上创建网桥。

前提条件

  • 将 NSX Edge 网桥配置为传输节点。请参见将 NSX Edge 网桥配置为传输节点
  • 创建 NSX Edge 集群。请参见创建 NSX Edge 集群
  • 配置 NSX Manager 用户界面设置,并将开关可见性设置为对所有用户可见。请参阅NSX 管理指南》中的“配置用户界面设置”。

过程

  1. 使用 admin 特权登录到 NSX Manager。
  2. 单击右上角的管理器按钮以选择“管理器”模式。
  3. 导航到网络 > 逻辑交换机 > Edge 网桥配置文件以创建 Edge 网桥配置文件。
    “Edge 网桥配置文件”屏幕的屏幕截图
  4. 执行以下 API 调用以绑定从 GM(全局管理器)分段创建的逻辑交换机。例如:
    POST https://<nsx-manager>/api/v1/bridge-endpoints
    {
        "bridge_endpoint_profile_id": "0010b881-0c1c-4829-98f3-8389697dc4e8", <- ID of the Bridge Endpoint Profile
        "vlan_transport_zone_id": "a95c914d-748d-497c-94ab-10d4647daeba", <- ID of the VLAN Transport Zone
        "vlan": 0 
    }
     
    Response:
    { 
        "vlan": 0,
        "vlan_trunk_spec": {
            "vlan_ranges": []
        },
        "ha_enable": true,
        "bridge_endpoint_profile_id": "0010b881-0c1c-4829-98f3-8389697dc4e8", <- ID of the Bridge Endpoint Profile
        "vlan_transport_zone_id": "a95c914d-748d-497c-94ab-10d4647daeba", <- ID of the Bridge Endpoint Profile
        "resource_type": "BridgeEndpoint",
        "id": "7e9c3517-f15b-490b-b14e-5ec356e92655", 
        "display_name": "7e9c3517-f15b-490b-b14e-5ec356e92655", <- ID of the Bridge Endpoint
        "tags": [],
        "_create_user": "admin",
        "_create_time": 1638555736780,
        "_last_modified_user": "admin",
        "_last_modified_time": 1638555736780,
        "_system_owned": false,
        "_protection": "NOT_PROTECTED",
        "_revision": 0
    }
    

    您可以通过导航到系统 > Fabric > 传输区域来找到传输区域的 UUID。查找 Edge 节点的 VLAN 传输区域。

    “传输区域”屏幕的屏幕截图
  5. 执行以下 API 调用以在网桥上创建端口。
    POST https://<nsx-manager>/api/v1/logical-ports 
    {
        "logical_switch_id": "dd2841db-dff9-4927-834f-11b5ac8803d4", <- ID of the Logical Switch
        "admin_state": "UP",
        "attachment": {
            "attachment_type": "BRIDGEENDPOINT",
            "id": "7e9c3517-f15b-490b-b14e-5ec356e92655" <- ID of the Bridge Endpoint
        }
    }
    
    Response:
    {
        "logical_switch_id": "dd2841db-dff9-4927-834f-11b5ac8803d4", <- ID of the Logical Switch
        "attachment": {
            "attachment_type": "BRIDGEENDPOINT",
            "id": "7e9c3517-f15b-490b-b14e-5ec356e92655"  <- ID of the Bridge Endpoint
        },
        "admin_state": "UP",
        "address_bindings": [],
        "switching_profile_ids": [
            {
                "key": "SwitchSecuritySwitchingProfile",
                "value": "47ffda0e-035f-4900-83e4-0a2086813ede"
            },
            {
                "key": "SpoofGuardSwitchingProfile",
                "value": "fad98876-d7ff-11e4-b9d6-1681e6b88ec1"
            },
            {
                "key": "IpDiscoverySwitchingProfile",
                "value": "64814784-7896-3901-9741-badeff705639"
            },
            {
                "key": "MacManagementSwitchingProfile",
                "value": "1e7101c8-cfef-415a-9c8c-ce3d8dd078fb"
            },
            {
                "key": "PortMirroringSwitchingProfile",
                "value": "93b4b7e8-f116-415d-a50c-3364611b5d09"
            },
            {
                "key": "QosSwitchingProfile",
                "value": "f313290b-eba8-4262-bd93-fab5026e9495"
            }
        ],
        "ignore_address_bindings": [],
        "internal_id": "55ac50fa-c5e1-413b-b1ec-2d85619cf5c3",
        "resource_type": "LogicalPort",
        "id": "55ac50fa-c5e1-413b-b1ec-2d85619cf5c3", <- ID of the Port created with the Bridge 
        "display_name": "55ac50fa-c5e1-413b-b1ec-2d85619cf5c3",
        "_create_user": "admin",
        "_create_time": 1638556071051,
        "_last_modified_user": "admin",
        "_last_modified_time": 1638556071051,
        "_system_owned": false,
        "_protection": "NOT_PROTECTED",
        "_revision": 0
    }

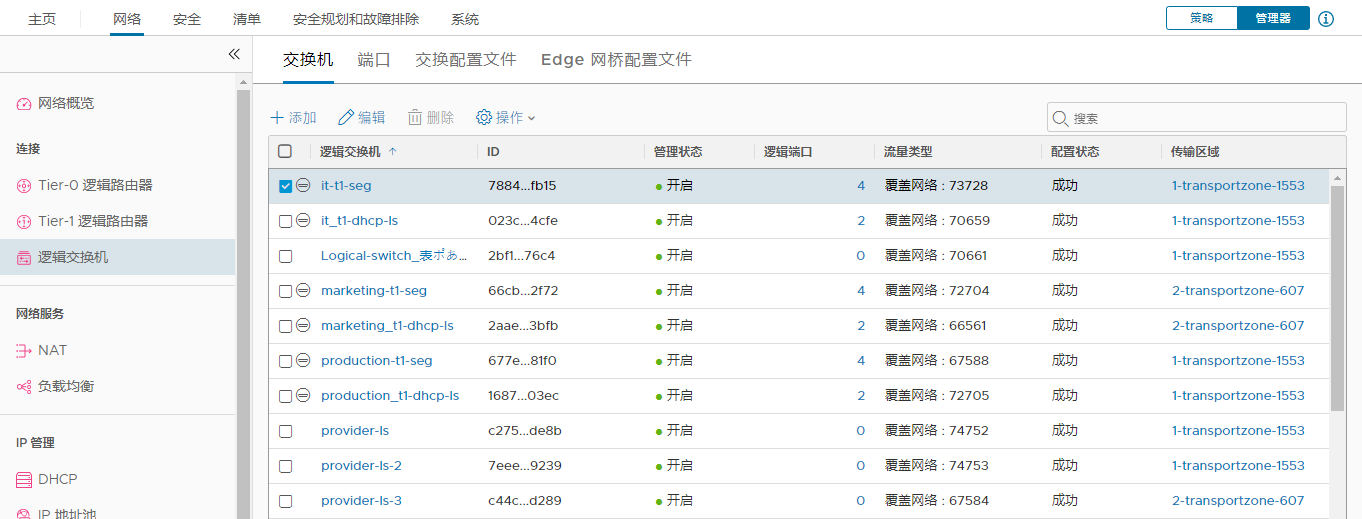
    您可以通过导航到网络 > 逻辑交换机来查看 UUID。

    “交换机”屏幕的屏幕截图

    此逻辑交换机是从全局管理器创建的延伸分段。选择“策略”模式后,可以在 NSX Manager UI 中看到此分段。

    “分段”屏幕的屏幕截图

    在“管理器”模式下,可以看到网桥已成功。

    “交换机”屏幕的屏幕截图

    在“策略”模式下,可以看到已创建的 VIF。UI 中显示该 VIF 已连接到网桥端点,但没有更多详细信息。

    “分段端口”屏幕的屏幕截图
    您可以使用以下 API 调用获取有关此端口的更多信息:
    GET https://<nsx-manager>/api/v1/logical-ports/55ac50fa-c5e1-413b-b1ec-2d85619cf5c3
    
    Response:
    {
        "logical_switch_id": "dd2841db-dff9-4927-834f-11b5ac8803d4",
        "attachment": {
            "attachment_type": "BRIDGEENDPOINT",
            "id": "7e9c3517-f15b-490b-b14e-5ec356e92655"
        },
        "admin_state": "UP",
        "address_bindings": [],
        "switching_profile_ids": [
            {
                "key": "SwitchSecuritySwitchingProfile",
                "value": "47ffda0e-035f-4900-83e4-0a2086813ede"
            },
            {
                "key": "SpoofGuardSwitchingProfile",
                "value": "fad98876-d7ff-11e4-b9d6-1681e6b88ec1"
            },
            {
                "key": "IpDiscoverySwitchingProfile",
                "value": "64814784-7896-3901-9741-badeff705639"
            },
            {
                "key": "MacManagementSwitchingProfile",
                "value": "1e7101c8-cfef-415a-9c8c-ce3d8dd078fb"
            },
            {
                "key": "PortMirroringSwitchingProfile",
                "value": "93b4b7e8-f116-415d-a50c-3364611b5d09"
            },
            {
                "key": "QosSwitchingProfile",
                "value": "f313290b-eba8-4262-bd93-fab5026e9495"
            }
        ],
        "ignore_address_bindings": [],
        "internal_id": "55ac50fa-c5e1-413b-b1ec-2d85619cf5c3",
        "resource_type": "LogicalPort",
        "id": "55ac50fa-c5e1-413b-b1ec-2d85619cf5c3",
        "display_name": "55ac50fa-c5e1-413b-b1ec-2d85619cf5c3",
        "_create_user": "admin",
        "_create_time": 1638556071051,
        "_last_modified_user": "admin",
        "_last_modified_time": 1638556071051,
        "_system_owned": false,
        "_protection": "NOT_PROTECTED",
        "_revision": 0
    }

结果

现在,您已为联合分段配置了网桥,随后可执行以下任务:

迁移后网桥移除

迁移后,移除不再需要的对象。
  1. 进行以下 PUT API 调用。逻辑端口 ID (55ac50fa-c5e1-413b-b1ec-2d85619cf5c3) 位于上述步骤 5 执行的 POST API 调用所得到的响应中。使用该 POST API 调用所得到的响应作为此调用的正文,但不要包含 "attachment" 参数。
    PUT https://<nsx-manager>/api/v1/logical-ports/55ac50fa-c5e1-413b-b1ec-2d85619cf5c3
    {
        "logical_switch_id": "dd2841db-dff9-4927-834f-11b5ac8803d4",
        "admin_state": "UP",
        "address_bindings": [],
        "switching_profile_ids": [
            {
                "key": "SwitchSecuritySwitchingProfile",
                "value": "47ffda0e-035f-4900-83e4-0a2086813ede"
            },
            {
                "key": "SpoofGuardSwitchingProfile",
                "value": "fad98876-d7ff-11e4-b9d6-1681e6b88ec1"
            },
            {
                "key": "IpDiscoverySwitchingProfile",
                "value": "64814784-7896-3901-9741-badeff705639"
            },
            {
                "key": "MacManagementSwitchingProfile",
                "value": "1e7101c8-cfef-415a-9c8c-ce3d8dd078fb"
            },
            {
                "key": "PortMirroringSwitchingProfile",
                "value": "93b4b7e8-f116-415d-a50c-3364611b5d09"
            },
            {
                "key": "QosSwitchingProfile",
                "value": "f313290b-eba8-4262-bd93-fab5026e9495"
            }
        ],
        "ignore_address_bindings": [],
        "internal_id": "55ac50fa-c5e1-413b-b1ec-2d85619cf5c3",
        "resource_type": "LogicalPort",
        "id": "55ac50fa-c5e1-413b-b1ec-2d85619cf5c3",
        "display_name": "55ac50fa-c5e1-413b-b1ec-2d85619cf5c3",
        "_create_user": "admin",
        "_create_time": 1638556071051,
        "_last_modified_user": "admin",
        "_last_modified_time": 1638556071051,
        "_system_owned": false,
        "_protection": "NOT_PROTECTED",
        "_revision": 0
    }
  2. 通过调用以下 API 删除端口和网桥端点。端口 ID 和网桥端点 ID 位于上述步骤 5 执行的 POST API 调用所得到的响应中。
    DEL https://<nsx-manager>/api/v1/logical-ports/55ac50fa-c5e1-413b-b1ec-2d85619cf5c3
    DEL https://<nsx-manager>/api/v1/bridge-endpoints/7e9c3517-f15b-490b-b14e-5ec356e92655