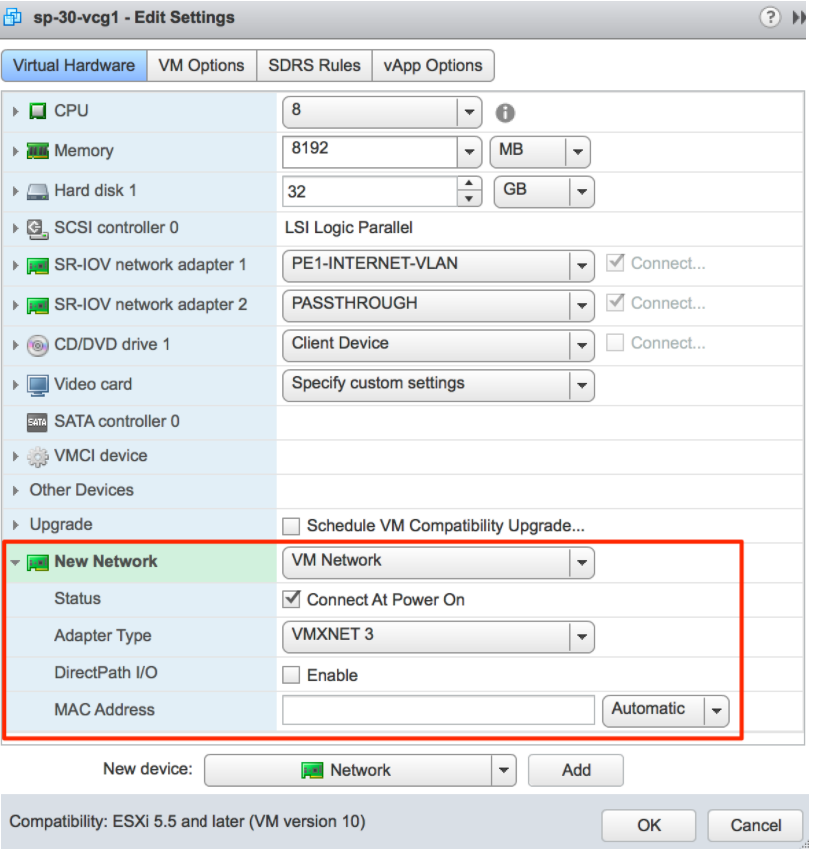
如果要使用 OAM 接口部署网关,请完成以下步骤。
- 向虚拟机添加一个额外接口 (ETH2)。
VMware:如果管理/OAM 需要使用专用 vNIC,请添加另一个 vmxnet3 类型的 vNIC。您必须重复执行上一步,即,单击确定 (OK),然后再次编辑设置 (Edit Settings),才能记录 vNIC MAC 地址。

KVM:如果管理/OAM 需要使用专用 vNIC,请确保您具有名为 oam-network 的 libvirt 网络。然后,将以下行添加到您的 XML 虚拟机结构中:
…..
</controller>
<interface type='network'>
  <source network='public_interface'/>
  <vlan><tag id='#public_vlan#'/></vlan>
  <alias name='hostdev1'/>
  <address type='pci' domain='0x0000' bus='0x00' slot='0x11' function='0x0'/>
</interface>
<interface type='network'>
  <source network='inside_interface'/>
  <alias name='hostdev2'/>
  <address type='pci' domain='0x0000' bus='0x00' slot='0x12' function='0x0'/>
</interface>
<interface type='network'>
  <source network='oam_interface'/>
  <vlan><tag id='#oam_vlan#'/></vlan>
  <alias name='hostdev2'/>
  <address type='pci' domain='0x0000' bus='0x00' slot='0x13' function='0x0'/>
</interface>
<serial type='pty'>
  <source path='/dev/pts/3'/>
  <target port='0'/>
  <alias name='serial0'/>
</serial>
- 使用添加的额外接口配置 network-config 文件。
version: 2
ethernets:
  eth0:
    addresses:
      - #_IPv4_Address_/mask#
  mac_address: #_mac_Address_#
    gateway4: #_IPv4_Gateway_#
    nameservers:
      addresses:
        - #_DNS_server_primary_#
        - #_DNS_server_secondary_#
      search: []
    routes:
      - to: 0.0.0.0/0
        via: #_IPv4_Gateway_#
        metric: 1

  eth1:
    addresses:
      - #_MGMT_IPv4_Address_/Mask#
    mac_address: #_MGMT_mac_Address_#
    nameservers:
      addresses:
        - #_DNS_server_primary_#
        - #_DNS_server_secondary_#
      search: []
    routes:
      - to: 0.0.0.0/0
        via: #_MGMT_IPv4_Gateway_#
       metric: 13

   eth2:
    addresses:
      - #_OAM_IPv4_Address_/Mask#
    nameservers:
      addresses:
        - #_DNS_server_primary_#
        - #_DNS_server_secondary_#
      search: []
    routes:
      - to: 10.0.0.0/8
        via: #_OAM_IPv4_Gateway_#
      - to: 192.168.0.0/16
        via: #_OAM_IPv4_Gateway_#