


This page explains how to install GenAI on VMware Tanzu Platform for Cloud Foundry with an existing Tanzu Application Service deployment on VMware vSphere, so that apps hosted on Tanzu Application Service can use AI models running on NVIDIA vGPUs.
CautionGenAI on Tanzu Platform is currently in beta and is intended for evaluation and test purposes only. Do not use in a production environment. This document applies to GenAI on Tanzu Platform v0.0.118 and may not apply to later versions.
Prerequisites
-
A Tanzu Application Service environment with:
- Tanzu Operations Manager v3.0.24 or later.
- Tanzu Application Service v4.0.x or later.
- Internet access from BOSH compilation and Tanzu Application Service worker VMs, while GenAI on Tanzu Platform installs.
- The VMs need online access to download models and components.
- Once installation is complete, models and data stay within your Tanzu Application Service network, and Tanzu foundation VMs make no outbound calls to external third-party APIs or services.
- Future support for air-gapped installation is under evaluation.
- Hardware:
- VMware ESXi 8.0.2 host machine.
- NVIDIA Telsa T4 Graphics card, physically plugged into the VMware ESXi host.
- NVIDIA Delegated License Service (DLS, on-premises) for NVIDIA License System v3.2.
- Software, to install as described in the following sections.
- NVIDIA GPU vSphere Installation Bundle (VIB) for ESXi,
NVD-AIE-800_550.54.16-1OEM.800.1.0.20613240_23471877.zip. - One of the following vGPU drivers, to install on your VMware vSphere ESXi host as described in the following sections.
- NVIDIA AI Enterprise (NVAIe) v5.0 vGPU software (requires NVIDIA license).
- NVIDIA vGPU Software (requires NVIDIA license).
- Ubuntu Guest OS driver.
- GenAI on Tanzu Platform v0.0.118 or higher.
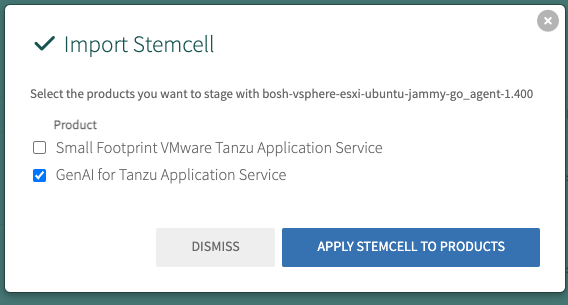
- A BOSH stemcell with EFI support, downloaded from BOSH Stemcells. Stemcells that support EFI are available for:
- VMware vSphere: Stemcell v1.446 and higher.
- NVIDIA GPU vSphere Installation Bundle (VIB) for ESXi,
Step 1: Set Up Your ESXi Host and Install a vGPU Driver
There are three options for the vGPU driver that’s installed on your ESXi host, which GenAI on Tanzu Platform includes when it creates vGPU-enabled VMs:
- NVIDIA AI Enterprise (NVAIe) v5.0 (requires NVIDIA license)
- NVIDIA vGPU Software (requires NVIDIA license)
- Ubuntu Guest OS driver, version
nvidia-linux-grid-550_550.54.15_amd64.deb- OSS driver for direct passthrough
- Experimental support
Each option has pros and cons.
- NVIDIA NVAIe performs the best, by supporting the “-C compute-optimized” profile when assigning virtual slices of the GPU.
- The Ubuntu OSS driver binds VMs to their underlying hosts, which prevents things like vMotion and ESXi host maintenance, but it does not require additional licensing from NVIDIA and is useful for test systems or POCs.
To install a NVIDIA NVAIe or NVIDIA vGPU driver on your ESXi host:
-
Validate NVIDIA support for your ESXi version, vCenter version, and vGPU card by checking the support matrix for your vGPU driver:
-
Download the appropriate version of the NVAIe or NVIDIA vGPU software from the NVIDIA License portal.
-
Extract the downloaded zip file and find the guest driver.
-
Upload the guest driver to a local file server where GenAI on Tanzu Platform can access it when it creates VMs. This can be either:
- On Tanzu Application Service through a static file buildpack.
- On an existing customer file server.
-
Install the NVIDIA GPU vSphere Installation Bundle (VIB) on your ESXi Host, as described in Installing and configuring the NVIDIA VIB on ESXi in the Broadcom Support knowledge base.
Note
It is critical that the Guest Driver and ESXi host driver / VIB come from the same NVIDIA software release.
-
Follow the NVIDIA License System Quick Start Guide to set up an NVIDIA license server, either in the cloud or on-premises:
- Cloud: See Configuring a CLS Instance
- On-premises: See Configuring a DLS Instance
Step 2: Install the GenAI on Tanzu Platform Tile
Download the GenAI on Tanzu Platform tile from Broadcom Support. After you have the GenAI on Tanzu Platform tile downloaded, upload the tile to your Tanzu Operations Manager. After the tile has been uploaded and added for installation, follow the steps below for each tile configuration tab:

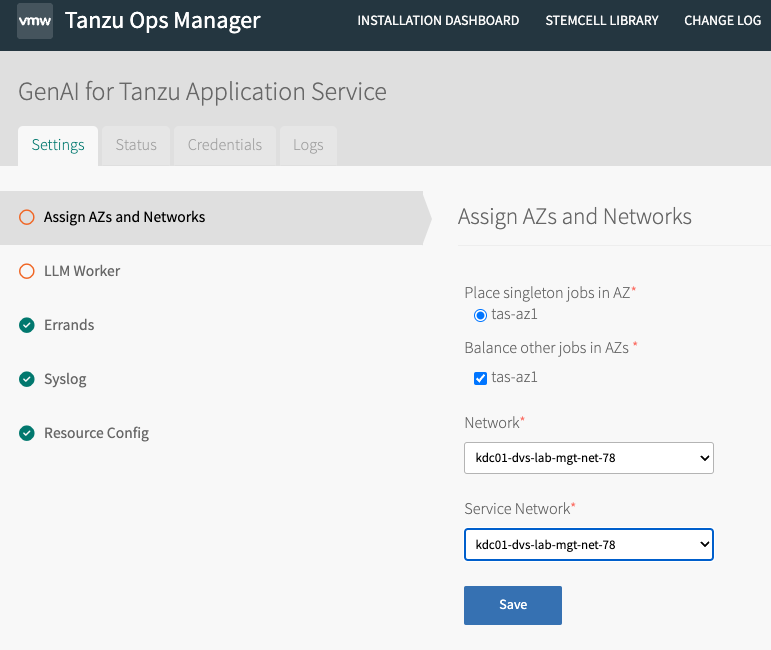
Assign AZs and Networks
Configure the AZ for the tile to use where your GPUs are located. This can be an existing AZ within your deployment or a new one added with ESXi hosts that have installed GPUs. VMs deployed by the GenAI tile are new workloads and have no correlation to Deigo or isolation segments.
LLM Worker
Most of the GenAI on Tanzu Platform tile configuration is in this tab. See the following section for how to populate each field.
Model

The default populated model is “lmsys/vicuna-7b-v1.5” in the GenAI on Tanzu Platform tile. However, this is simply a string representation of a model located on huggingface. The LLM model does not actually ship with the tile due to size. You can configure this field to match any FastChat compatible model on huggingface. Ensure that whatever model you select runs on your hardware. For more information, see Model Support in the FastChat repo.
Model Name

This field relates to what model names are advertised on our OpenAI-compatible API server, which is hosted on our FastChat controller. The default configuration is “text-embedding-ada-002,gpt-3.5-turbo,text-davinci-003,vicuna-7b-v1.5” and works fine if you keep vicuna as your model. However, you may need to update this field as you swap models out depending on their interfaces. Valid model names for this field are configured by the platform operator.
Worker Additional Models
You can add additional models that spin up on additional VMs under the “worker additional model” line. The following use case adds the codellama model to run code completion workloads as well. Valid model names for this field are configured by the platform operator.
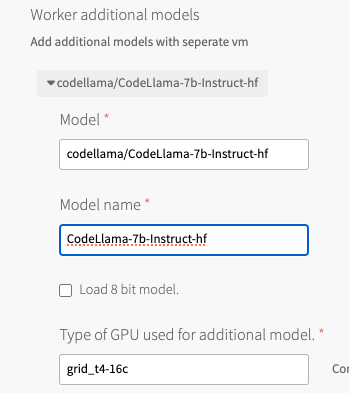
Type of GPU Used

This is a drop-down menu to select the type of GPU used within the tile. This example uses an NVIDIA Telsa T4, with the NVIDIA NVAIe vGPU drives, so we select the “grid_t4-16c” vgpu profile to use the compute-optimized profile.
Load 8-bit model

This checkbox enables quantization of the model. This can be useful to fit models on smaller graphics cards, such as the Telsa T4. Quantization impacts some performance of the model, so you need to evaluate whether this is needed for your model/card combination. This is checked by default.
Use VGPU Drivers

Check this box if you plan to use NVIDIA vGPU software (either NVIDIA vGPU or NVIDIA NVAIE vGPU).
Additional Data Needed for NVIDIA VGPU Drivers
The following fields below should be used to populate the required information to successfully install the NVIDIA vGPU drivers and ensure BOSH deployed VMs can communicate with the appropriate NVIDIA License server.
Important Only fill these fields out if you are using NVIDIA VGPU.
Address to License Server

This is the address to the NVIDIA license server. In this example, we are using a NVIDIA NLS appliance running on-premises vs. the NVIDIA CLS cloud service.
Client Token Needed for License Server

Get this token from your NVIDIA license server of choice. It is needed to register BOSH deployed VMs and successfully activate the NVIDIA GPU drivers.
URL to NVIDIA Drivers

In this example, the guest driver is hosted on a TrueNAS fileserver by using the “webdav” protocol. The example string is “http://webdav:[email protected]:8080/webserver/nvidia-linux-grid-550_550.54.15_amd64.deb”. You should be able to host this file on any webserver running on your premises. If you do not have a fileserver to use, you can even host this on Tanzu Application Service itself by using the static file buildpack.
SHA256 of NVIDIA Driver

For security, provide the SHA-256 hash value of the NVIDIA driver file. For example, to obtain this on MacOS, run a command and paste in output resembling:
$ shasum -a 256 ./nvidia-linux-grid-550_550.54.15_amd64.deb
cad102a736f6b0b62b7e75d874afb12d84a3cc35dc6f653269439b3033b358e6
GPU Network AZ Single-Select

Confirm the AZ where your GPUs are located.
Worker Disk Type

Some of these models can be quite large, so assign the appropriate storage size so your LLM workers have enough space to host the models they will run.
Worker VM Extensions/Worker Custom VM Extensions
These fields are unlikely to apply to an installation on vSphere. If you do have custom VM extensions, you can add those here.
