The management packs consist of a PAK file that contains default dashboards for the objects that the management pack identifies. After installation, configure the management pack. If you are upgrading from a previous version of the Management Pack, please see: Upgrading the Management Pack (Cisco UCS) before installing the new version.
Prerequisites
All management packs are available in the VMware Marketplace. For information on compatibility between products, see VMware Product Interoperability Matrix.
Download the PAK file from VMware Marketplace.
Save that PAK file to a temporary folder on your local system.
Before you install the PAK file or upgrade your instance, clone any customized content to preserve it. Customized content can include alert definitions, symptom definitions, recommendations, and views.
Procedure
- Log in to the user interface with administrator privileges.
- In the menu, select Data Sources, and in the left pane select .
- On the Repository tab, click Add.
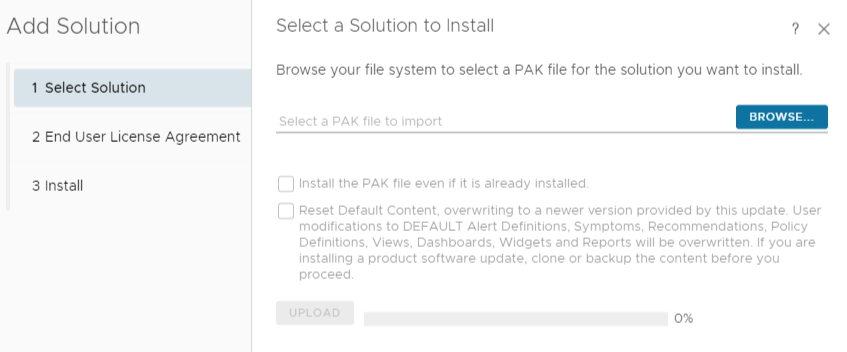
The Add Solution wizard opens. The wizard includes three pages where you locate and upload a PAK file, accept the EULA and install, and review the installation.

- Click Browse to locate the temporary folder and select the PAK file you downloaded.
- (Optional) To upgrade to the latest version of the management pack:
- Select the Install the PAK file even if it is already installed checkbox to upgrade the management pack using the current PAK file even if an older version of the PAK file is already uploaded.
Do not overwrite or update the solution alerts, symptoms, recommendations, and policies and leave all user customizations in place.
- Select the Reset Default Content, overwriting to a newer version provided by this update. User modifications to DEFAULT Alert Definitions, Symptoms, Recommendations, Policy Definitions, Views, Dashboards, Widgets, and Reports will be overwritten. If you are installing a product software update, clone or backup the content before you proceed check box to upgrade the management pack using the current PAK file and overwrite the solution default alerts, symptoms, recommendations, and policies with the newer versions provided with the current PAK file.
Note:
A reset overwrites customized content. Clone your customized content before the upgrade.
- (Optional) A warning, The PAK file is unsigned appears if the PAK file is not signed with a digital signature that VMware provides. The digital signature indicates the original developer or publisher and provides the authenticity of the management pack.
If installing a PAK file from an untrusted source is a concern, check with the management pack distributor before proceeding with the installation.
- Click Upload. The upload might take several minutes.
- Read and accept the EULA, and click Next. Installation details appear in the window during the process.
Note:
The installation starts only if all the cluster's nodes are accessible.
- Review the installation progress, including the nodes where the adapter was installed. When the installation is complete, click Finish.
- In the menu, select Data Sources, and in the left pane select .
- On the Accounts tab, click Add Account.
- On the Accounts Types page, click the management pack you have installed.
- Enter a display name and description for the cloud account.
- Enter the Name for the management pack instance as you want it to appear in .
- Enter the Description. for the management packs with any additional information that helps you manage your instances.
- Select the Credential you want to use to sign on to the environment from the drop-down menu. To add new credentials to access the management pack, click the plus sign and create a new credential.
- Enter Collector/Group to manage the management pack on . If you have only one account, select Default collector group.
- Enter the connection information as required to configure the instance of the management pack.
Each management pack has unique settings, configure the settings as prompted to configure that instance of the management pack. For more information on individual management packs, see List of Management Packs.
- Click VALIDATE CONNECTION to initiate the authentication request to the CSP authentication service.
- (Optional) Configure the Advanced Settings for the management pack.
- Click ADD.
What to do next
Verify that the adapter is configured and collecting data by viewing application-related data.
