


To create a parent-child relationship between custom properties, you bind the parent to the child. When you add the parent and child custom properties to a blueprint, the requesting user selects a value for the parent property. The selected parent value determines the possible values for the child property.
- The parent custom property definition can be a static list or an external value that is determined by an vRealize Orchestrator action. It provides possible input parameters to a child property definition.
- The child custom property definition must call a vRealize Orchestrator action. In the child custom property, you bind the parent custom property so that it provides an input parameter value.
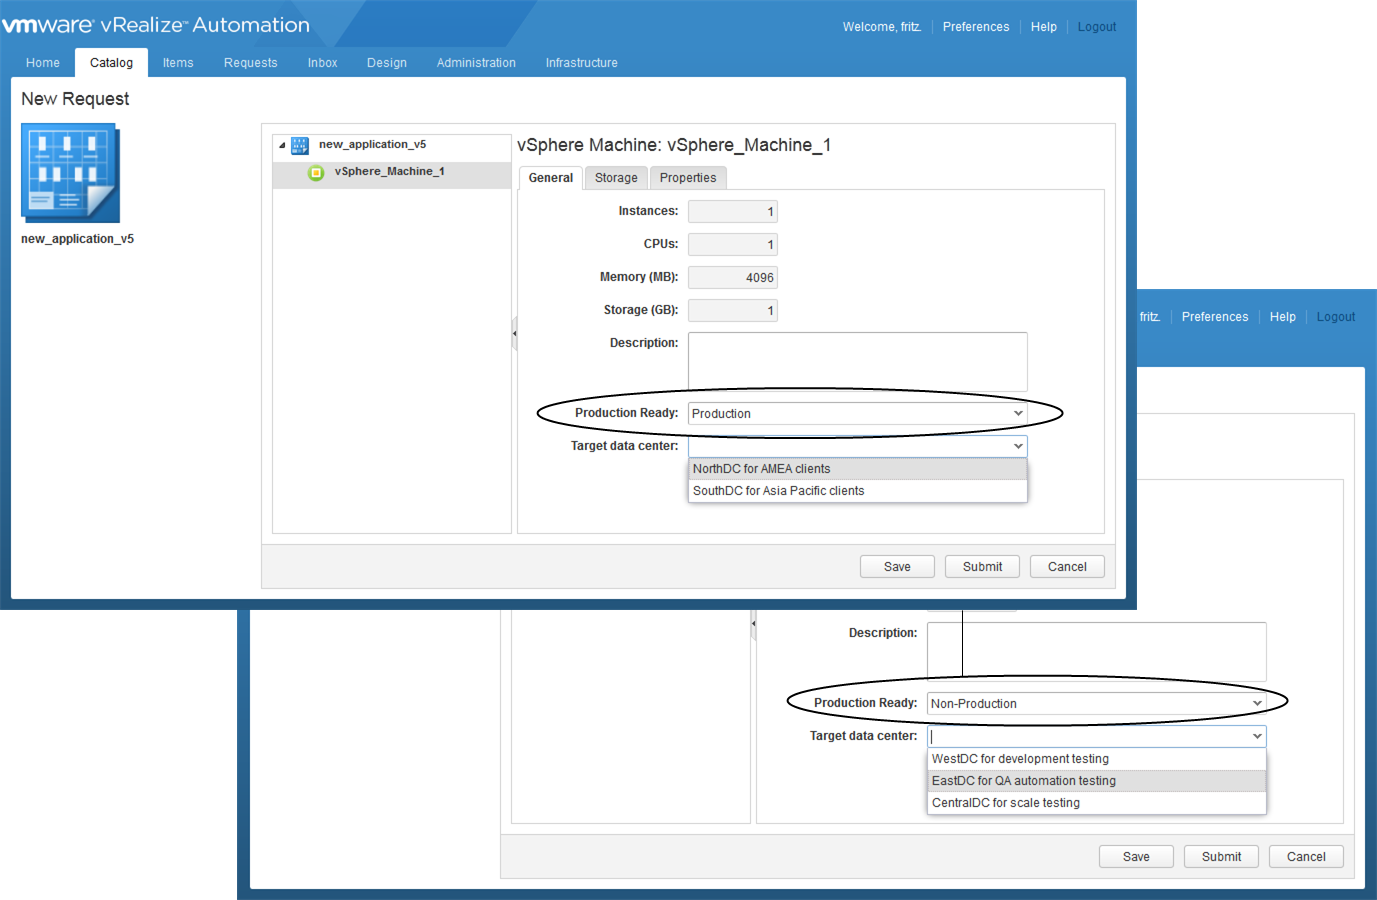
For example, your development team works on production and non-production systems. You also have five data centers. Three of the data centers are your development testing data centers and the other two are where you provide services to your internal clients. To ensure that developers can deploy the same blueprint to either environment, the testing or the internal clients data centers, you create and bind two custom property definition. Using the first custom property, the requesting user can select either the production or non-production environment. Based the environment that the user selects in the request form, the second custom property displays one the following values:
- The list of three testing data centers for the non-production environments.
- The two internal clients data centers as production environments.
The goal of this procedure is to create two custom properties that you bind in parent-child relationship. With the binding, you can select the appropriate location based on the selected production state.
Prerequisites
- For this example, create a vRealize Orchestrator action that provides data center names as location information. Name the action datacenters_prod, add an input parameter named prod as a string type, and use this sample script for the action script.
if(prod == null) {
	return ['Empty1', 'Empty2'];
} else if (prod.equals('nonprod')) {
	return ['WestDC for development testing', 'EastDC for QA automation testing', 'CentralDC for scale testing'];
} else {
	return ['NorthDC for AMEA clients', 'SouthDC for Asia Pacific clients'];
}
For information about developing workflows, and about creating and using vRealize Orchestrator script actions, see Developing with VMware vCenter Orchestrator .
-
Log in to the vRealize Automation console as a tenant administrator or fabric administrator.
Procedure
- Create a custom property definition so that users can select production or non-production environment.
- Select .
- Configure the custom property options.
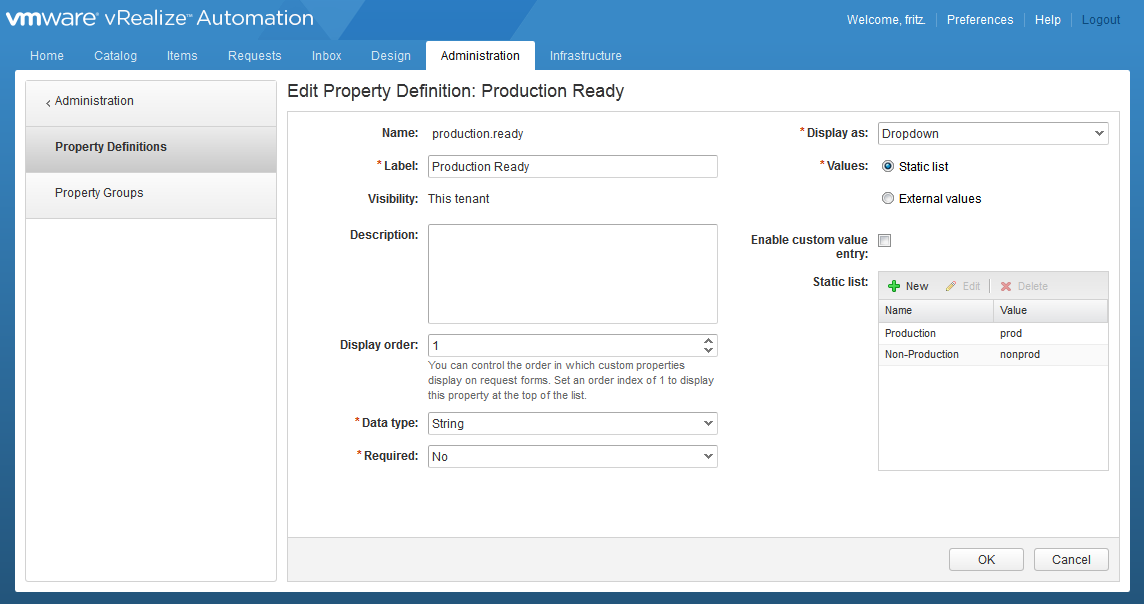
Option Example Values Name production.ready Label Environment Description Select the production or non-production environment. Display order 1 You select 1 to ensure that this custom property appears first in the blueprint.
Data type String Display as Dropdown Values Static list Static list values Add the following key-pair pairs. - Production and prod
- Non-Production and nonprod
- Click OK.
The production.ready custom property is configured and added ready to use. - Create a vRealize Orchestrator action custom property definition that runs your custom location action.
- Select .
- Configure the custom property options.
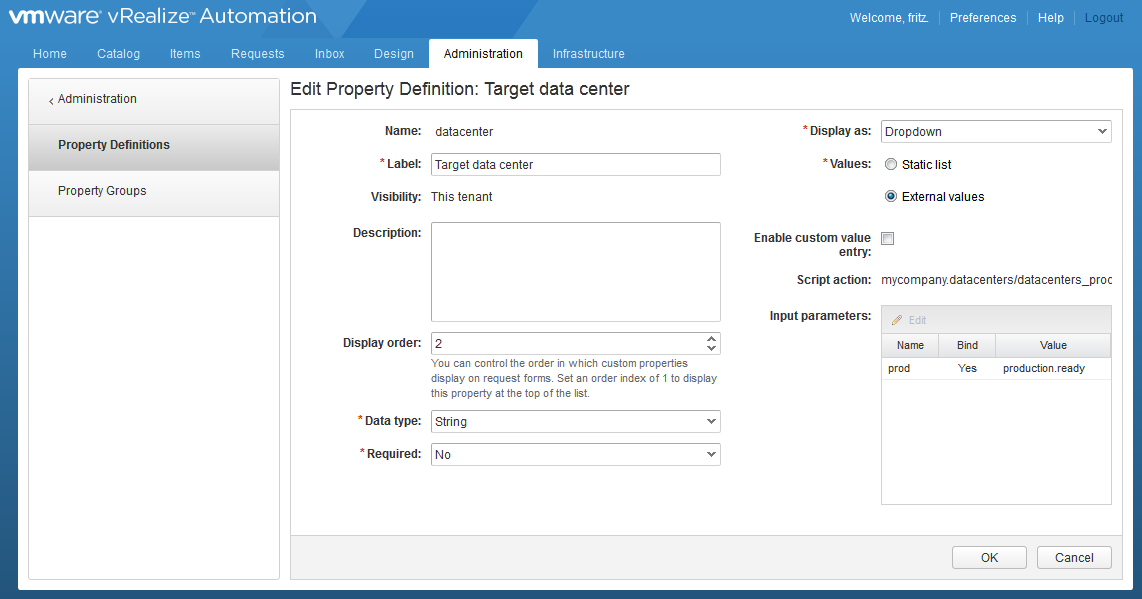
Option Example Values Name datacenter Label Target data center Description Select the datacenter base on whether you are deploying a production or non-production blueprint. Display order 2 You select 2 to ensure that this custom property appears after the production.ready custom property in the blueprint.
Data type String Display as Dropdown Values External values Script action Click Select and locate your datacenters_prod action. The input parameters table includes a prod parameter. - In the Input parameters table, select the prod row and click Edit.
- Select the Bind check box.
- Select production.ready in the drop-down menu.
- Click OK.
- Click OK.
The data center custom property is configured and ready to use.
What to do next
- Because of the relationship between the two property definitions, add the two property definitions to a property group. See Create a Property Group.
- Add your production-datacenter property group to a blueprint. See Add a Custom Property or Property Group as a Blueprint Machine Property.
