


This topic tells you how admins configure a Single Sign‑On for VMware Tanzu Application Service service plan to manage user access to TAS for VMs apps using an external identity provider (IdP).
You can also configure a Single Sign‑On service plan to use the internal user store to manage user accounts. For more information, see Configuring Internal User Store.
Configure an External Identity Provider
You can configure Single Sign‑On to use external IdPs that support:
- SAML 2.0. See Add a SAML Provider.
- OpenID Connect (OIDC). See Add an OIDC Provider.
- LDAP. See Add an LDAP Provider.
To delete an external IdP, see Delete an External Identity Provider below.
Add a SAML Provider
To add an external SAML IdP:
-
Log in to the SSO Operator Dashboard at
https://p-identity.SYSTEM-DOMAINusing your UAA admin credentials. You can find these credentials in your VMware Tanzu Application Service for VMs tile in Tanzu Operations Manager on the Credentials tab. -
Click the plan name and navigate to the Identity Providers tab.
-
Click Add IDP.
-
Enter an Identity Provider Name. This name is displayed as a link on the login page.
-
Enter an Identity Provider Description. This is the name of the group that the IdP authenticates. This description is displayed to the Space Developers when they select an IdP for their app.
-
Under Identity Provider type, select SAML 2.0.
-
Configure Identity Provider Metadata by configuring one of the below fields as follows:
Field Instructions Identity Provider Metadata URL Select the Identity Provider Metadata URL radio button, then enter a URL and click Preview Metadata. If you select this option, your metadata is periodically fetched from the configured URL. This keeps the metadata up-to-date. SAML File Metadata Select the Upload IdP Metadata File radio button, then click browse to upload the XML metadata that you downloaded from your external IdP. If you select this option, your metadata is not periodically updated. If the metadata changes, you must manually upload the file again. 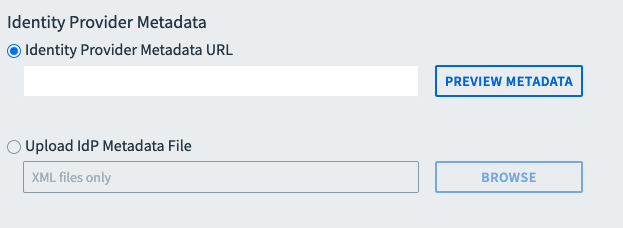
-
Enter Email Domains. This is a comma-separated list of domains for IdP discovery.
(Optional) Configure User Attributes and External Group Mappings
To configure user attributes and external group mappings:
-
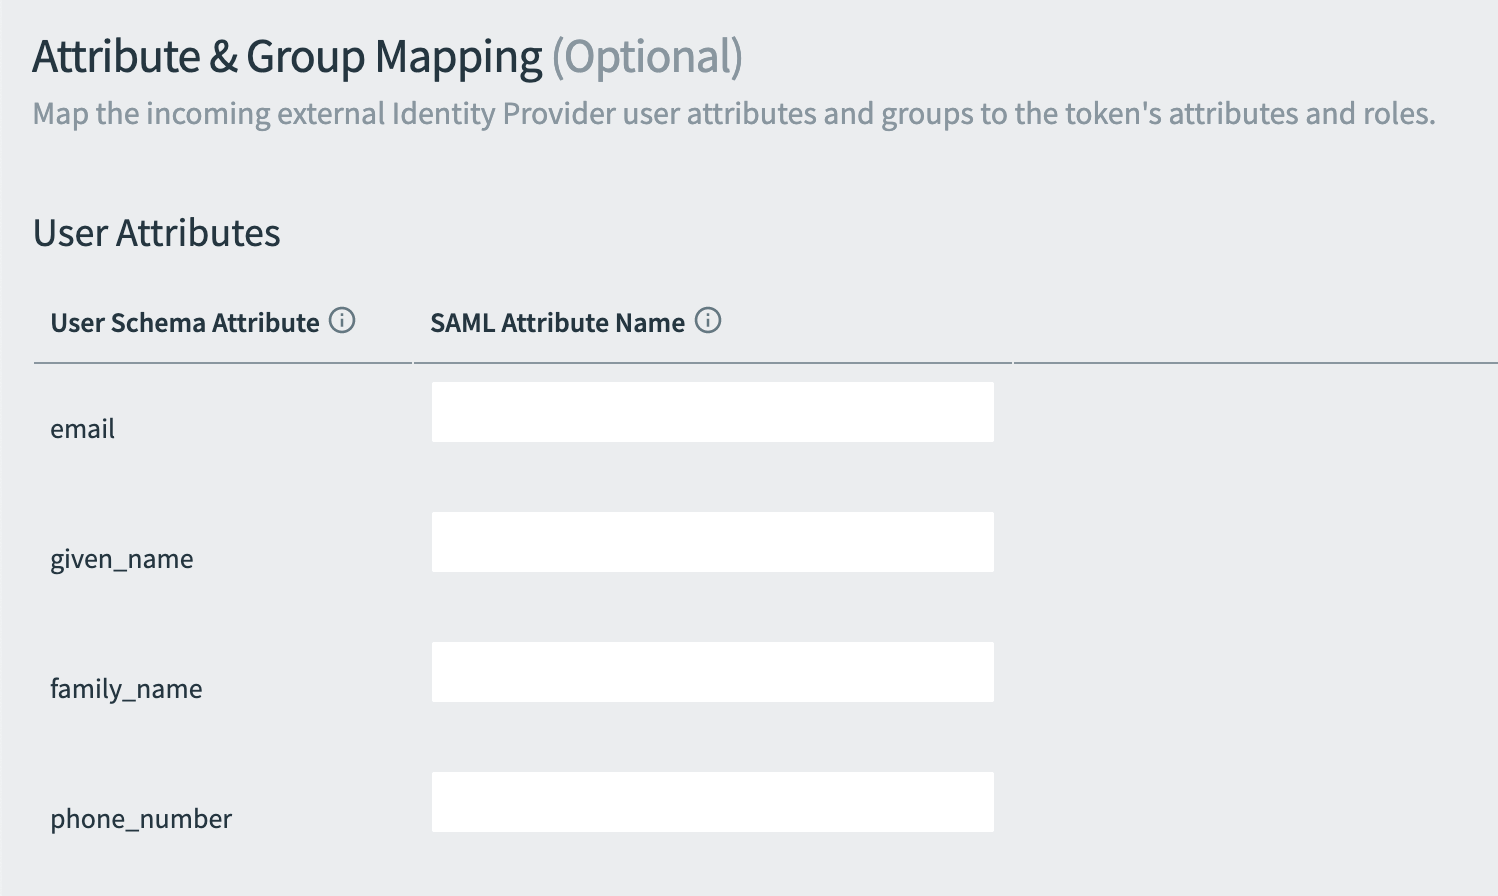
Under Attribute & Group Mappings, scroll to User Attributes.
-
Enter a SAML Attribute Name next to the corresponding attribute from the incoming SAML assertion. They are sent to apps through OpenID tokens, along with any other stored user information issued by Single Sign‑On.
-
Under Attribute & Group Mappings, scroll to External Group Mappings. After a Space Developer defines the resources required by an app, an admin can map existing groups to those resources.
For information about how Space Developers define resources, see Create or Edit Resources.
After resource permissions mappings are configured and a user authenticates, the user group memberships are mapped to scopes in the resulting token.
You can configure external group mappings as follows:
Field Instructions SAML Groups Attribute Name Enter the name of the attribute in the SAML Assertion which contains the list of group memberships. External Group Name Enter the group name that you defined in the external IdP. Permissions Search and select the SSO permissions that users in the external group should have access to. Groups with unsupported characters in permissions mappings are not editable. Supported characters are alphanumeric characters, hyphens, and underscores.
You can use the UAA API to automate the above procedure. To do this automation, you need an identity zone admin client. For instructions about creating the identity zone admin client, see Create a UAA Identity Zone Admin Client.
For instructions about granting admin permissions to mapped external identity groups, see Grant Admin Permissions to an External Group (SAML or LDAP) in the Cloud Foundry documentation. -
Under Attribute & Group Mappings, scroll to External Group Allowed List. An admin can include groups from an external IdP in a group allowlist. The list of groups in the allowlist propagates into the
rolesclaim of the ID token and theroleskey of the/userinfoendpoint response when a user authenticates using an external IdP.For an app to retrieve an ID token or a
/userinforesponse containing external groups, the app must request therolesclaim and the group allowlist must include the external groups.Select Allow all groups, Do not allow any groups, or Select groups to allow from the radio group.
Field Description Allow all groups All groups appear in the rolesclaim of the ID token and theroleskey of the/userinfoendpointDo not allow any groups No groups appear in the rolesclaim of the ID token and theroleskey of the/userinfoendpointSelect groups to allow Groups are rejected by default. Only groups matching the specified matchers are present in the rolesclaim of the ID token and theroleskey of the/userinfoendpoint. To specify a matcher, choose a Match Type, then specify an Allowed External Group Name Pattern that matches group names in your Identity Provider. -
Under Attribute & Group Mappings, scroll to Custom Attributes and configure the fields as follows:
Field Instructions Custom Attributes Enter any custom attributes to propagate from the IdP to the service provider.
They are sent to apps through OpenID tokens, along with any other stored user information issued by Single Sign‑On.- (Optional) To expose custom user attributes through the
/userinfoendpoint, select Persist Custom Attributes. Your app must also have theuser_attributesscope assigned for the custom attributes to appear. - Enter an SSO Attribute Name.
- Enter an IdP Attribute Name with the corresponding attribute from the incoming SAML assertion.
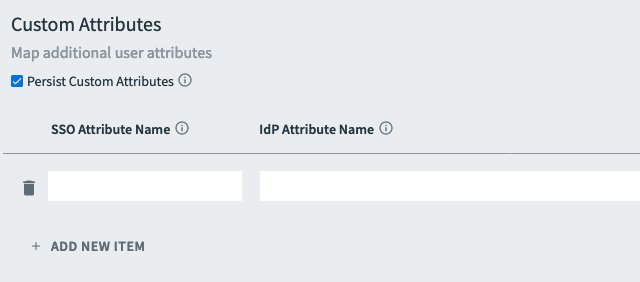
- (Optional) To expose custom user attributes through the
-
Click Save to save the IdP.
Configure SAML Settings
For each plan, you can configure SAML settings when SAML is used for exchanging authentication and authorization data between the IdP and the service provider.
Single Sign‑On enables the ability to sign authentication requests and require signed assertions from the external IdP. These settings affect all SAML Identity Providers in the plan.
To configure SAML settings:
-
Log in to the SSO Operator Dashboard at
https://p-identity.SYSTEM-DOMAINusing your UAA admin credentials. You can find these credentials in your TAS for VMs tile in Tanzu Operations Manager under the Credentials tab. -
Click the plan name and navigate to the Configure tab.
-
Configure the fields as follows:
Field Description Perform signed authentication requests Select this checkbox to enable the service provider to sign requests sent to the external IdP. Require signed assertions Select this checkbox to enable the service provider to require that responses from the external IdP are signed 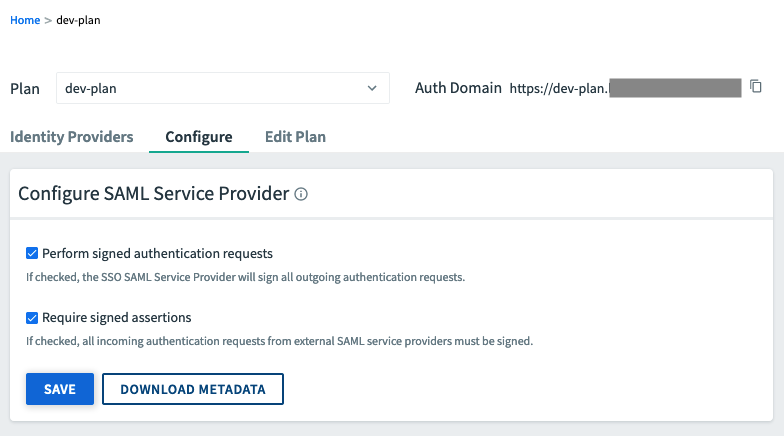
-
Click Save to save the configurations.
-
Click Download Metadata.
Add an OIDC Provider
To add an external OIDC IdP:
-
Log in to the SSO Operator Dashboard at
https://p-identity.SYSTEM-DOMAINusing your UAA admin credentials. You can find these credentials in your TAS for VMs tile in Tanzu Operations Manager on the Credentials tab. -
Click the plan name and navigate to the Identity Providers tab.
-
Click Add IDP.
-
Enter an Identity Provider Name. This name must match your origin key. However, you can replace lowercase letters with capital letters and replace dashes with spaces. This name is displayed as a link on the login page.
-
Enter an Identity Provider Description. This is the name of the group that the IdP authenticates. This description is displayed to the Space Developers when they select an IdP for their app.
-
Under Identity Provider type, select OpenID Connect.
-
Configure OpenID Connect Settings. The following tabs expand to show instructions for using a discovery endpoint URL to fetch the settings, or manually entering the OIDC settings:
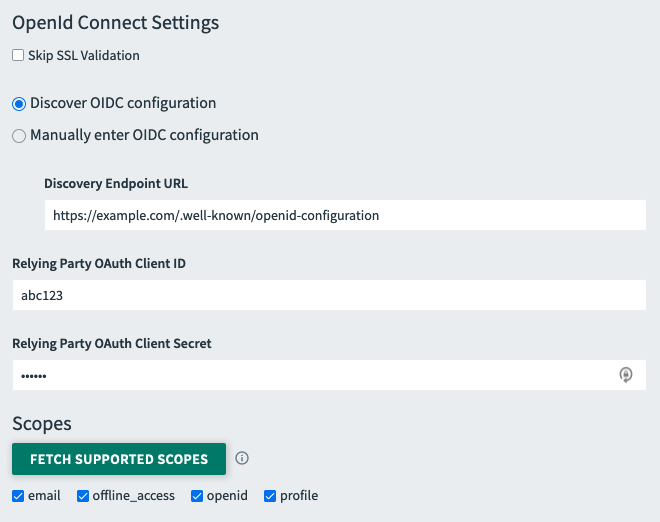
- (Optional) If you do not want to use SSL validation, select Skip SSL Validation.
- Select the Discover OIDC Configuration radio button.
- Configure the fields as follows:
Field Instructions Discovery Endpoint URL Enter the discovery endpoint URL from the IdP metadata. Relying Party OAuth Client ID Enter the client ID from the IdP. Relying Party OAuth Client Secret Enter the client secret from the IdP. - Click Fetch Supported Scopes to retrieve the scopes supported by your OIDC provider.
- Select the Scopes that SSO will use during authentication.
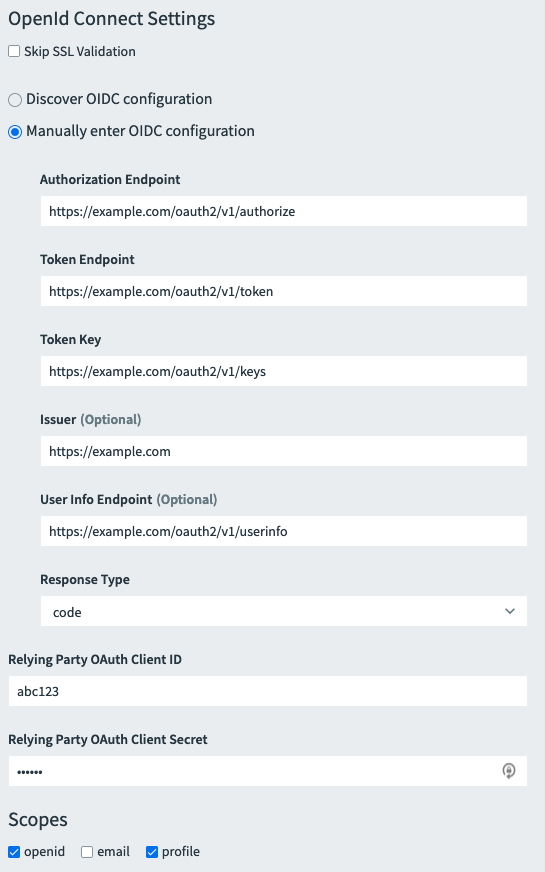
- (Optional) If you do not want to use SSL validation, select Skip SSL Validation.
- Select the Manually Enter OIDC Configuration radio button.
- Configure the fields as follows:
Field Description Authorization Endpoint URL Enter the authorization endpoint URL from the IdP metadata. Token Endpoint URL Enter the token endpoint URL from the IdP metadata. Token Key Enter the token key URL or the token key value from the IdP metadata. Issuer (Optional) If your IdP requires this field, enter a value. User Info Endpoint URL (Optional) If your IdP requires this field, enter a value. Response Type Select the requested grant types from the dropdown. Relying Party OAuth Client ID Enter the client ID from the IdP. Relying Party OAuth Client Secret Enter the client secret from the IdP. - Select the applicable Scopes for your IdP
-
Enter Email Domains. This is a comma-separated list of domains for IdP discovery.
(Optional) Configure User Attributes and External Group Mappings
To configure user attributes and external group mappings:
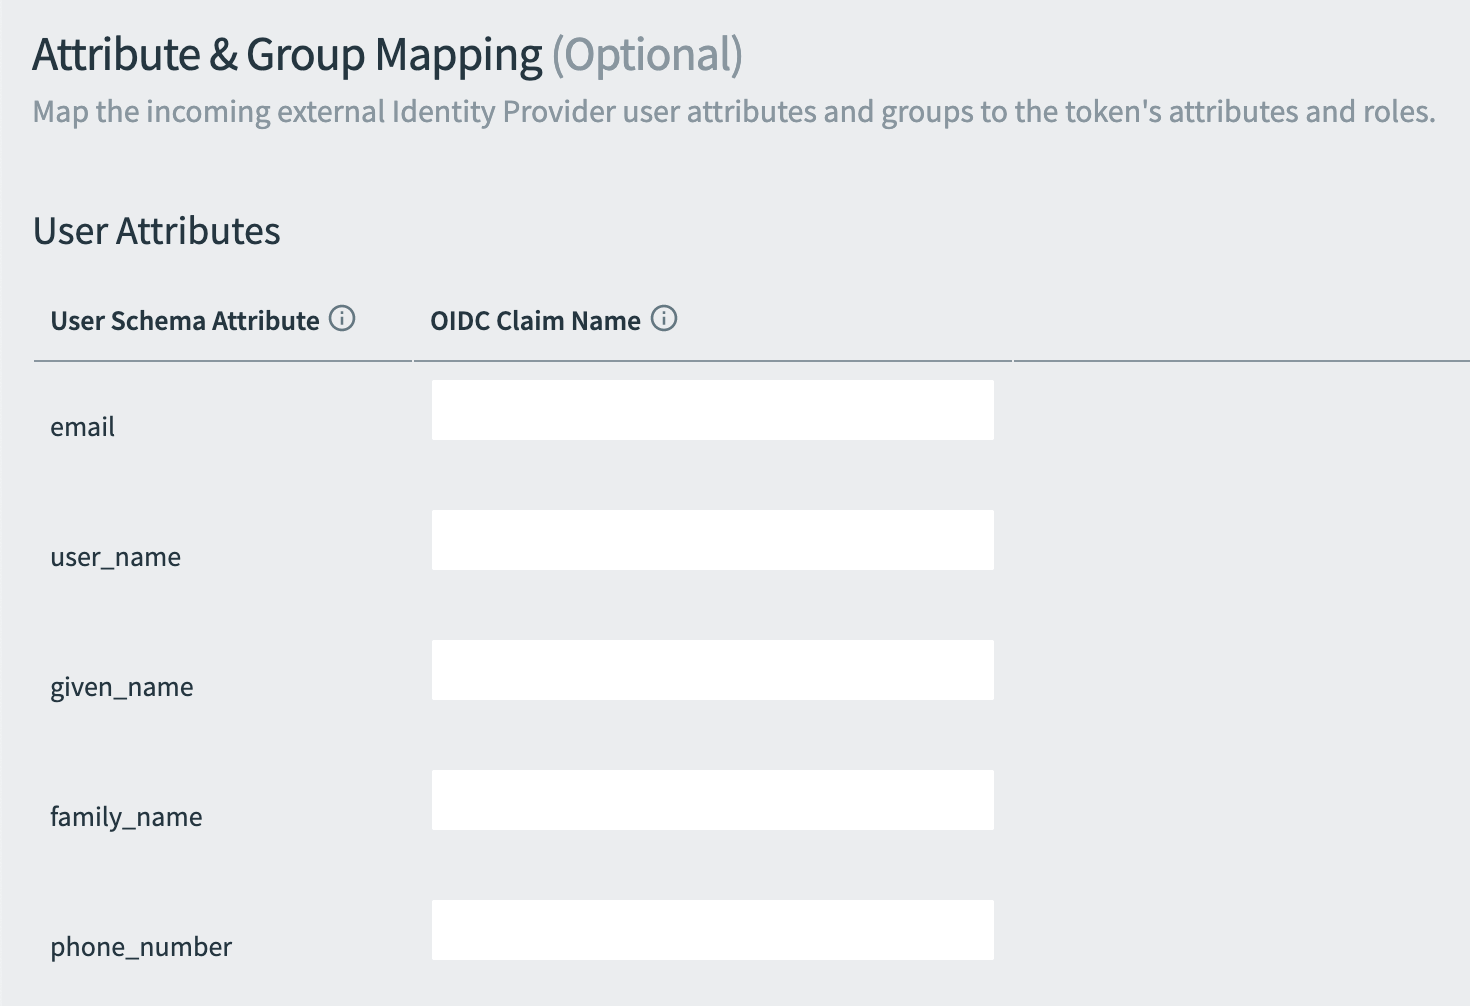
-
Under Attribute & Group Mapping, scroll to User Attributes.
-
Enter an OIDC Claim Name next to each corresponding attribute from the incoming OIDC ID token. They are sent to apps through OpenID tokens, along with any other stored user information issued by Single Sign‑On.
-
Under Attribute & Group Mappings, scroll to External Group Mappings. After a Space Developer defines the resources required by an app, an admin can map existing groups to those resources.
For information about how Space Developers define resources, see Create or Edit Resources.
After resource permissions mappings are configured and a user authenticates, the user group memberships are mapped to scopes in the resulting token.
You can configure external group mappings as follows:
Field Instructions OIDC Groups Claim Name Enter the name of the claim in the external IdP's OIDC token which contains the list of group memberships. External Group Name Enter the group name that you defined in the external IdP. Permissions Search and select the SSO permissions that users in the external group should have access to. Groups with unsupported characters in permissions mappings are not editable. Supported characters are alphanumeric characters, hyphens, and underscores.
You can use the UAA API to automate the above procedure. To do this automation, you need an identity zone admin client. For instructions about creating the identity zone admin client, see Create a UAA Identity Zone Admin Client.
For instructions about granting admin permissions to mapped external identity groups, see Grant Admin Permissions to an External Group (SAML or LDAP) in the Cloud Foundry documentation. -
Under Attribute & Group Mappings, scroll to External Group Allowed List. An admin can include groups from an external IdP in a group allowlist. The list of groups in the allowlist propagates into the
rolesclaim of the ID token and theroleskey of the/userinfoendpoint response when a user authenticates using an external IdP.
For an app to retrieve an ID token or a /userinfo response containing external groups, the app must request the roles claim and the group allowlist must include the external groups.
Select **Allow all groups**, **Do not allow any groups**, or **Select groups to allow** from
the radio group.

<table>
  <col style="width:40%">
  <col style="width:60%">
    <thead><tr>
      <th>Field</th>
      <th>Description</th>
    </tr></thead>
    <tr>
      <td><strong>Allow all groups</strong></td>
      <td>All groups appear in the <code>roles</code> claim of the ID token and the <code>roles</code> key of the <code>/userinfo</code> endpoint</td>
    </tr>
    <tr>
      <td><strong>Do not allow any groups</strong></td>
      <td>No groups appear in the <code>roles</code> claim of the ID token and the <code>roles</code> key of the <code>/userinfo</code> endpoint</td>
    </tr>
    <tr>
      <td><strong>Select groups to allow</strong></td>
      <td>Groups are rejected by default. Only groups matching the specified matchers are present in the <code>roles</code> claim of the ID token and the <code>roles</code> key of the
        <code>/userinfo</code> endpoint.
      To specify a matcher, choose a <strong>Match Type</strong>, then specify an <strong>Allowed External Group Name Pattern</strong> that matches group names in your Identity Provider.
      </td>
    </tr>
  </table>
-
Under Attribute & Group Mappings, scroll to Custom Attributes and configure the fields as follows:
Field Instructions Custom Attributes Enter any custom attributes to propagate from the IdP to the service provider.
They are sent to apps through OpenID tokens, along with any other stored user information issued by Single Sign‑On.- (Optional) To expose custom user attributes through the
/userinfoendpoint, select Persist Custom Attributes. Your app must also have theuser_attributesscope assigned for the custom attributes to appear. - Enter an SSO Attribute Name.
- Enter an IdP Attribute Name with the corresponding attribute from the incoming OIDC ID token.
- (Optional) To expose custom user attributes through the
-
Click Save to save the IdP.
Add an LDAP Provider
When integrating Single Sign‑On with a LDAP external IdP, authentication is chained. An authentication attempt with user credentials is first attempted against the internal user store before the external LDAP IdP.
When using an LDAP external IdP, you should not:
- Bootstrap or Create Users in the UAA Database: This can cause user collisions.
- Enable Manual Lockouts: For example, lockouts that result from users using the same account.
- Enable Automated Deletions: This can disrupt service accounts and prevent user logins.
VMware recommends that you do not reuse LDAP service accounts across environments. You can only have one LDAP external IdP per service plan.
To add an LDAP IdP:
-
Log in to the SSO Operator Dashboard at
https://p-identity.SYSTEM-DOMAINusing your UAA admin credentials. You can find these credentials in your VMware Tanzu Application Service for VMs tile in Tanzu Operations Manager on the Credentials tab. -
Click the plan name and navigate to the Identity Providers tab.
-
Click Add IDP.
-
Enter an Identity Provider Name. This name is displayed as a link on the login page.
-
Enter an Identity Provider Description. This description is displayed to the Space Developers when they select an IdP for their app.
-
Under Identity Provider type, select LDAP. You can only have one LDAP provider per Service Plan.
-
Configure the fields as follows:
Field Instructions Connection Hostname Enter the hostname for your LDAP server. Port Enter the port number for your LDAP server. Security protocol Select the security protocol that your LDAP uses for connection. Referral Select how UAA handles LDAP server referrals to other user stores. User DN Enter the LDAP Distinguished Name (DN) for binding to your LDAP server. Bind Password Enter the password for binding to your LDAP server. Users Search Base Enter the location in the LDAP directory tree where LDAP user search begins. The LDAP search base typically matches your domain name. Search Filter (Optional) Enter a string to use for LDAP user search criteria. Just in Time Provisioning If this option is enabled, users are created at login time.
If this option is not enabled, users must be created before being able to log inGroups Search Base (Optional) Enter the location in the LDAP directory tree where the LDAP group search begins.
To use the memberOf attribute on user objects, enter the valuememberOfas the Search Base instead of an LDAP path for a group organizational unit. This causes Single Sign‑On to ignore the Search Filter value.Search filter (Optional) Enter a string that defines LDAP group search criteria. The standard value is member={0}. 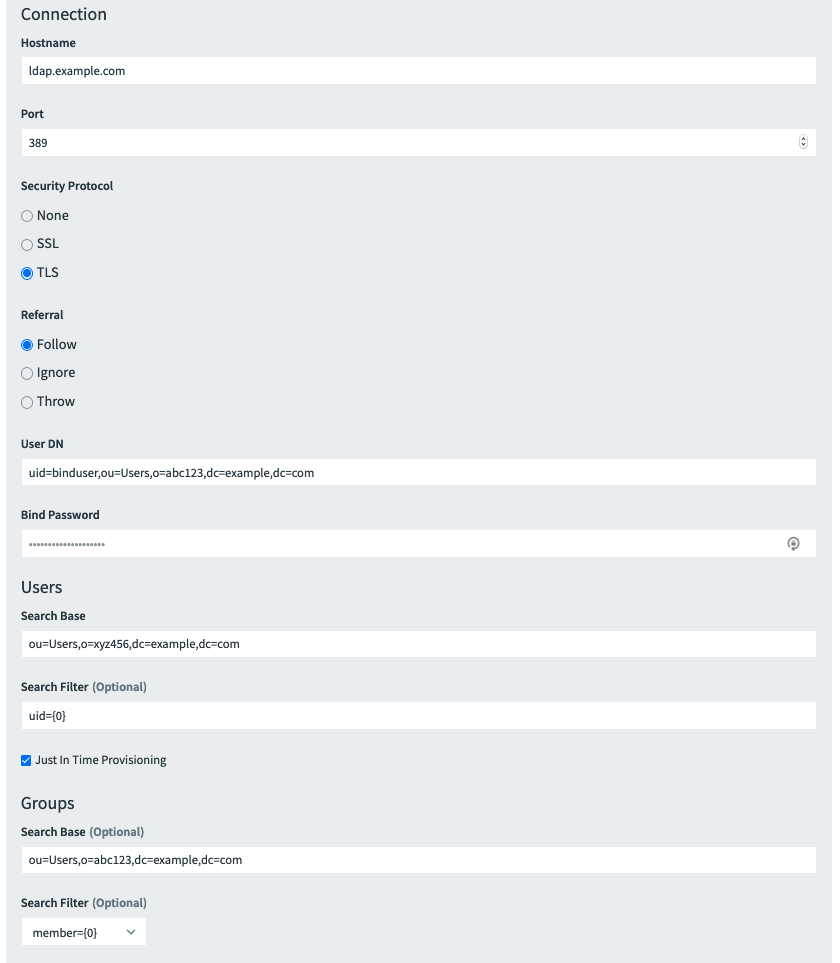
-
Enter Email Domains. This is a comma-separated list of domains for IdP discovery.
(Optional) Configure User Attributes and External Group Mappings
To configure user attributes and external group mappings:
-
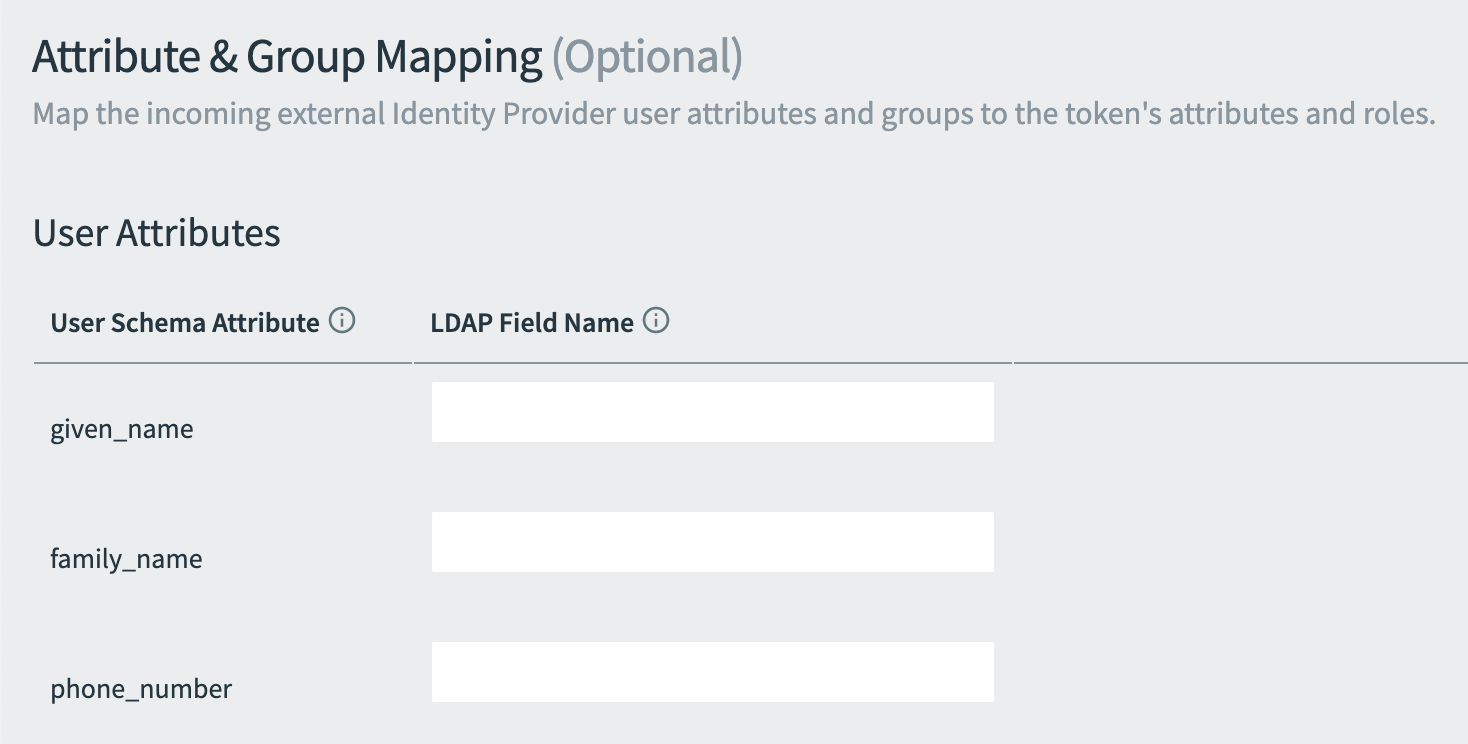
Under Attribute & Group Mappings, scroll to User Attributes.
-
Enter an LDAP Field Name next to each corresponding User Schema Attribute. They are sent to apps through OpenID tokens, along with any other stored user information issued by Single Sign‑On.
-
Under Attribute & Group Mappings, scroll to External Group Mappings. After a Space Developer defines the resources required by an app, an admin can map existing groups to those resources.
For information about how Space Developers define resources, see Create or Edit Resources.
After resource permissions mappings are configured and a user authenticates, the user group memberships are mapped to scopes in the resulting token.
You can configure external group mappings as follows:
Field Instructions External Group Name Enter the fully qualified LDAP paths. The path uses this format: cn=XXX-group,ou=users,o=YYY,dc=ZZZ,dc=com.Permissions Search and select the SSO permissions that users in the external group should have access to. Groups with unsupported characters in permissions mappings are not editable. Supported characters are alphanumeric characters, hyphens, and underscores.
You can use the UAA API to automate the above procedure. To do this automation, you need an identity zone admin client. For instructions about creating the identity zone admin client, see Create a UAA Identity Zone Admin Client.
For instructions about granting admin permissions to mapped external identity groups, see Grant Admin Permissions to an External Group (SAML or LDAP) in the Cloud Foundry documentation. -
Under Attribute & Group Mappings, scroll to External Group Allowed List. An admin can include groups from an external IdP in a group allowlist. The list of groups in the allowlist propagates into the
rolesclaim of the ID token and and theroleskey of the/userinfoendpoint response when a user authenticates using an external IdP.
For an app to retrieve an ID token or a /userinfo response containing external groups, the app must request the roles claim and the group allowlist must include the external groups.
Select **Allow all groups**, **Do not allow any groups**, or **Select groups to allow**
from the radio group.

<table>
  <col style="width:40%">
  <col style="width:60%">
  <thead><tr>
    <th>Field</th>
    <th>Description</th>
  </tr></thead>
  <tr>
    <td><strong>Allow all groups</strong></td>
    <td>All groups appear in the <code>roles</code> claim of the ID token and the
      <code>roles</code> key of the <code>/userinfo</code> endpoint</td>
  </tr>
  <tr>
    <td><strong>Do not allow any groups</strong></td>
    <td>No groups appear in the <code>roles</code> claim of the ID token and the
      <code>roles</code> key of the <code>/userinfo</code> endpoint</td>
  </tr>
  <tr>
    <td><strong>Select groups to allow</strong></td>
    <td>Groups are rejected by default. Only groups matching the specified matchers are present in
      the <code>roles</code> claim of the ID token and the <code>roles</code> key of the
      <code>/userinfo</code> endpoint.
    To specify a matcher, choose a <strong>Match Type</strong>, then specify an
    <strong>Allowed External Group Name Pattern</strong> that matches group names in your Identity
    Provider.
    </td>
  </tr>
</table>
-
Under Attribute & Group Mappings, scroll to Custom Attributes and configure the fields as follows:
Field Instructions Custom Attributes Enter any custom attributes to propagate from the IdP to the service provider.
They are sent to apps through OpenID tokens, along with any other stored user information issued by Single Sign‑On.- (Optional) To expose custom user attributes through the
/userinfoendpoint, select Persist Custom Attributes. Your app must also have theuser_attributesscope assigned for the custom attributes to appear. - Enter an SSO Attribute Name.
- Enter an IdP Attribute Name with the corresponding attribute from LDAP.
- (Optional) To expose custom user attributes through the
-
Click Save to save the IdP.
Delete an External Identity Provider
Deleting an external IdP deletes all of its configurations. This prevents users from authenticating through the external IdP. You cannot undo this action.
To delete an external IdP:
-
Log in to the SSO Operator Dashboard at
https://p-identity.SYSTEM-DOMAINusing your UAA admin credentials. You can find these credentials in your TAS for VMs tile in Tanzu Operations Manager on the Credentials tab. -
Click the plan name and navigate to the Identity Providers tab.
-
Click on the name of your external IdP.
-
Click Delete at the bottom of the page.
-
In the dialog box that appears, click Delete Identity Provider to confirm that you want to delete the IdP, along with all of its configurations.
Transfer Group Membership and Roles
You can use the SSO Operator Dashboard to configure resource permissions mappings and group allowlists to transfer group membership and roles from existing IdP groups to Single Sign‑On.
Delete Resource Permissions Mappings
To delete resource permissions mappings:
-
Log in to the SSO Operator Dashboard at
https://p-identity.SYSTEM-DOMAINusing your UAA admin credentials. You can find these credentials in your TAS for VMs tile in Tanzu Operations Manager on the Credentials tab. -
Click the plan name and navigate to the Identity Providers tab.
-
Click on the name of the external IdP you want to delete permissions for and scroll to the External Group Mapping section.
-
Click the trash can icon next to the group name whose resource permissions mappings you want to delete.
-
Click Save at the bottom of the page.
Groups with unsupported characters in permissions mappings are not editable. Supported characters are alphanumeric characters, hyphens, and underscores.
You can use the UAA API to automate the above procedure. To do this automation, you need an identity zone admin client. For instructions about creating the identity zone admin client, see Create a UAA Identity Zone Admin Client.
For information about un-mapping a group mapping, see Unmap in the UAA API documentation.
Test Identity Provider Configurations
VMware provides sample apps you can deploy to validate your IdP configurations.
To deploy a sample app, see identity-sample-apps in GitHub.
