PowerShell scripts prepare your environment with all the configuration settings. When you run the PowerShell script to deploy Unified Access Gateway, the solution is ready for production on first system boot.

Important: With a PowerShell deployment, you can provide all the settings in the INI file, and the Unified Access Gateway instance is production-ready as soon as it is booted up. If you do not want to change any settings post-deployment, you need not provide the Admin UI password.

However, both Admin UI and the API are not available if the Admin UI password is not provided during deployment. If you do not provide the Admin UI password at the time of deployment, you cannot add a user later to enable access to either the Admin UI or the API. You must redeploy your Unified Access Gateway

Note:
  • Unified Access Gateway 3.5 and later includes an optional sshEnabled INI property. Setting sshEnabled=true in the [General] section of the PowerShell INI file automatically enables ssh access on the deployed appliance. VMware does not generally recommend enabling ssh on Unified Access Gateway except in certain specific situations and where access can be restricted. This capability is mainly intended for Amazon AWS EC2 deployments where an alternative console access is not available. For more information on Amazon AWS EC2 see, Unified Access Gateway PowerShell Deployment to Amazon Web Services.

    If sshEnabled=true is not specified or is set to false then the ssh is not enabled.

    Enabling ssh access on Unified Access Gateway for vSphere, Hyper-V or Microsoft Azure deployments is not generally required as console access with those platforms can be used. If root console access is required for Amazon AWS EC2 deployment, then set sshEnabled=true. In cases where ssh is enabled, TCP port 22 access must be restricted in firewalls or security groups to source IP addresses of individual administrators. EC2 supports this restriction in the EC2 Security Group associated with the Unified Access Gateway network interfaces.

  • Unified Access Gateway 2009 includes the sysLogType property in the INI file to enable syslog configuration.
  • With Unified Access Gateway 2009, you can include the parameters in the INI file for creating low-priviledged admin users with monitoring roles. Creating superuser admin user is not supported.
  • With Unified Access Gateway 2012, you can provide the following properties in the INI file:
    • rootPasswordExpirationDays - This property is used for setting the password expiration policy for the root users. The default password expiration time is 365 days. The expiration time can be set to 0 to prevent the password expiry.

    • Custom configuration setting - The custom configuration values that must be added to the systemd.network files can be provided in the format, SectionName^Parameter=Value. An example of a custom configuration entry is DHCP^UseDNS=false. This value, when used, disables the usage of DNS IP addresses provided by the DHCP server. Using the same format, you can add multiple such systemd.network configuration entries separated by semi-colons. Example of custom configuration values for the eth (0,1, and 2) is included in the General section of the sample INI file.

Prerequisites

  • For a Hyper-V deployment, and if you are upgrading Unified Access Gateway with static IP, delete the older appliance before deploying the newer instance of Unified Access Gateway.
  • Verify that the system requirements are appropriate and available for use.

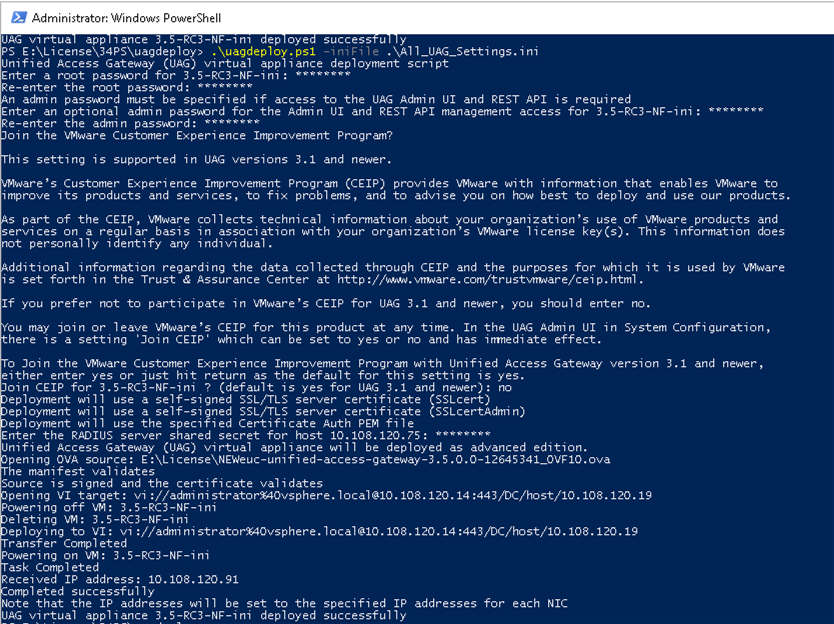
    This is a sample script to deploy Unified Access Gateway in your environment.

    Figure 1. Sample PowerShell Script
Procedure

  1. Download the Unified Access Gateway OVA from My VMware to your Windows machine.
  2. Download the uagdeploy-XXX.zip files into a folder on the Windows machine.
    The ZIP files are available at the VMware Download page for Unified Access Gateway.
  3. Open a PowerShell script and modify the directory to the location of your script.
  4. Create a INI configuration file for the Unified Access Gateway virtual appliance.
    For example: Deploy a new Unified Access Gateway appliance UAG1. The configuration file is named uag1.ini. This file contains all the configuration settings for UAG1. You can use the sample INI files in the uagdeploy.ZIP file to create the INI file and modify the settings appropriately.
    Note:
    • You can have unique INI files for multiple Unified Access Gateway deployments in your environment. You must change the IP Addresses and the name parameters in the INI file appropriately to deploy multiple appliances.
    • To convert the private key from PKCS8 to PKCS1, thats is, from the BEGIN PRIVATE KEY format to BEGIN RSA PRIVATE KEY format, run the following openssl command:

      openssl rsa -in key.pem -out keyrsa.pem

      To convert PKCS#12 format file with either a .p12 or .pfx file extension and to ensure the key is an RSA key, run the following commands:

      openssl pkcs12 -in cert.pfx -nokeys -out cert.pem

      openssl pkcs12 -in cert.pfx -nodes -nocerts -out key.pem

      openssl rsa -in key.pem -check -out keyrsa.pem

    Example of the INI File to modify.
    [General]
    netManagementNetwork=
    netInternet=
    netBackendNetwork=
    name=
    dns = 192.0.2.1 192.0.2.2
    dnsSearch = example1.com example2.com
    ip0=10.108.120.119
    diskMode=
    source=
    defaultGateway=10.108.120.125
    target=
    ds=
    deploymentOption=threenic
    eth0CustomConfig=DHCP^UseDNS=false
    eth1CustomConfig=DHCP^UseDNS=false
    eth2CustomConfig=DHCP^UseDNS=false
    authenticationTimeout=300000
    fipsEnabled=false
    sysLogType=TCP
    uagName=UAG1
    locale=en_US
    ipModeforNIC3=DHCPV4_DHCPV6
    tls12Enabled=true
    ipMode=DHCPV4_DHCPV6
    requestTimeoutMsec=10000
    ipModeforNIC2=DHCPV4_DHCPV6
    tls11Enabled=false
    clientConnectionIdleTimeout=180
    tls10Enabled=false
    adminCertRolledBack=false
    cookiesToBeCached=none
    healthCheckUrl=/favicon.ico
    quiesceMode=false
    syslogUrl=10.108.120.108:514
    syslogSystemMessagesEnabled=false
    isCiphersSetByUser=false
    tlsPortSharingEnabled=true
    ceipEnabled=true
    bodyReceiveTimeoutMsec=15000
    monitorInterval=60
    cipherSuites=TLS_ECDHE_RSA_WITH_AES_128_GCM_SHA256,TLS_ECDHE_RSA_WITH_AES_256_GCM_SHA384,TLS_ECDHE_RSA_WITH_AES_128_CBC_SHA256
    , TLS_ECDHE_RSA_WITH_AES_256_CBC_SHA384
    adminPasswordExpirationDays=90
    rootPasswordExpirationDays=365
    passwordPolicyMinLen=6
    passwordPolicyMinClass=4
    passwordPolicyUnlockTime=900
    passwordPolicyFailedLockout=3
    httpConnectionTimeout=120
    isTLS11SetByUser=false
    sessionTimeout=36000000
    ssl30Enabled=false
    snmpEnabled= TRUE | FALSE
    ntpServers=ipOrHostname1 ipOrHostname2
    fallBackNtpServers=ipOrHostname1 ipOrHostname2
    sshEnabled=
    sshPasswordAccessEnabled=
    sshKeyAccessEnabled=
    sshPublicKey1=
    adminDisclaimerText=
    
    [SnmpSettings]
    version=
    usmUser=
    securityLevel=
    authAlgorithm=
    authPassword=
    privacyAlgorithm=
    privacyPassword=
    
    [WebReverseProxy1]
    proxyDestinationUrl=https://10.108.120.21
    trustedCert1=
    instanceId=view
    healthCheckUrl=/favicon.ico
    userNameHeader=AccessPoint-User-ID
    proxyPattern=/(.*)
    landingPagePath=/
    hostEntry1=10.108.120.21 HZNView.uagqe.auto.com
    
    [Horizon]
    proxyDestinationUrl=https://enterViewConnectionServerUrl
    trustedCert1=
    gatewayLocation=external
    disableHtmlAccess=false
    healthCheckUrl=/favicon.ico
    proxyDestinationIPSupport=IPV4
    smartCardHintPrompt=false
    queryBrokerInterval=300
    proxyPattern=(/|/view-client(.*)|/portal(.*)|/appblast(.*))
    matchWindowsUserName=false
    windowsSSOEnabled=false
    
    [Airwatch]
    tunnelGatewayEnabled=true
    tunnelProxyEnabled=true
    pacFilePath=
    pacFileURL=
    credentialFilePath=
    apiServerUsername=domain\apiusername
    apiServerPassword=*****
    proxyDestinationUrl=https://null
    ntlmAuthentication=false
    healthCheckUrl=/favicon.ico
    organizationGroupCode=
    apiServerUrl=https://null
    airwatchOutboundProxy=false
    outboundProxyHost=1.2.3.4
    outboundProxyPort=3128
    outboundProxyUsername=proxyuser
    outboundProxyPassword=****
    reinitializeGatewayProcess=false
    airwatchServerHostname=tunnel.acme.com
    trustedCert1=c:\temp\CA-Cert-A.pem
    hostEntry1=1.3.5.7 backend.acme.com
    
    [AirwatchSecureEmailGateway]
    airwatchOutboundProxy=false
    memConfigurationId=abc123
    apiServerUsername=domain\apiusername
    healthCheckUrl=/favicon.ico
    apiServerUrl=https://null
    outboundProxyHost=1.2.3.4
    outboundProxyPort=3128
    outboundProxyUsername=proxyuser
    outboundProxyPassword=****
    reinitializeGatewayProcess=false
    airwatchServerHostname=serverNameForSNI
    apiServerPassword=****
    trustedCert1=c:\temp\CA-Cert-A.pem
    pfxCerts=C:\Users\admin\My Certs\mycacerts.pfx
    hostEntry1=1.3.5.7 exchange.acme.com
    
    [AirWatchContentGateway]
    cgConfigId=abc123
    apiServerUrl=https://null
    apiServerUsername=domain\apiusername
    apiServerPassword=*****
    outboundProxyHost=
    outboundProxyPort=
    outboundProxyUsername=proxyuser
    outboundProxyPassword=*****
    airwatchOutboundProxy=false
    hostEntry1=192.168.1.1 cgbackend.acme.com
    trustedCert1=c:\temp\CA-Cert-A.pem
    ntlmAuthentication=false
    reinitializeGatewayProcess=false
    airwatchServerHostname=cg.acme.com
    
    [SSLCert]
    pemPrivKey=
    pemCerts=
    pfxCerts=
    pfxCertAlias=
    
    [SSLCertAdmin]
    pemPrivKey=
    pemCerts=
    pfxCerts=
    pfxCertAlias=
    
    [JWTSettings1]
    publicKey1=
    publicKey2=
    publicKey3=
    name=JWT_1
    
    [JWTSettings2]
    publicKey1=
    publicKey2=
    name=JWT_2
    
    [AdminUser1]
    name=monitoringUser1
    enabled=true
    
    [AdminUser2]
    name=monitoringUser2
    enabled=true
    
    [OutboundProxySettings1]
    proxyUrl=
    name=
    proxyType=HTTP
    includedHosts1=
    includedHosts2=
    trustedCert1=
    
    [OutboundProxySettings2]
    proxyUrl=
    name=
    proxyType=HTTP
    includedHosts1=
    includedHosts2=
    trustedCert1=
    Note: Passwords for the low-privileged admin users with monitoring roles are provided as parameter to the PowerShell script. If the password is not provided, then the user is prompted to enter the password. Provide the parameter as newAdminUserPwd and the parameter value similar to monitoringUser1:P@ssw0rd1;monitoringUser2:P@ssw0rd2. The enabled parameter in the INI file is optional and defaults to true if the parameter is unavailable.
  5. To make sure that the script execution is not restricted., type the PowerShell set-executionpolicy command.
    set-executionpolicy -scope currentuser unrestricted
    You only need to do this once to remove the restriction.
    1. (Optional) If there is a warning for the script, run the following command to unblock the warning: unblock-file -path .\uagdeploy.ps1
  6. Run the command to start the deployment. If you do not specify the .INI file, the script defaults to ap.ini.
    .\uagdeploy.ps1 -iniFile uag1.ini
  7. Enter the credentials when prompted and complete the script.
    Note: If you are prompted to add the fingerprint for the target machine, enter yes.
    Unified Access Gateway appliance is deployed and available for production.

Results

For more information on PowerShell scripts, see https://communities.vmware.com/docs/DOC-30835.

What to do next

If you want to upgrade Unified Access Gateway while preserving the existing settings, edit the .ini file to change the source reference to the new version and rerun the .ini file: uagdeploy.ps1 uag1.ini. This process can take up to 3 minutes.
[General]
name=UAG1
source=C:\temp\euc-unified-access-gateway-3.2.1-7766089_OVF10.ova

If you want to upgrade with zero service interruption, see Upgrade with Zero Downtime.