When you copy a system, you create a copy of the source system as a new target system. The most common use of copy function is to take a source production system and create a copy of that system for quality assurance or project work. Other use cases may also apply.
To copy a system, follow the instruction below.
Note: This operation has limitations. For more information about the limitations, please see the section
Existing Limitations.
Procedure
- Login to LaMa web user interface and navigate to the Provisioning view and choose the Systems view.
Figure 1. Navigation to Provisioning 
- Click on the Provisioning button for the selected SAP system virtual machine.
- Select Copy System from the dropdown list.
Figure 2. Copy Operation 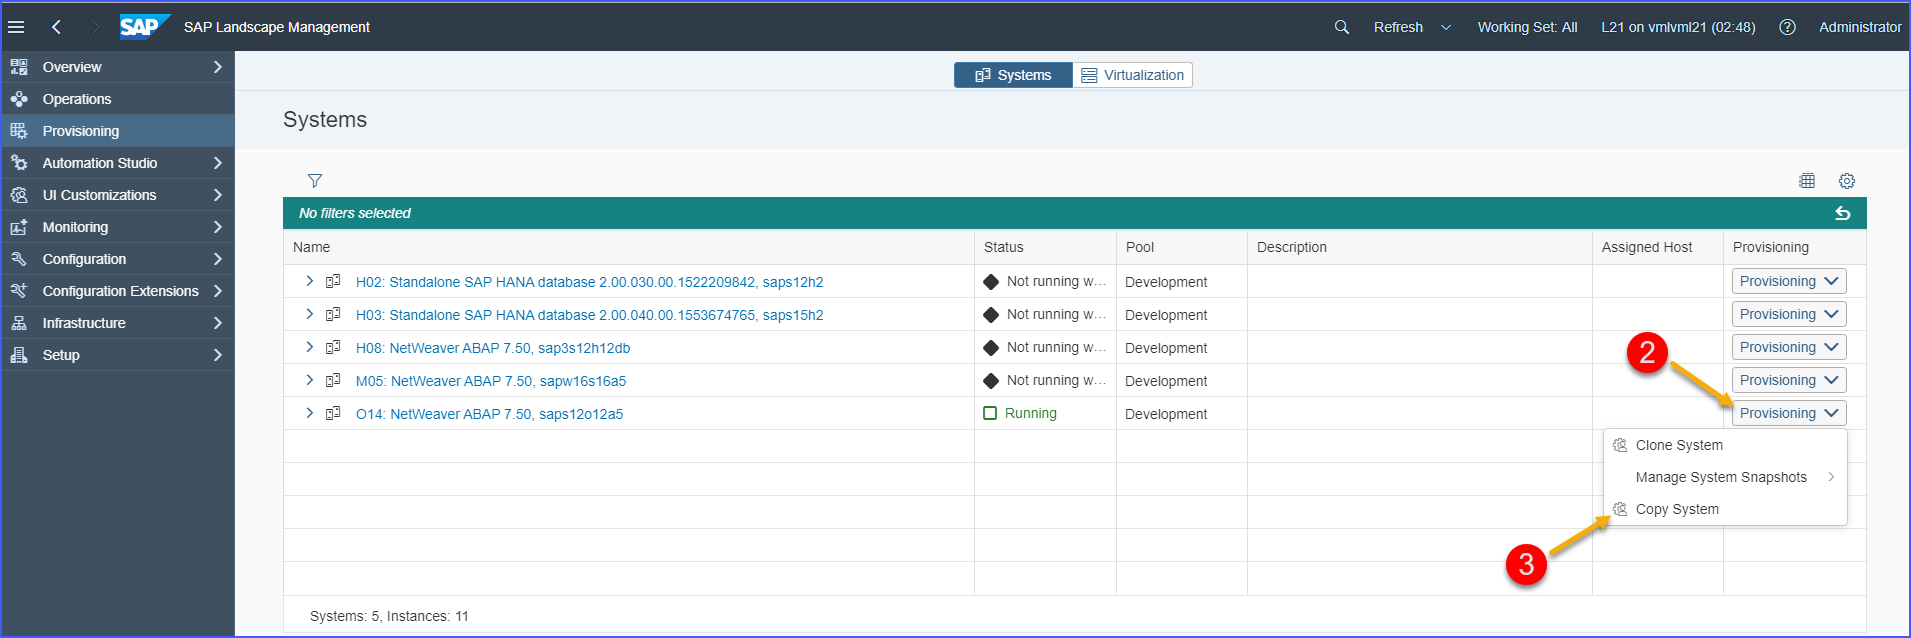
- In the pop-up window do the following:
- Provide the new System ID in the corresponding field.
- Provide a password for the new system that you are going to create as a result of Copy operation. Re-enter the password to confirm the same.
- Click on the Next button.
Figure 3. Basic Data 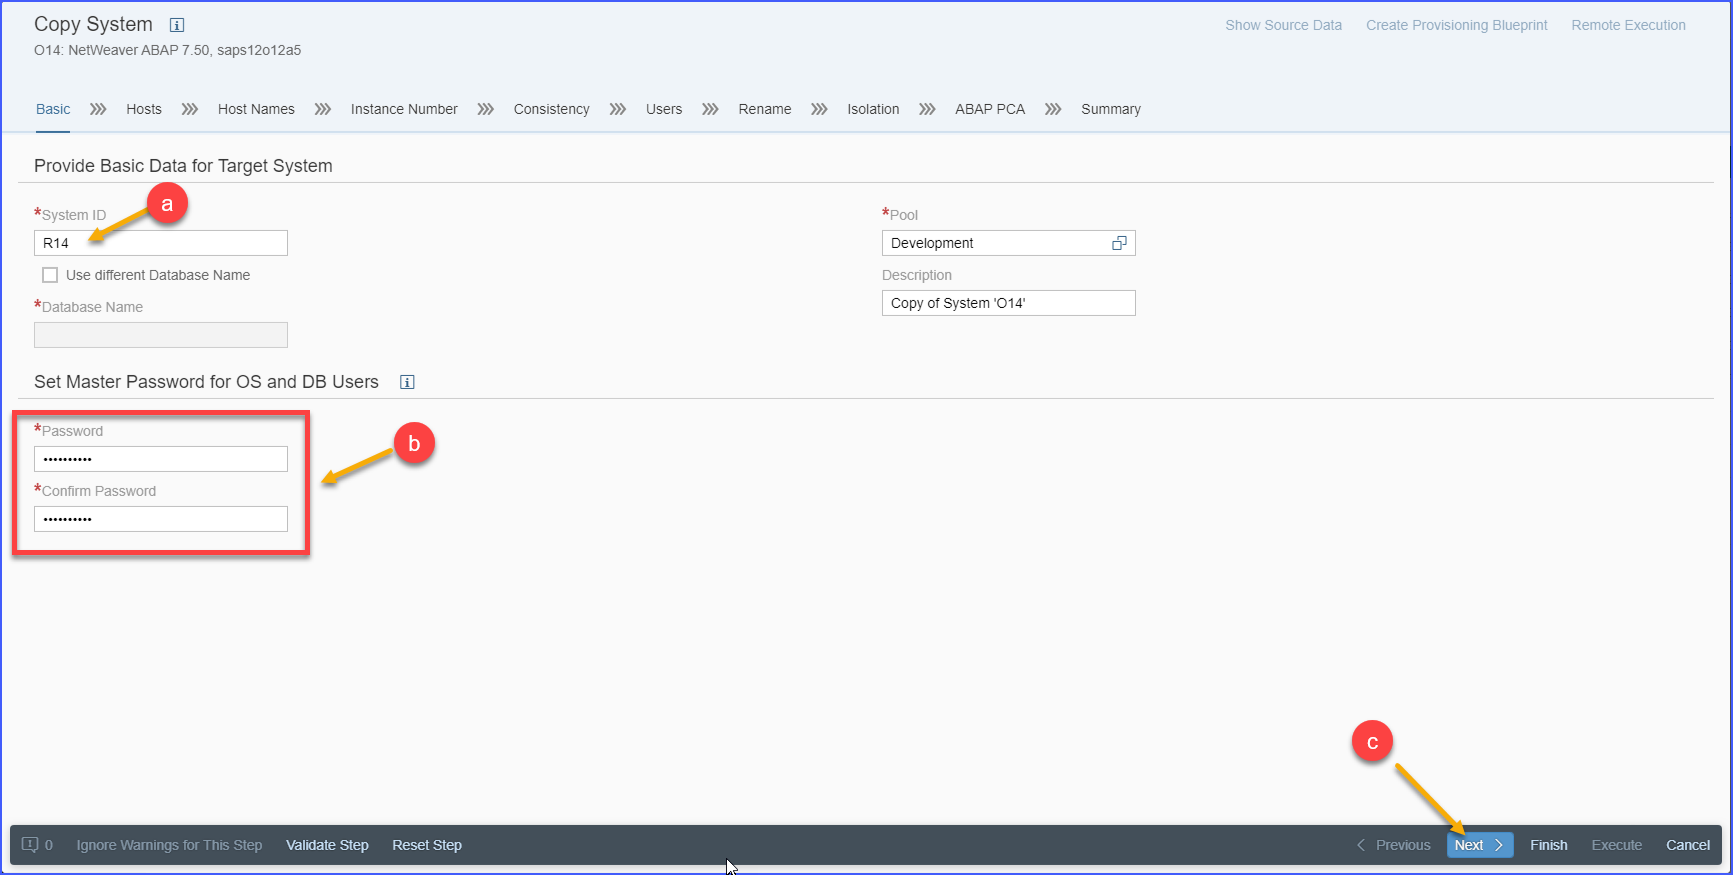
- Click on the pencil icon to enter required parameters.
Figure 4. Host Selection 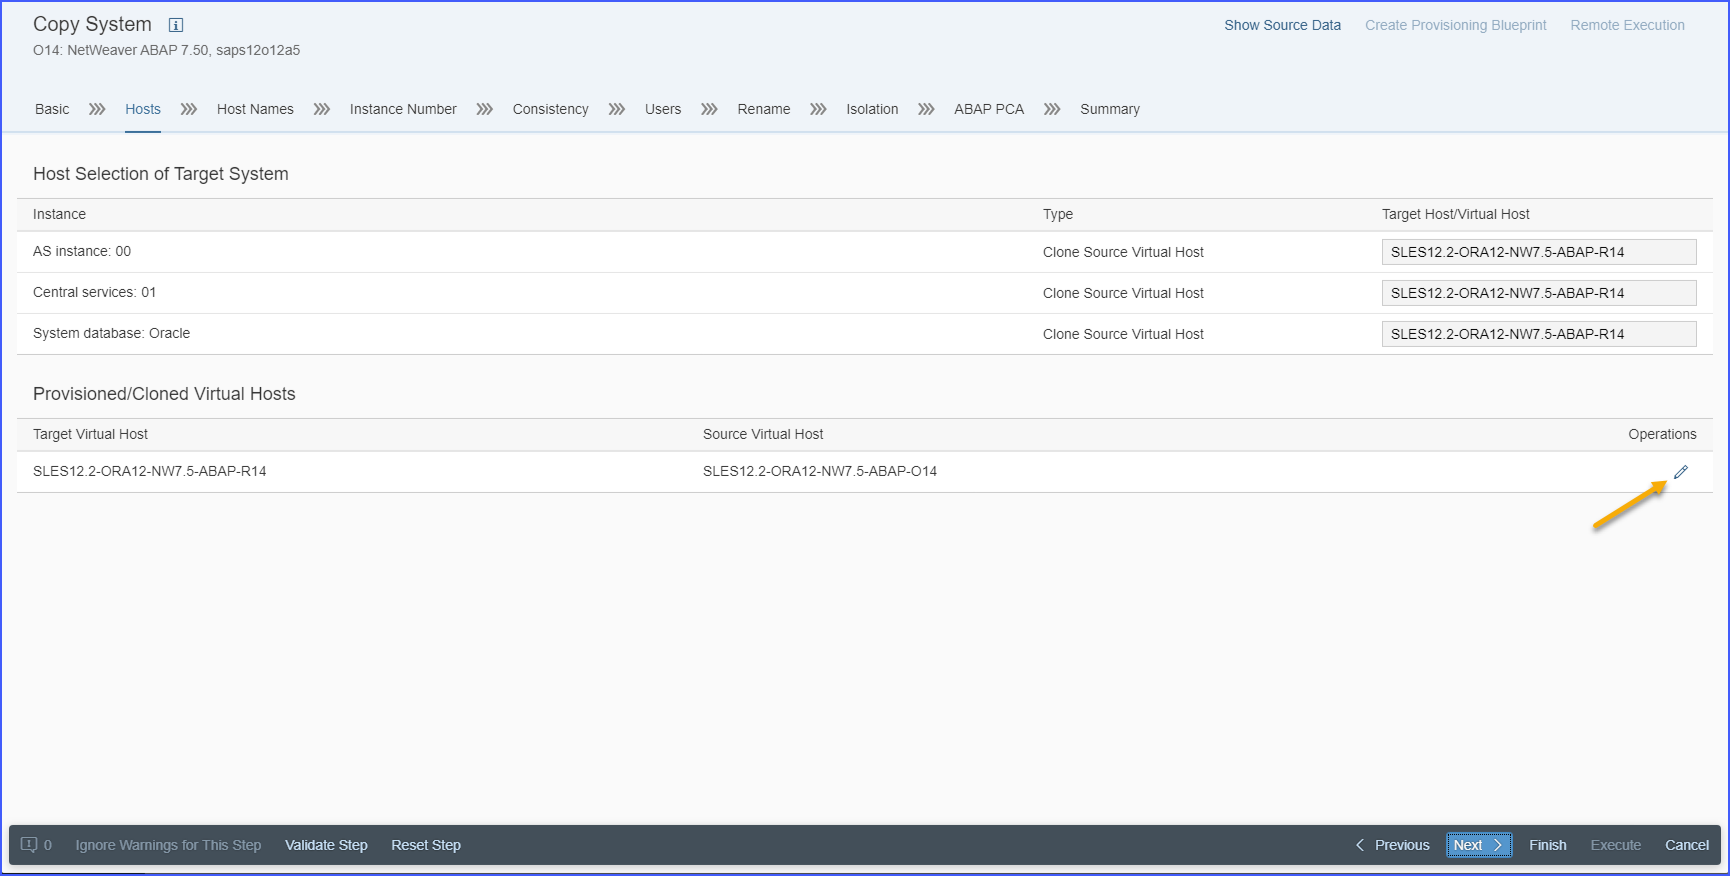
- In the pop-up window do the following:
- Provide the Target Name for the new SAP system virtual machine.
- Click on the Target Element field.
Figure 5. Target Selection 
- In the Target Element window, select the target resource pool or ESXi Host on which to place the new copied system. The dialog presents useful information like the current utilization levels for either the resource pool or host. This will help you make an informed decision on where to place the new copied system.
- Click on the Confirm button to close the Target Element window.
Figure 6. Resource Pool Information 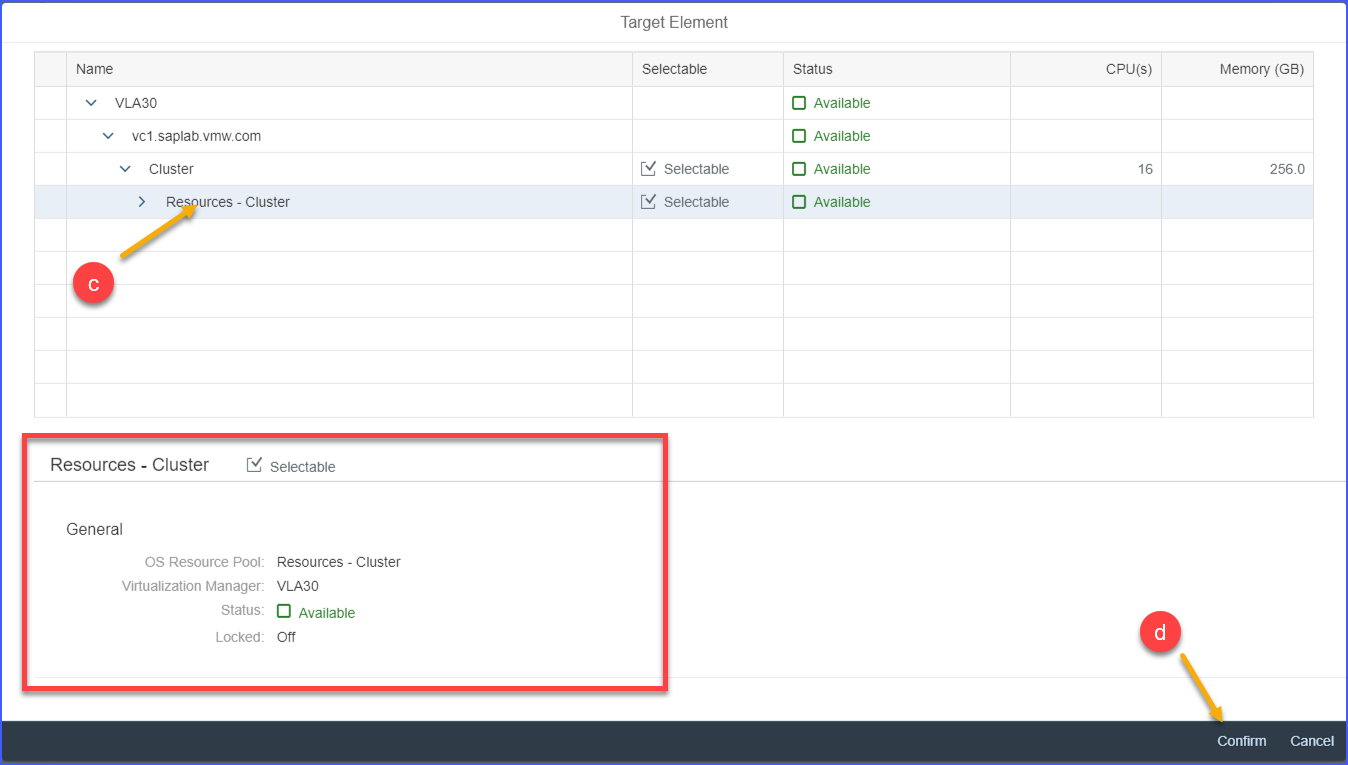
- Click on the Next button.
- Specify a Data Storage:
- Click on the Data Storage field.
Figure 7. Data Storage 
- In the Data Storage window select a datastore or a datastore cluster to store the new copied system. The dialog provides useful information like the size and current utilization levels for various available datastores or datastore clusters. This allows you to make an informed decision of choosing the right datastore or datastore cluster. Click on the Confirm button.
Note: The datastore cluster is available for selection only if the datastore cluster support feature is turned on by VI administrator.
Figure 8. Data Storage Information  Note: Linked copies can only use the same datastore or datastore cluster as the source system.
 - Click on the Next button.
- Click on the Data Storage field.
- For the next step do the following:
- Select Customization specification for guest OS.
- Guest Customization Specifications are created in the VMware vCenter Server and are made available via the VMware Adapter for SAP Landscape Management. You will need a Guest Customization Specification to copy a system.
- Work with your VMware Administrator to create a Guest Customization Specification if none is present in the SAP LaMa.
Note: DHCP customization specifications may cause an inconsistent /etc/hosts file contents in the target system. PROMPT customization specifications is a more reliable option. - Choose whether you want to create either a linked copy or a full copy.
- A linked copy creates a target system that has a file link to the original source system. This reduces the utilized storage for the target system. Linked copy is most commonly used in development or sandbox systems. Linked copy operation completes substantially faster than full copy.
- A full copy creates a target system that has the exact same disk structure and size as the source system. There is no link between the source and target systems here. For example, you can use Full copies to create production systems and/or systems that can be exported to be used in other data centers.
- Click on the Next button.
Figure 9. Customization Specification 
- Select Customization specification for guest OS.
- Select target networks for network adapters of the new VM:
Note: The dialog appears in the operation roadmap only if the network migration feature is turned on by VI administrator.
- Click on the Target Network Adapter field.
Figure 10. Target Network Adapter 
- Click on the one of the allowed values from the list.
Figure 11. Select Target Network Adapter 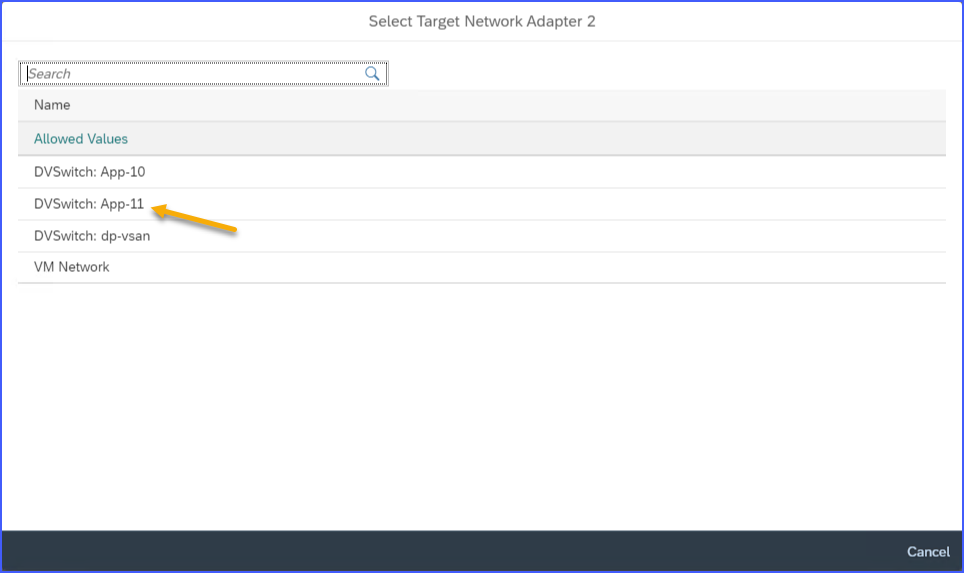
- Click on the Next button.
- Click on the Target Network Adapter field.
- Review the various settings that you have chosen so far. Use the Previous button to go back and make appropriate changes, if required. When you are satisfied with the settings and are ready to proceed further, click on the Set button.
- Click on the Next button.
Figure 12. Host Selection 
- Choose a different network for each component of the target SAP system and clicking on the Next button.
Note: If the host is not configured as adaptive instance you will see warnings that you need to ignore by pressing Ignore Warnings for This Step button and clicking on the Next button again.
Figure 13. Host Names and Networks 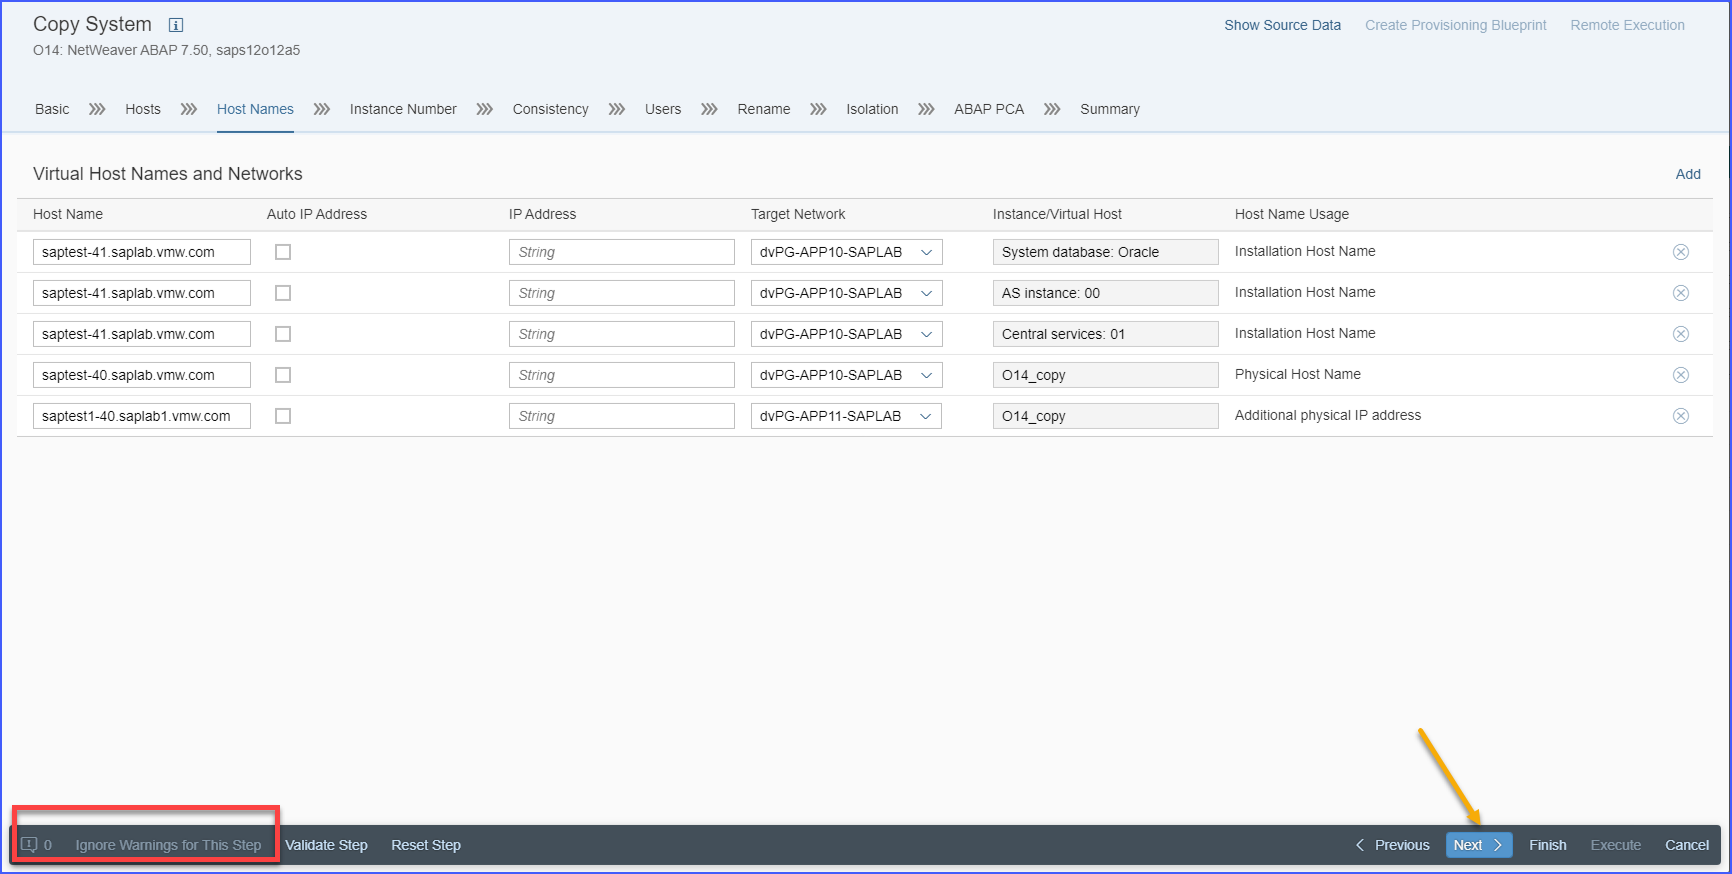
- Specify the instance number for the SAP instances and click on the Next button.
Figure 14. Instance Number 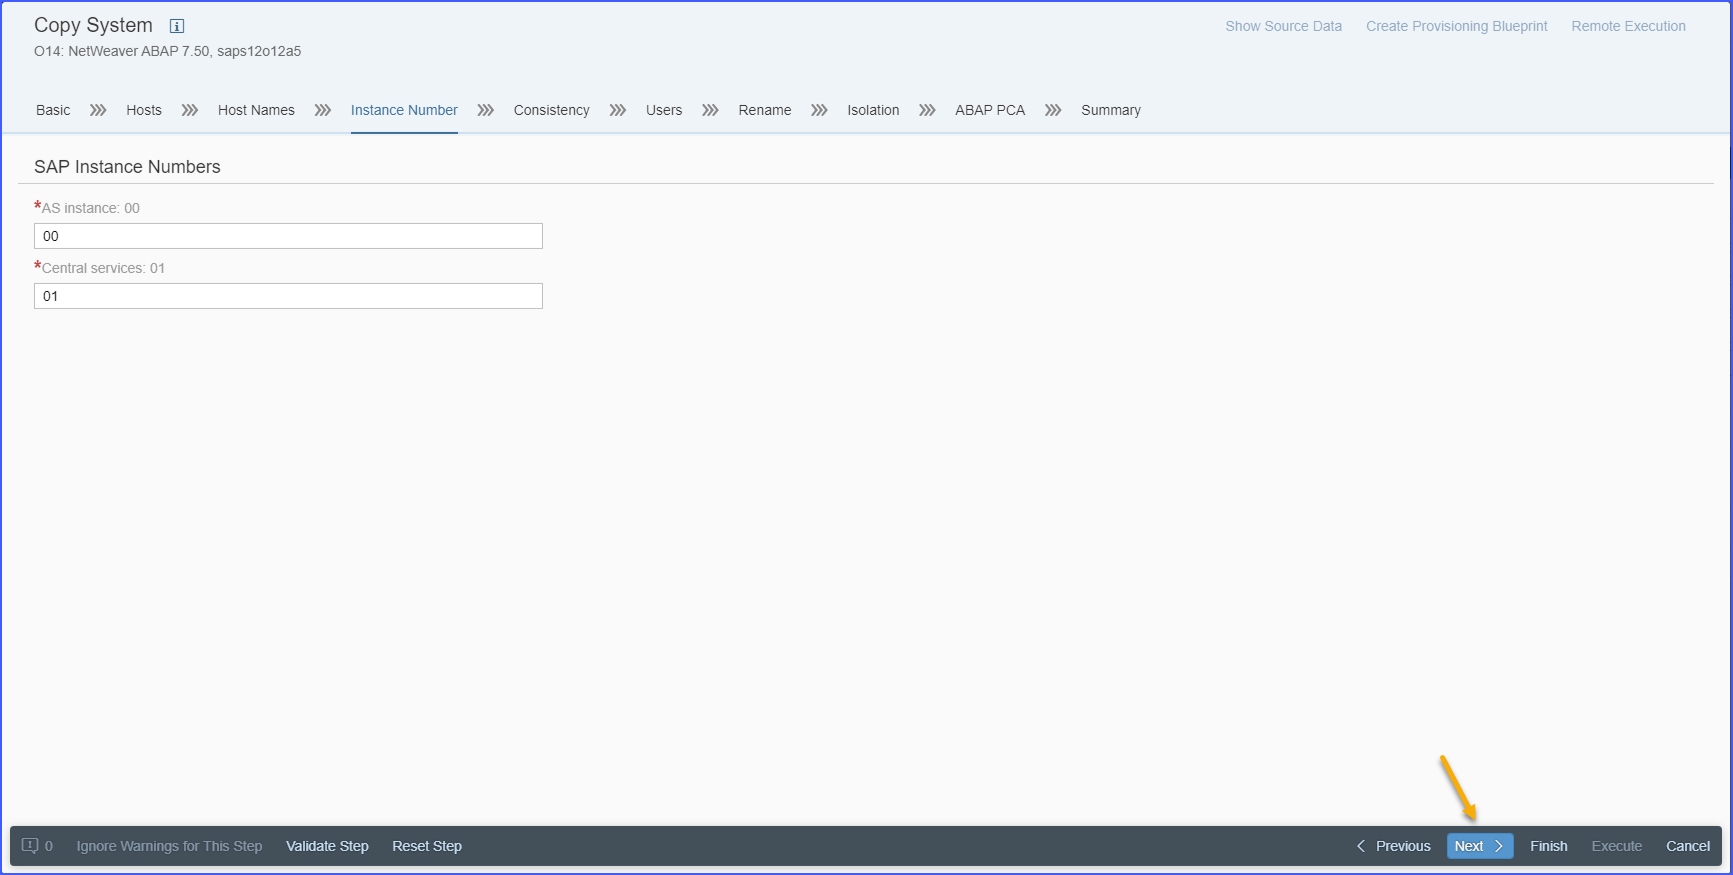
- Select the appropriate database consistency method, depending on what state the database is in. Click on the radio button against one of the following options:
- Online: Backup/Suspend IO Mode with a timeout value — Use this option typically for copying production systems to prevent system outages. A timeout value is provided to ensure database consistency is done in a timely manner.
- Offline: Stop and Restart System — When you select this option, the SAP LaMa will stop the system, take the copy, and then restart the system after the copy completes.
- Offline: Database Already Stopped — Use this option when the database is already stopped.
- Database was stopped during system snapshot — Use this option when the database has already been snapshotted prior to initiating the copy process.
- Scheduled Execution of Cloning Step — Use this option to schedule the clone operation at a specific date/time. Provided date/time defines, when the clone operation will be executed by scheduler. For example, this option is useful to ensure that the current ongoing system activity won’t be impacted.
Click on the Next button.
Note: Offline linked copy of SAP HANA on SLES must be performed with closed hbdstudio on source machine.Figure 15. Consistency 
- Review the new users that will be created on the target system and click on the Next button.
Note: For the Copy process, the SAP LaMa copies the users from the source system over to the target system changing them to match with the new System ID.
Figure 16. Users 
- Review the target system naming convention and click on the Next button.
Note: Observe that the SAP LaMa takes the source system ID and swaps it out for the new target system ID.
Figure 17. Rename 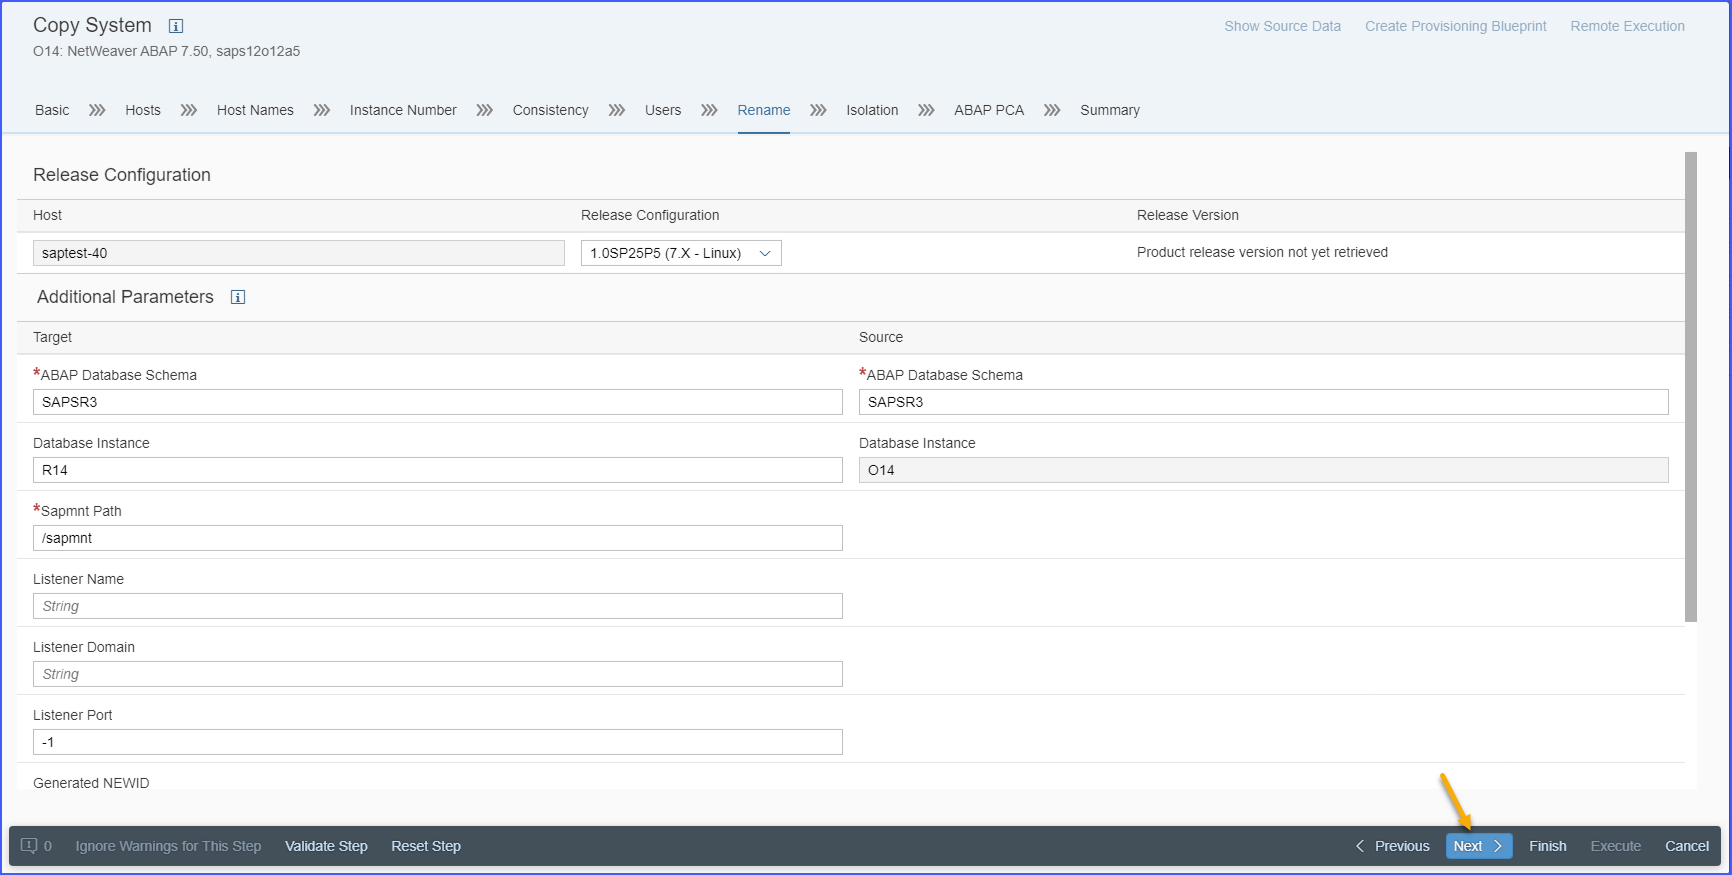
- You can choose to isolate the new target system from the source system. You do this by selecting the appropriate radio button under section Unfence Target System After System Copy/Refresh. This will prevent it from accidentally communicating as the source system.
Click on the Next button.
Figure 18. Isolation 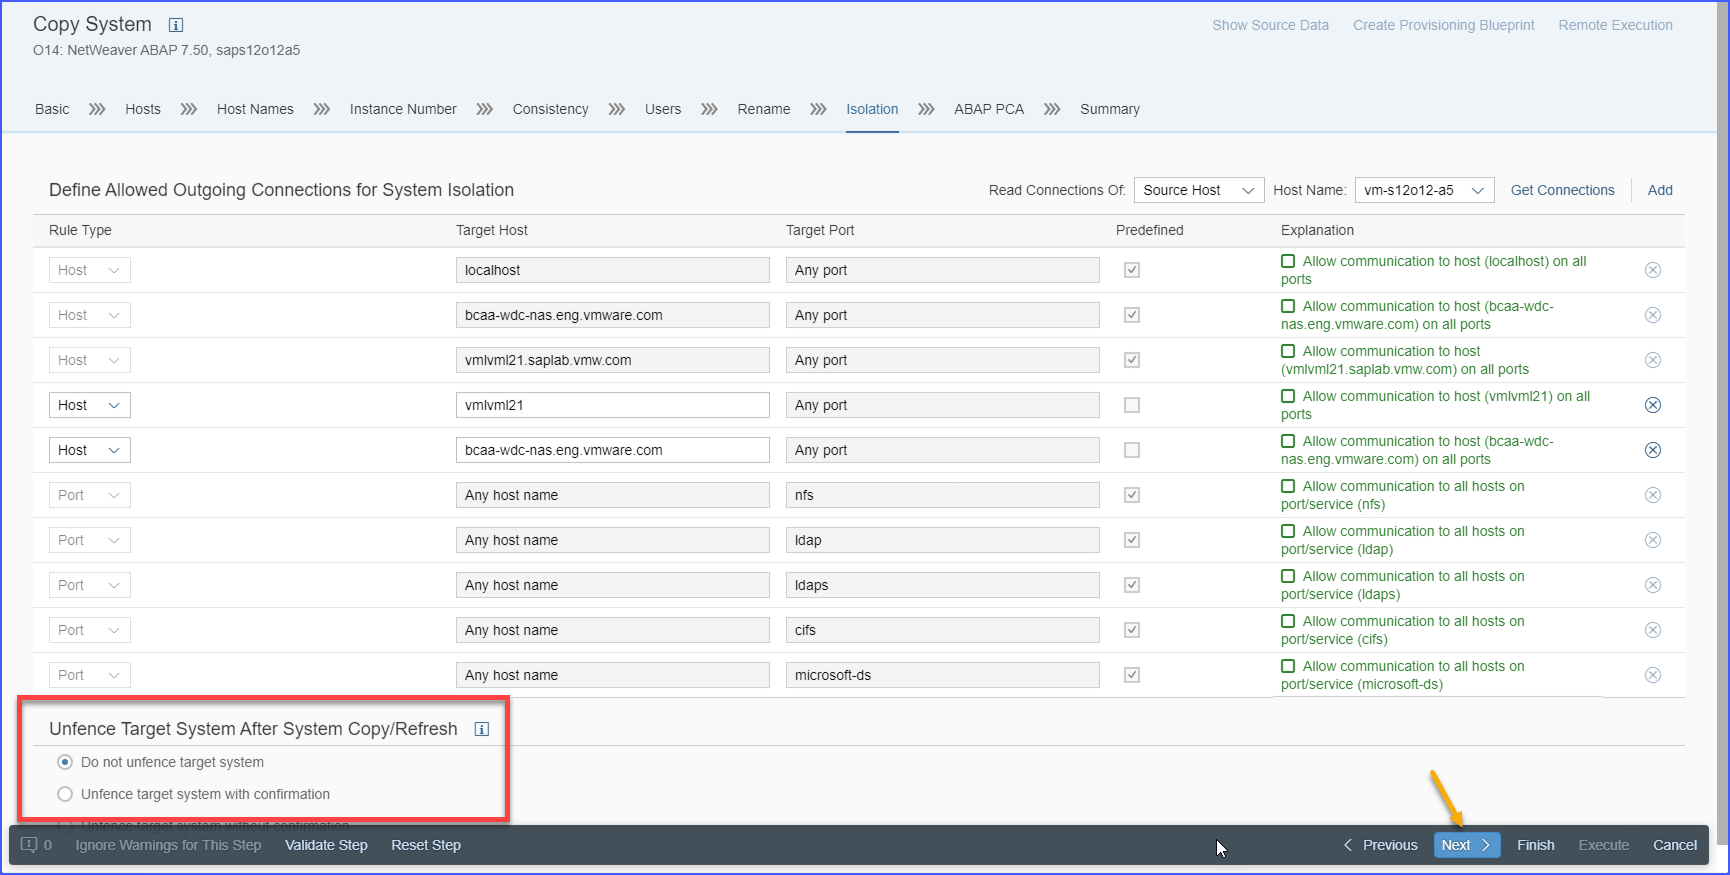
- Choose to either enact ABAP PCA or by-pass it. If you indeed plan to use PCA, choose the appropriate parameters to apply. If no PCA will be used, then you must uncheck that option and further click the Ignore Warnings for This Step to proceed. Click on the Next button.
Figure 19. ABAP PCA 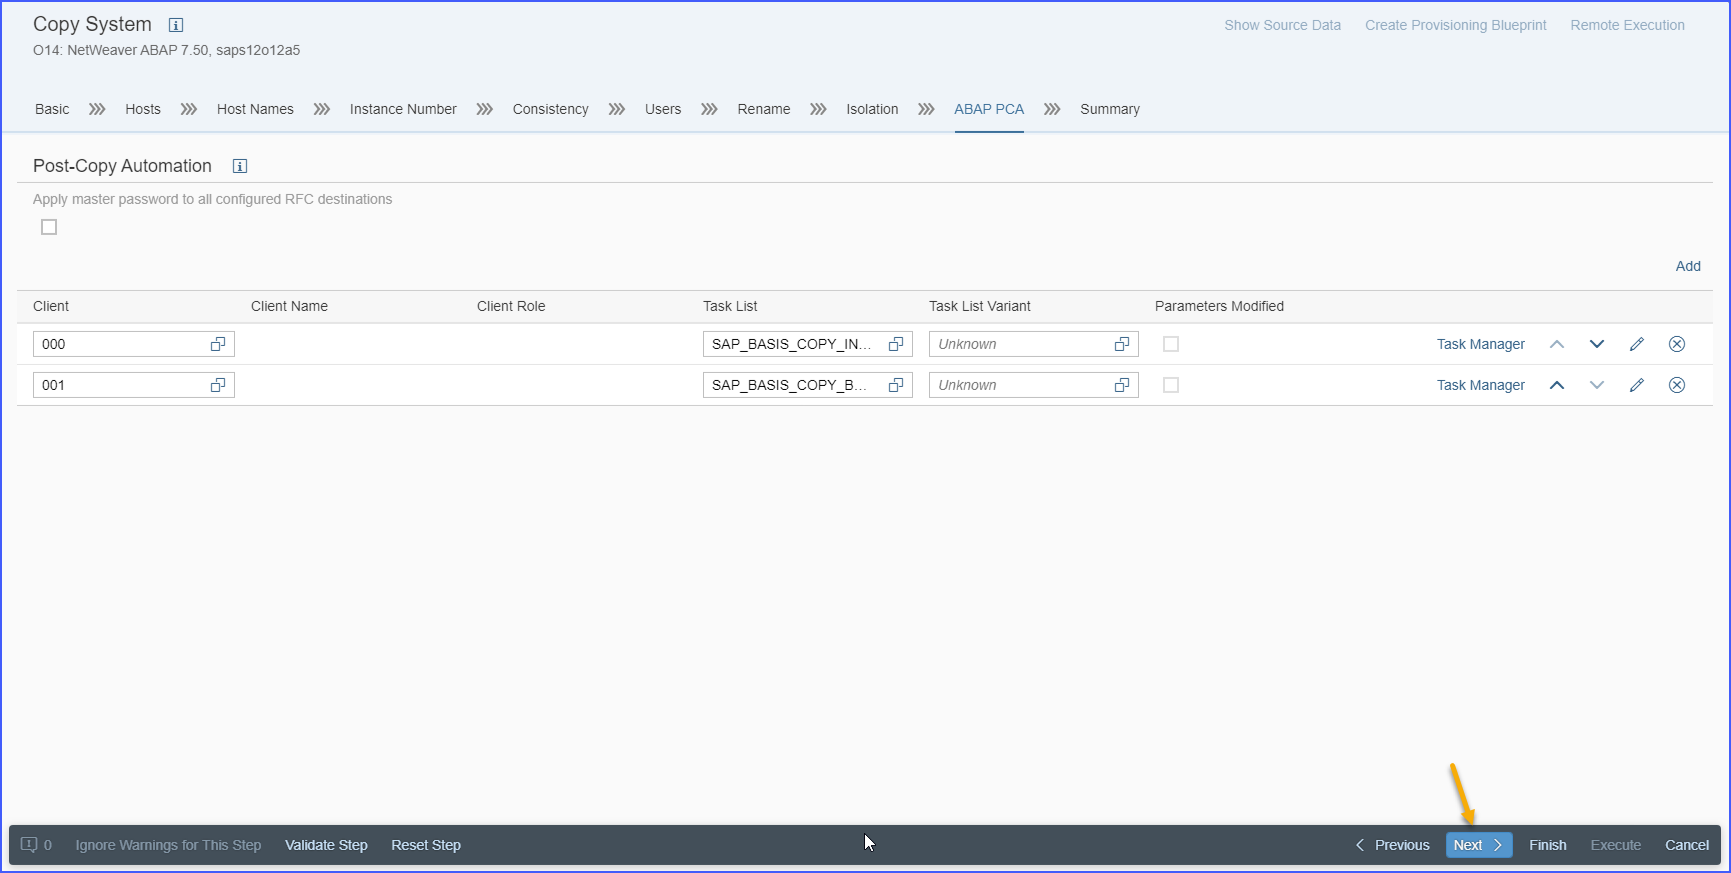
- Review all settings you have made so far. When you are done reviewing the settings, click on the Execute button.
Figure 20. Summary 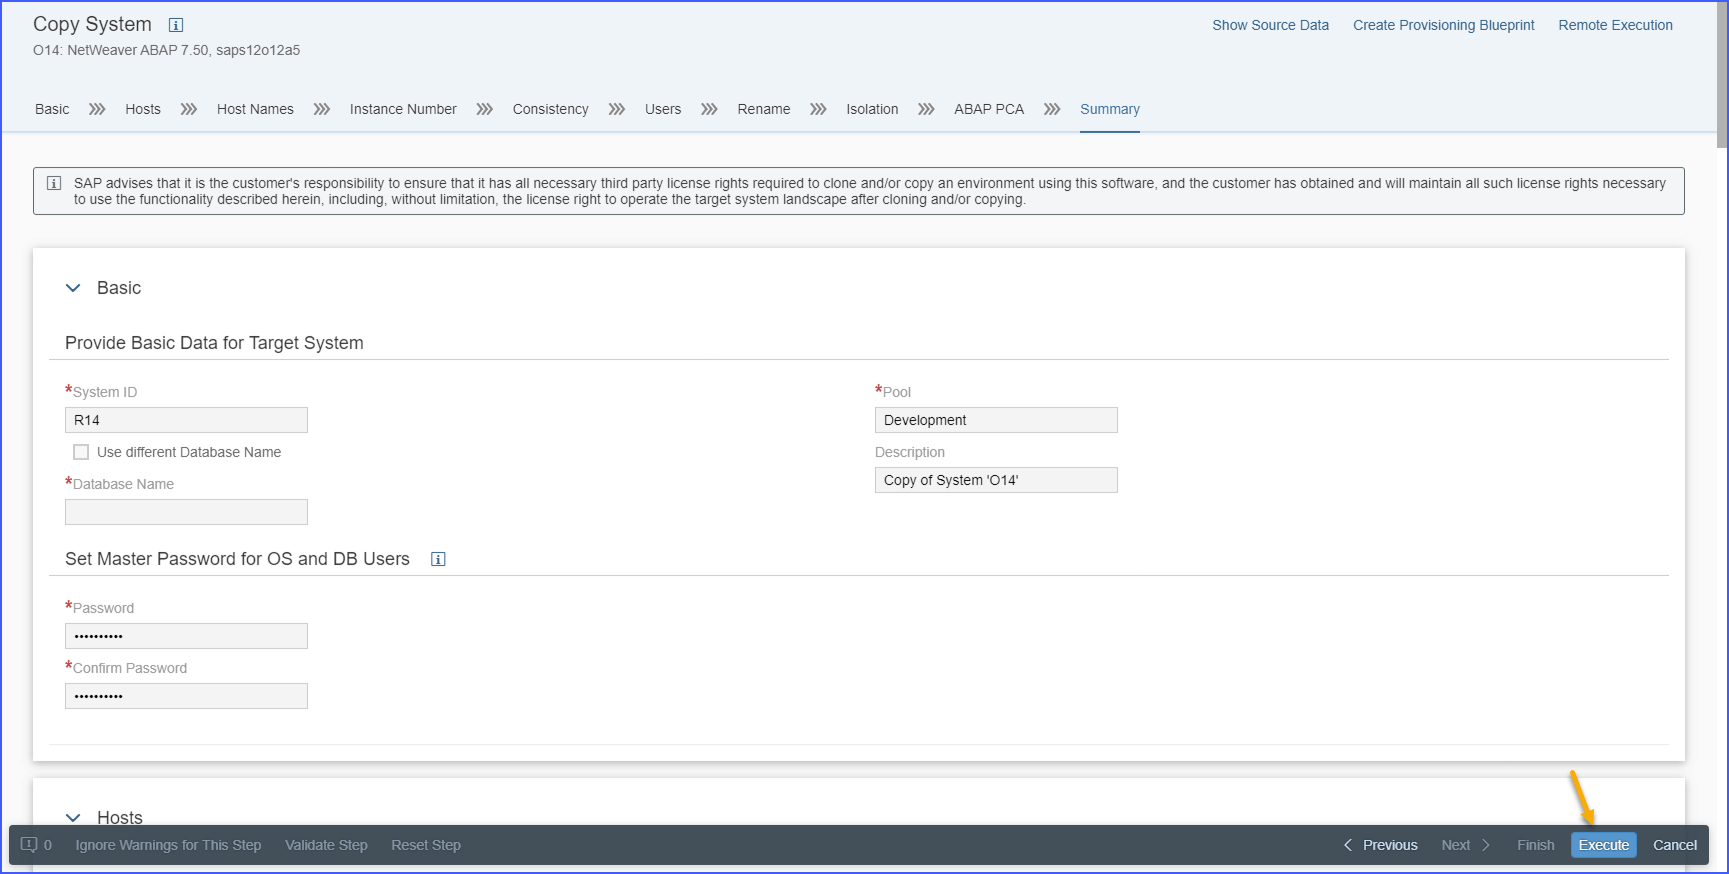
- You will be redirected to the Activity view under Monitoring view where you can monitor the system copy progress.
Figure 21. Monitoring 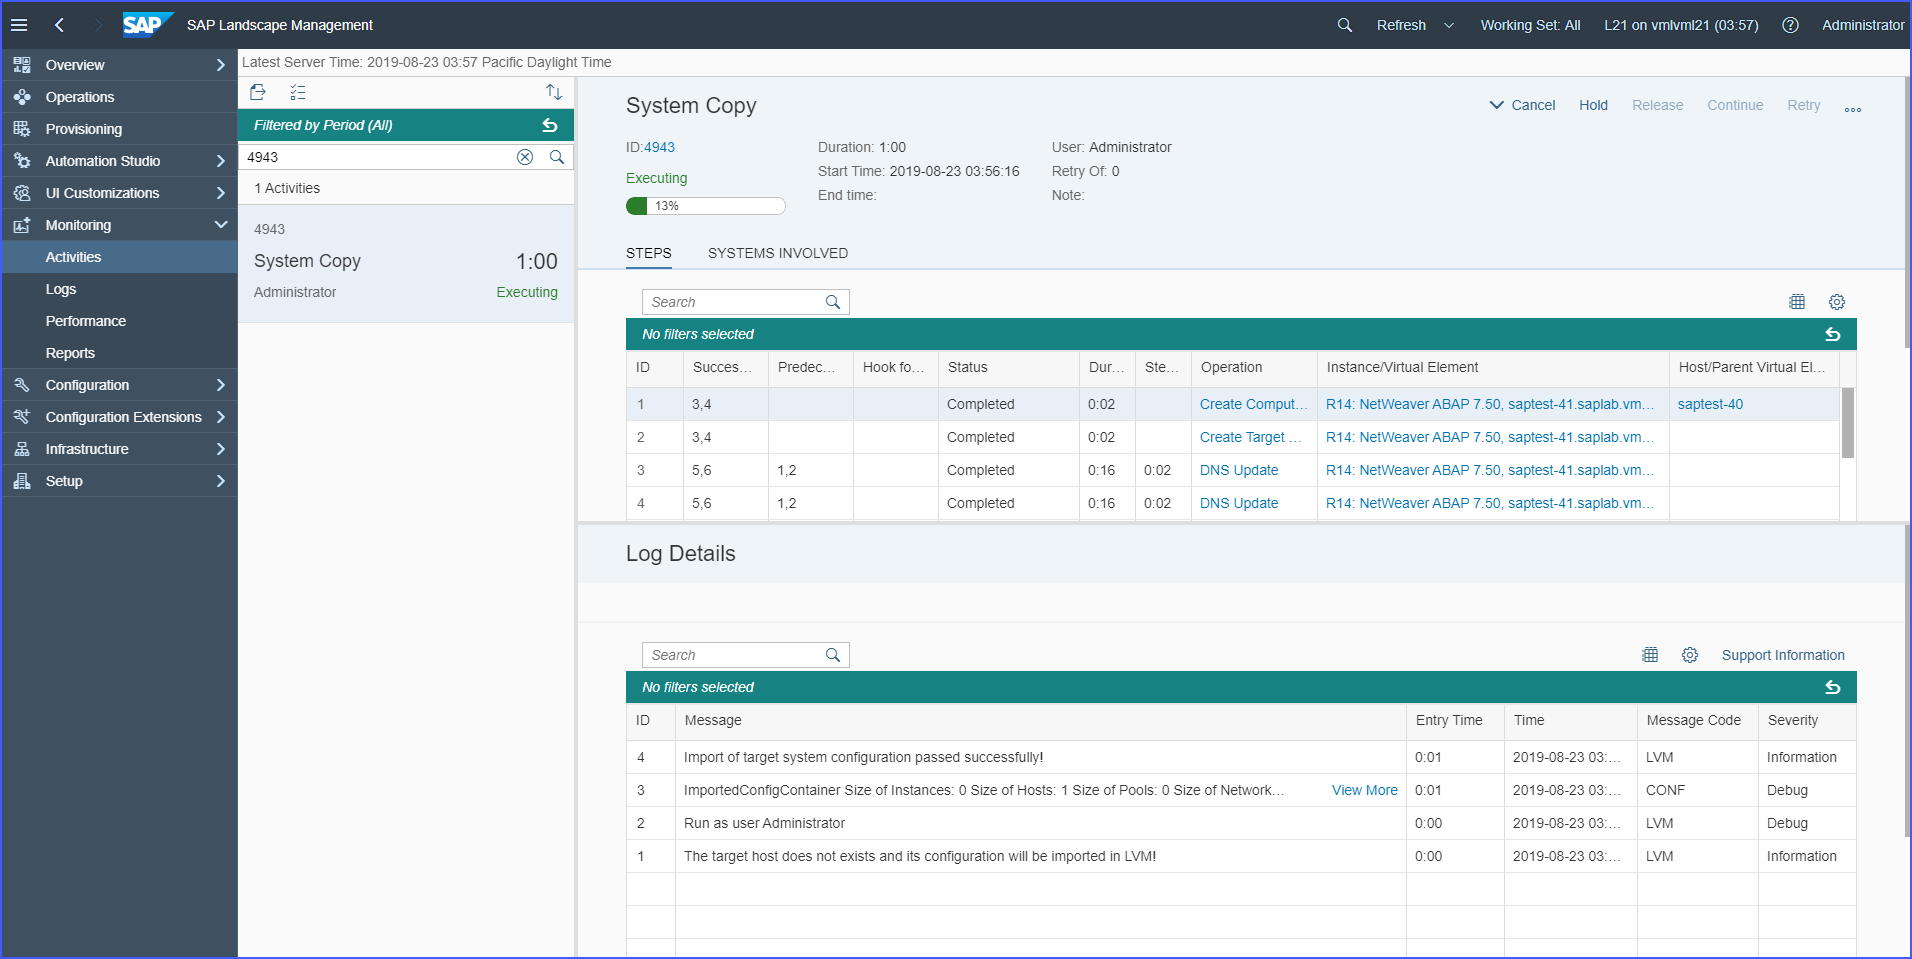
Each activity in the copy process has a corresponding line item and a respective log entry. Click on the particular operation line item to read its corresponding log entry for more details.
Results
Successful completion of these tasks enables you to copy a source system into a new target system.
Note: Consider a system with two network interfaces, wherein one network interface is an actual vNIC and the second is an IP alias on the said vNIC. If you successfully clone or copy this system via
LaMa, after you reboot or restart the network, you will see that the target system has only one network interface. The alias disappears. For systems that are not adaptively installed or those that cannot be relocated, it is not possible to change the host name.
LaMa activates Internet Protocol (IP) addresses only in a transient way. When the host is rebooted, the IP addresses are no longer active.