


Transition applications to VMware Tanzu Application Catalog
This section explains the process of rebasing an existing application using VMware Tanzu Application Catalog (Tanzu Application Catalog), showing you how to both rebuild and redeploy your application on Kubernetes using containers and Helm charts from the Tanzu Application Catalog. To illustrate the steps, it uses a simple React Web application served with Apache.
Tanzu Application Catalog gives developers a private self-service registry of Bitnami open source containers that are continuously maintained to meet the IT governance needs of operators in each organization. Each container is continuously updated and comes with metadata proving the trustworthiness of the software within. This metadata includes:
- A history of updates to each container and Helm chart
- A manifest of libraries, binaries and software licenses in every container
- Results of tests run in every environment relevant to the customer for every update
- Proof of open source security and virus scans
- Links to the upstream source of libraries and binaries included in every container
Tanzu Application Catalog allows developers to build containers for production workloads in a faster and more secure manner. With Tanzu Application Catalog, developers can replace the containers and Helm charts they were maintaining for production workloads with IT-approved containers and charts built and maintained by VMware. These can be downloaded for local development, or they can be used in production. For development teams that rely on hand-built containers, Tanzu Application Catalog is a huge leap forward in efficiency, compliance, and better security.
What to do first
Ensure:
- You have a subscription to Tanzu Application Catalog. However, the steps outlined below also hold true for fully-functional Tanzu Application Catalog environments. To subscribe, see request access.
- You have a React application suitable for deployment on Apache. If you don’t, you can use this example community project from the React website.
- You have a Docker build environment.
- You have an account with a private or public container registry. If you don’t, you can sign up for a free Docker Hub account.
- You have a Kubernetes cluster running with kubectl and Helm v3.x installed.
To transitions applications to Tanzu Application Catalog, follow the steps as explained in the sections below:
- Rebuild the application container using a Tanzu Application Catalog base image
- Redeploy the application using a Tanzu Application Catalog Helm chart
Rebuild the application container using a Tanzu Application Catalog base image
An application’s Dockerfile usually begins by specifying the base image for the container. For example, if your application uses the Bitnami Apache container as its base image, your Dockerfile will begin with a line similar to the one below:
FROM bitnami/apache:latest
To rebase your application using the Tanzu Application Catalog, you need to simply replace the previous line to reference a base image from the Tanzu Application Catalog instead. No other changes are needed to your application code.
Begin by selecting an appropriate base image. Follow the steps below:
- Log in to the Tanzu Application Catalog.
- Select your organization.
- In the left navigation pane, go to Applications > “My Applications”.
-
Locate and select the base container you wish to use in the list of available applications. Click the “Details” link. In this example, select the Apache container image.

-
On the container detail page, note the container tags.

Once you have chosen the base image to use, rebuild your application container with that base image.
-
Begin by obtaining the source code for your application. If you’re using the example React application listed above, clone the corresponding Git repository on your development system, as shown below:
$ git clone https://github.com/pankajladhar/GFontsSpace.git -
Change into the application source directory, download dependencies and build the project:
$ cd GFontsSpace $ yarn install $ yarn build -
Create a Dockerfile that uses the Apache container image from the Tanzu Application Catalog by specifying the container tag in the first line. Then, add the built application to the Apache server’s document root (by default, this is configured as the /app directory):
FROM gcr.io/bitnami/apache:2.4-centos-7
COPY build /app
Note
Most container images in Tanzu Application Catalog are non-root container images. If your build process requires installation of system packages or modification of privileged configuration files, your Dockerfile must switch to a non-root user account first with the
USER rootcommand. -
Build the Docker image, replacing the USERNAME placeholder in the command below with your Docker Hub username:
$ docker build -t myapp . -
Upload the Docker image to your container registry following your registry’s documentation. For example, to upload the image to Docker Hub, use the commands below and replace the USERNAME placeholder with your Docker Hub username.
$ docker login
$ docker tag myapp USERNAME/myapp
$ docker push USERNAME/myapp
Confirm that you see the image in your container registry before proceeding to the next step.
Redeploy the application using a Tanzu Application Catalog Helm chart
To deploy an application on Kubernetes using Helm, you first add the chart repository and then deploy a chart from that repository, passing it necessary inputs such as the container image to use, the Ingress hostname (if required), the type of service, and so on. For example, to deploy a custom application on a Kubernetes cluster using the Bitnami Apache Helm chart, you would execute commands similar to the below:
$ helm repo add bitnami https://charts.bitnami.com/bitnami
$ helm repo update
$ helm install apache bitnami/apache \
    --set image.registry=docker.io \
    --set image.repository=USERNAME/myapp \
    --set image.tag=latest \
    --set service.type=LoadBalancer \
    --set image.pullPolicy=Always
To redeploy your application on Kubernetes using the Tanzu Application Catalog, you need to simply use the Tanzu Application Catalog repository instead of the Bitnami chart repository, and deploy the application using a chart from there. No other changes are needed to your deployment infrastructure.
To see how this works, use the Apache Helm chart from the Tanzu Application Catalog to deploy the React application container image built in the previous step.
- Log in to the Tanzu Application Catalog.
- Select your organization.
- From the left navigation pane, go to “Applications” > “My Applications”.
-
Locate and select the Helm chart you wish to use. Click the “Details” link. In this example, select the Apache chart.

-
Use the example commands shown on the detail page to deploy the React application using the Apache Helm chart. Modify the example commands to reflect your registry and repository credentials.
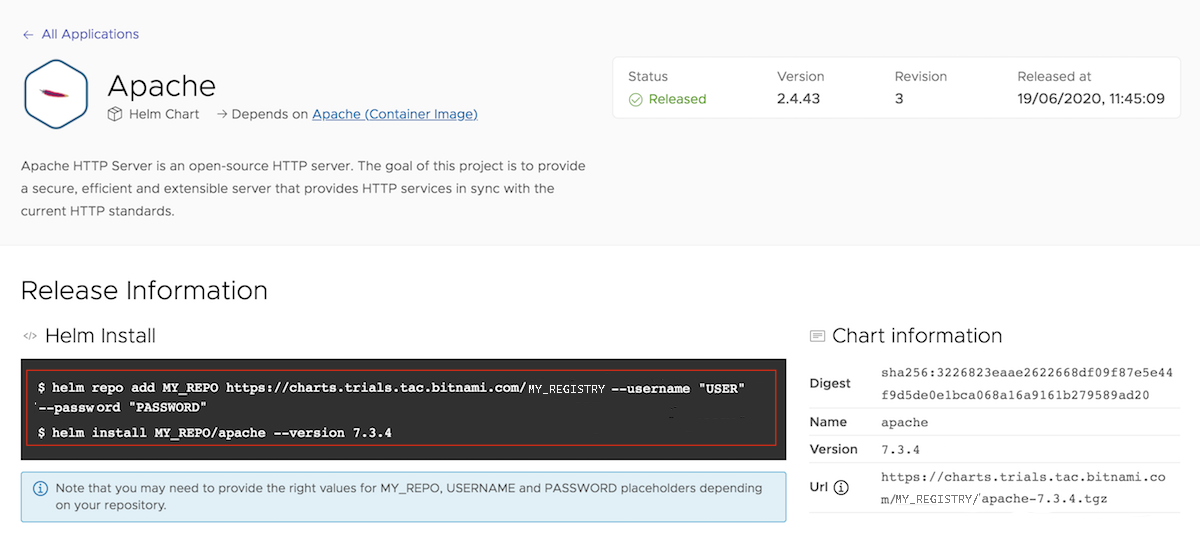
For example, if your application image is in a Docker Hub registry, use the commands below and replace the USERNAME placeholder with your Docker Hub username and the REPOSITORY placeholder with a reference to your Tanzu Application Catalog chart repository.
helm registry login YOUR_HOSTED_REGISTRY/charts
helm install oci://YOUR_HOSTED_REGISTRY/charts/mysql --version 9.4.3 --generate-name \
    --set image.registry=docker.io \
    --set image.repository=USERNAME/myapp \
    --set image.tag=latest \
    --set service.type=LoadBalancer \
    --set image.pullPolicy=Always
If you wish to access the application externally through a domain name and you have installed the NGINX Ingress controller, use these commands instead and replace the DOMAIN placeholder with your domain name:
helm registry login YOUR_HOSTED_REGISTRY/charts
helm install oci://YOUR_HOSTED_REGISTRY/charts/mysql --version 9.4.3 --generate-name \
    --set image.registry=docker.io \
    --set image.repository=USERNAME/myapp \
    --set image.tag=latest \
    --set image.pullPolicy=Always \
    --set ingress.enabled=true \
    --set ingress.hosts[0].name=DOMAIN
This will create a pod within the cluster for the Apache service.
Note
For complete list supported parameters for Apache Helm chart, see, Parameters.
Once the chart has been installed, you will see some information about the deployment. Run the helm status command to see deployment status:
$ helm status apacheObtain the public IP address of the Apache service (if you deployed using a load balancer) using the command below:
$ kubectl get svc --namespace default apacheThe external IP address of the Apache service can be obtained from the output of the previous command, as shown below:

Test the application by browsing to the service IP address, such as <http://IP-ADDRESS/> or, if you used the NGINX Ingress controller, to the specified domain name. If you used the example application, here is a screenshot of what you should see:

You’ve now successfully rebased and redeployed your application on Kubernetes using a container and Helm chart from the Tanzu Application Catalog. As the example above demonstrates, apart from adapting your build and deployment process to reference the container images and charts in the Tanzu Application Catalog, there are no other changes needed for you to immediately start becoming productive with it.
Useful links
