


How to integrate a webhook with VMware Aria Automation for Secure Clouds
You can use the webhook integration to send security findings to a URL destination in a custom format (JSON, XML, HTML, plain text, and so on). This lets you send findings data to third-party applications that don't have a specific integration for VMware Aria Automation for Secure Clouds as long as they can process the custom format. Microsoft Teams, ServiceNow, and PagerDuty are just a few examples of the services you can include in your security posture through webhook integration.
Navigate to Settings > Integrations.
Under Webhook, select Add New.
Enter the following information:
- Integration name: This is the name of your integration.
- Headers: Any headers you need to include with your requests, such as authorization or content types, are entered here in key:value format. An example would be content-type:application/json.
- URL: Enter the URL destination you want to send findings data to.
Click Enable if you want this integration to be active immediately upon saving.
Select the Template you want to use for your finding data. Three pre-made templates are available: one for generic use, and two others for Microsoft Teams and PagerDuty, respectively. You can also create a custom template; see the content after these instructions for more details.
Note: If implementing the Microsoft Teams template, you may want to review the supporting Microsoft Teams documentation for creating an incoming webhook.
Click Next.
If you're an organization admin, you'll be prompted to select integration's context (Organization or Project).
Click Test to verify a successful connection between the integration and your receiving URL. All headers attached to the request appear in the preview window available on this screen.
After receiving a successful response, click Save.
Once you have a working integration, you can create a Webhook alert to start sending findings data through your webhook.
Create a custom webhook template
VMware Aria Automation for Secure Clouds's webhook templates are written in the Mustache format. If you want to create your own template, you should review the official Mustache documentation here in addition to these instructions.
This JSONC data structure for a single alert lists all the available input fields you can use when constructing your Mustache template, with descriptions in the comments:
{
    "Name": "SecureState Alert 1", // Name of your alert.
    "Message": "This is a SecureState Alert", // Additional message sent to the recipient.
    "Findings": [
        // A list of findings related to the alert.
        {
            "ID": "00000000-0000-0000-0000-000000000000", // Unique ID for the finding.
            "RuleDisplayName": "Azure AD group has administrator access", // Public name of the rule for the triggered finding.
            "RuleName": "azure-active-directory-group-admin-access", // Database name of the rule for the triggered finding.
            "RuleService": "ActiveDirectory", // Service type of the triggered finding.
            "RuleSeverity": "Medium", // Severity of the triggered finding (High, Medium, or Low).
            "CloudAccountID": "00000000-0000-0000-0000-000000000000", // ID of the cloud account where your affected resource resides.
            "CloudAccountName": "azure-active-directory-group-admin-access", // Name of the cloud account where your affected resource resides.
            "CloudAccountEnvironment": "development", // The environment type assigned to the cloud account (Example: production, development).
            "CloudAccountProjectID": "00000000-0000-0000-0000-000000000000", // ID of the VMware Aria Automation for Secure Clouds project where the cloud account resides.
            "Source": "Native", // Specifies if the finding is from a native or third-party rule.
            "Provider": "azure", // Provider associated with the cloud account where the affected resource resides.
            "Service": "ActiveDirectory", // Service type of the affected resource.
            "Region": "global", // Region of the affected resource.
            "RiskScore": 40, // Risk score of the finding.
            "Tags": [
                // A list of tags associated with affected resource.
                {
                    "Key": "Owner", // Name of the tag.
                    "Value": "[email protected]", // Value of the tag.
                    "Last": false // Indicates the last tag in the list.
                }
            ],
            "Timestamp": "2020-01-01T12:00:00.000Z", // Time stamp from when the event was observed.
            "Last": false // Indicates the last finding in the list. Can be used with the {{ >comma }} Mustache partial.
        }
    ]
}
When creating your own template, you can add any of the input variables described above with the format {{ <variable> }}.
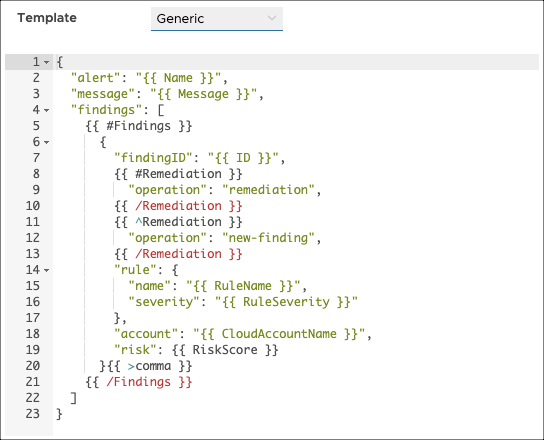
Note that the Findings and Tags fields are arrays of objects. One of the challenges with using a Mustache template to generate valid JSON payloads for your webhook integration is adding commas after each object in an array. To resolve that, VMware Aria Automation for Secure Clouds has added the {{ >comma }} partial for use with any data type in a Mustache template that includes the Last boolean field. This screenshot demonstrates how the partial is used:
Note: For the template to render correctly, all finding properties must be added after {{ #Findings }} and before {{ >comma }} {{ /Findings }}. See the following screenshot for an example of correct usage.
You can add a custom template by either writing or pasting it into the Template field. When you do this, the service creates a third template with the label "Custom". This action doesn't change the generic or Microsoft Teams templates, regardless of which one you have selected at the time.
Only one custom template is supported per individual webhook integration, and any change made in the Template field immediately overwrites previously saved custom content. To prevent losing information, save a copy of your custom template in a secure location.
Webhook examples
This section demonstrates just some of the different types of webhook integrations you can create.
PagerDuty
You can use webhook to automatically export findings as PagerDuty incidents with these examples as a reference. All you need from PagerDuty is an API auth token.
Create an auth token in PagerDuty.
Create a new webhook integration:
Headers
- Accept: application/vnd.pagerduty+json;version=2
- Authorization: Token token <token>
- Content-Type: application/json
- From: [email protected]
URL:
https://api.pagerduty.com/incidentsTemplate: Select the PagerDuty template and customize to your preference as necessary.
Test and validate the incident received in PagerDuty.
Set up alerts and receive real-time incident reporting in your PagerDuty service.

