As a cloud administrator, you can make Automation Assembler templates available in the Automation Service Broker catalog by adding an Automation Assembler content source and sharing the templates. The templates are the specifications for services or applications that you can deploy to your cloud providers.

Workflow diagram for importing and deploying Automation Assembler templates.

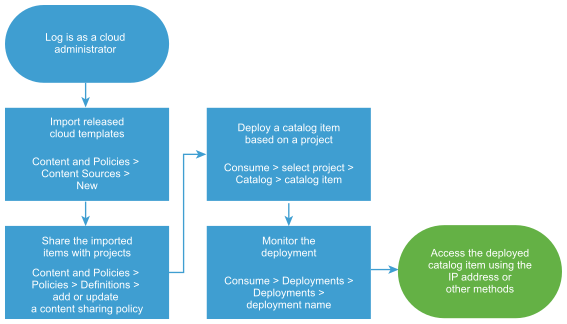
After you import the Automation Assembler templates, you share them with project members so that they can deploy the templates. At the request time, the template is deployed to cloud zone account region or datastore that supports the template requirements.

Prerequisites

Procedure

  1. Import templates from Automation Assembler.
    1. Select Content and Policies > Content Sources.
    2. Click New, and then click Template.
    3. Enter the Name for this content source.
    4. Select the Source project and then click Validate.
      The validation process tests the connection and provides the number of released templates that are associated with the project in Automation Assembler.
    5. Click Create and Import.
    The Content Sources page lists your new source and the number of discovered and imported items.
  2. Share the imported items with a project.
    If you want to share the template with more than one project, you must create a separate content sharing policy for each project.
    1. Select Content and Policies > Policies > Definitions, and create a new content sharing policy.
    2. Enter a name for the content sharing policy.
    3. In the Scope list, select the target project.
    4. In the Content sharing section, click Add Items, and then select one or more cloud templates to share with the project.

      The list of possible templates includes the templates associated with the current project in Automation Assembler and any templates for other projects where sharing is enabled.

      You can select all the items imported from a content sources or you can select individual items. To select only particular templates, select All Content in the Content Sources drop-down menu.

    5. In the Users section, select the users and user groups that you want to have access to the content.
      You can share the content with all users and groups in the project, or you can select individual users and groups.
    6. Click Create.
    The Automation Assembler templates are added to the catalog where the project members can request them.
  3. Verify that the template is available in the catalog to the members of the selected projects with whom you shared the content.
    1. Click the Consume tab.
    2. In the Projects drop-down menu, select the project with which you shared the cloud template.

      You can select multiple projects.

    3. On the Catalog page, locate the imported template, and review the projects to ensure that the project you configured is included.
    4. Click Request and provide any required information.
      If the template has more than one released version, select the version that you want to deploy.
    5. Click Submit.
      The provisioning process begins and the Deployments page opens with your current request at the top.
  4. Monitor the provisioning process to ensure successful deployment.
    1. Select Deployments > Deployments and locate your deployed catalog item.
    2. Monitor the card status until it is successful.

Results

The released Automation Assembler templates are imported into Automation Service Broker, shared in the catalog, and deployable.

What to do next