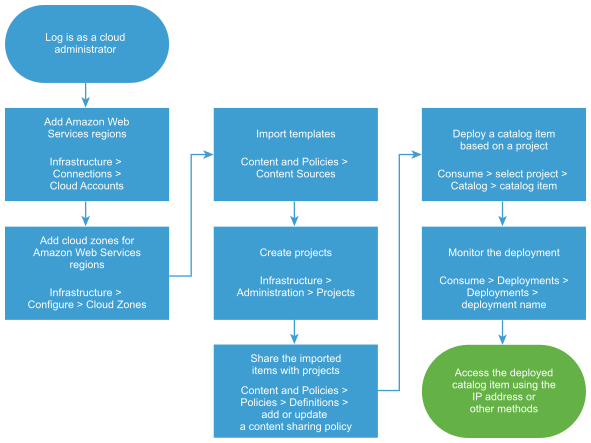
As a cloud administrator, you can populate the Automation Service Broker catalog with Amazon CloudFormation templates by adding one or more Amazon S3 buckets as content sources and sharing them with project members. The templates are the specifications for the services or applications that you can deploy to Amazon Web Services.
You can only add one bucket as a content source. To add multiple buckets, you create a content source for each bucket.
After you add the templates, you entitle project members to deploy the cloud templates. At the request time, the cloud template is deployed to the cloud account region that you define when you add the content source.
Prerequisites
- Ensure that you know to name of the S3 bucket that contains your CloudFormation templates.
- If you are adding a private bucket, you must know the access key and the secret key.
- Ensure that the CloudFormation template you want to import meets the size limit. The maximum allowed size is 150KB.
Procedure
- To deploy your CloudFormation templates, you must have at least one Amazon Web Services cloud account and select the regions.
- Select .
- Click Add Cloud Account and then click Amazon Web Services.
- Enter the 20-digit Access Key ID and corresponding Secret Access Key.
- To verify the credentials, click Validate.
- Enter an account name.
Provide a name that you can identify when you share templates with projects.
- Select one or more regions in this account that you want to deploy templates to.
- Click Create.
- Define cloud zones for the Amazon Web Services cloud account regions.
- Select , and then click New Cloud Zone.
- Select the Account/region, the Name, and the Placement policy.
- Click the Compute tab and verify or modify the resources that are included in the cloud zone.
- Click Create.
- Import the templates.
- Select .
- Click New, and then click AWS CloudFormation Template.
- Enter the Name for this content source.
- Add the S3 bucket information.
- Click Validate.
If the bucket is public, the validation process verifies the name and the number of templates. If the bucket is private, the validation process verifies the name, the keys, and the number of templates.
- Select the Deployment Target Amazon Web Services cloud account and a region.
- Click Create and Import.
- Add a project so that you can share the templates with project members.
- In Automation Service Broker, select , and then click New Project.
- Enter the project information on the Summary tab.
- Click the Users tab and then click Add Users.
To add project users, the individuals or the groups must already be active service organization users.
- If this project supports only CloudFormation templates, ignore the Provisioning tab.
CloudFormation templates are deployed to the target account and region that you defined when you imported the templates. If the project members can deploy other templates or content, you must add the target cloud zones for the content to the project.
- Click Create.
The new project is added to your projects. It is also added to your associated
Automation Assembler instance. If the project is for VMware Cloud Templates, you can add cloud zones in
Automation Assembler. If the project is for templates, you do not need to add cloud zones.
- Share the imported templates with a project.
If you want to share the templates with more than one project, you must create a separate content sharing policy for each project.
- Select , and create a new content sharing policy.
- Enter a name for the content sharing policy.
- In the Scope list, select the project that includes the users who should be able to deploy the templates.
- In the Content sharing section, click Add Items, and then select one or more Amazon Web Services content sources to share with the project.
- In the Users section, select the users and user groups that you want to have access to the content.
- Click Create.
The templates are added to the catalog where the project members can request them.
- Verify that the template is available in the catalog to the members of the selected projects.
- Click the Consume tab.
- In the Projects drop-down menu, select the project with which you shared the CloudFormation template.
You can select multiple projects.
- On the Catalog page, locate the imported CloudFormation template, and review the projects to ensure that the project you configured is included.
- Click Request and provide any required information.
- Click Submit.
The provisioning process begins and the Deployments page opens with your current request at the top.
- Monitor the provisioning process to ensure successful deployment.
- Select and locate your deployed catalog item.
- Monitor the card status until it is successful.
Results
The templates are imported into Automation Service Broker and shared in the catalog.


