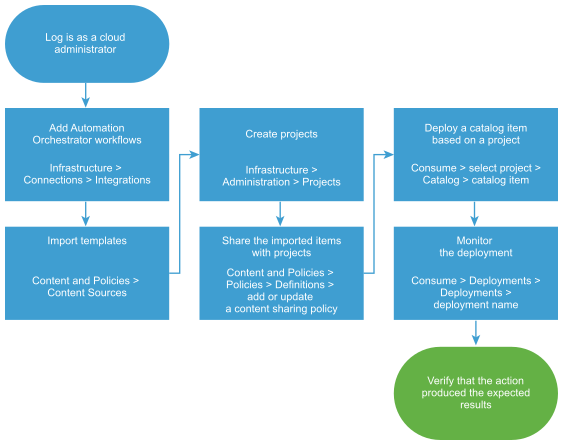
As a cloud administrator, you can add VMware Aria Automation Orchestrator workflows to the catalog. The workflows are created in Automation Orchestrator to accomplish a simple or complex task.

In addition to the regular input parameters, the workflows can include composite types as input parameters.

Automation Orchestrator setup workflow diagram.

Prerequisites

  • Verify that you have Automation Orchestrator workflows that can perform required tasks. See Managing Workflows.

Procedure

  1. If you do not have a VMware Aria Automation Orchestrator integration configured in Automation Assembler, you can add the integration in Automation Service Broker.
    1. Select Infrastructure > Connections > Integrations.
    2. Click Add Integration and then click Orchestrator.
    3. Enter a name that identifies this instance when you create the content source.
    4. Enter the URL for your Automation Orchestrator instance.
    5. Click Validate.
    6. Click Add.
  2. Import the workflow.
    1. Select Content and Policies > Content Sources.
    2. Click New, and then click Orchestrator.
    3. Enter the Name for this content source so that you can identify it when you share the content.
    4. Click Add and select the workflows that you want to make available in Automation Service Broker.
    5. Click Create and Import.
  3. Share the imported workflow with a project.
    1. Select Content and Policies > Policies > Definitions, and create a new content sharing policy.
    2. Enter a name for the content sharing policy.
    3. In the Scope list, select the project that includes the users who should be able to deploy the workflows.
    4. In the Content sharing section, click Add Items and then select one or more workflows to share with the project members.
      You can select all the items imported from a content source or you can select individual items. To select only particular workflows, select All Content in the Content Sources drop-down menu.
    5. In the Users section, select the users and user groups that you want to have access to the content.
    6. Click Create.
  4. Verify that the workflow is available in the catalog to members of the selected project.
    1. Click the Consume tab.
    2. In the Projects drop-down menu, select the project with which you shared the workflow.

      You can select multiple projects.

    3. On the Catalog page, locate the imported workflow, and review the projects to ensure that the project you configured is included.
    4. Click Request and provide any required information.
    5. Click Submit.
    The provisioning process begins and the Deployments page opens with your current request at the top.
  5. Monitor the provisioning process to ensure that the workflow runs successfully.
    1. Select Deployments > Deployments and locate your deployed request.
    2. Monitor the card status until it is successful.

Results

The Automation Orchestrator workflows are imported into Automation Service Broker and shared in the catalog.

What to do next