


As a cloud administrator using VMware Aria Automation for the first time, you can use the Launchpad in Automation Assembler to quickly set up a cloud account, add items to the Automation Service Broker catalog, and apply a lease policy to the catalog items. You can then use the dashboard on the Home tab to review usage and consumption details about your organization.

What does the Launchpad do
- Add a vCenter cloud account. Cloud accounts are the credentials that are used to collect data from and deploy resources to your vCenter instance.
- Share content in the Automation Service Broker catalog.
- Create a lease policy. Lease policies control how long a deployment is active.
When you run the Launchpad for the first time, you start by adding a cloud account. You can then perform the procedures as needed and in any order.
Once you complete the Launchpad, you can continue to use it whenever you need to add a cloud account, add catalog items, or create a lease policy quickly. If you want to revisit any of the procedures, they also appear as quick links at the top of the Home page.
How do I use the Home page dashboard
You use the Home page dashboard to view a summary of your VMs, deployments, and other inventory, such as cloud accounts, cloud zones, and projects, that are currently managed by VMware Aria Automation.
Clicking the numbers in the dashboard widgets takes you to the respective pages in Automation Assembler. For example, click the VMs count in the Cloud Accounts & VMs widget to view a full list of discovered virtual machines.
You can use the Notifications widget to track and manage approval requests for deployments or day 2 actions, deployment status updates, and expiring deployment leases. For more information about notifications, see Send email notifications to Automation Service Broker users.
Add a vCenter cloud account
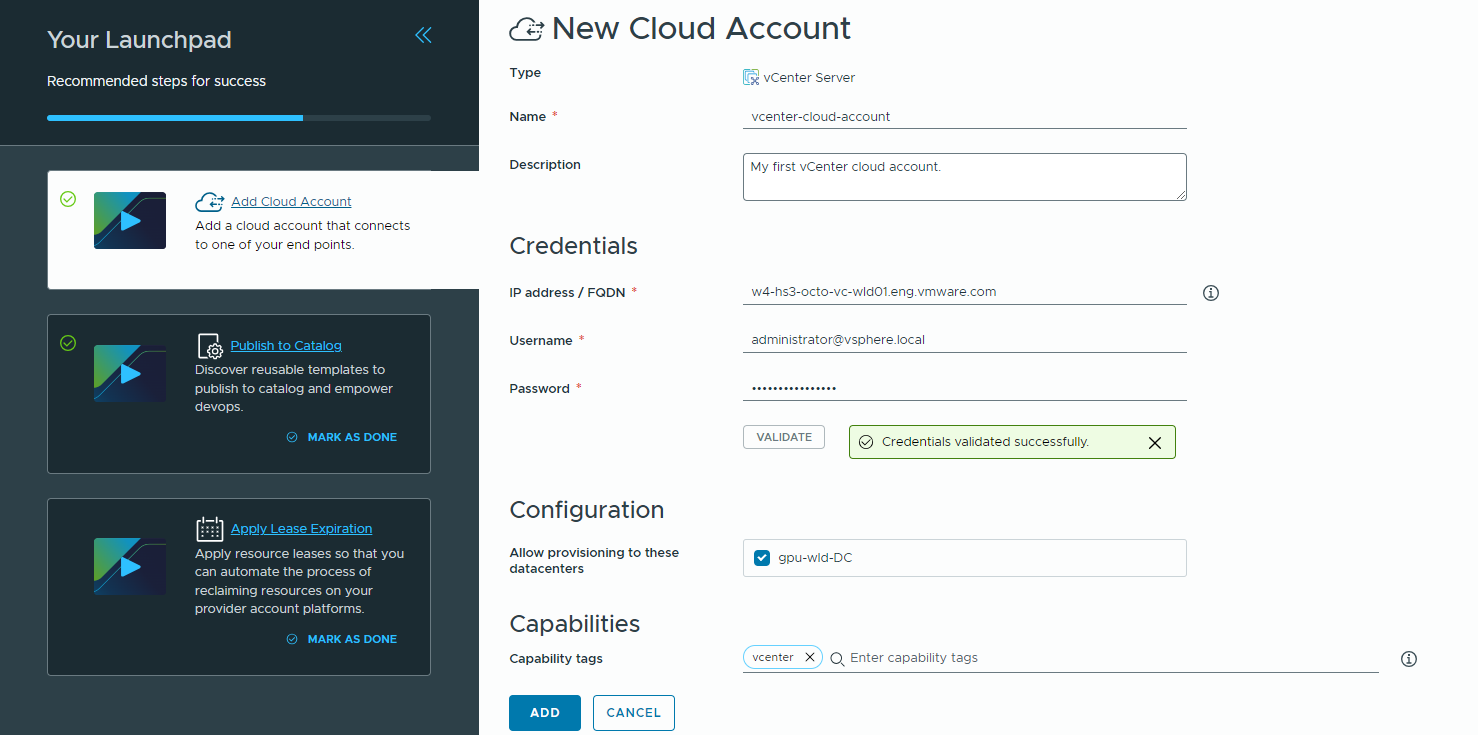
- Navigate to the Home tab in Automation Assembler.
- On the Add Cloud Account card, click Add cloud account.
- Enter a name and description for the cloud account.
- Provide credentials.
- Enter the vCenter server host IP address or fully-qualified domain name.
- Enter your vCenter server administrator username and password.
- Click Validate.
- If you need to add tags to support a tagging strategy, enter capability tags.
You can use tags to distinguish between multiple vCenter cloud accounts when designing a template.
You can add or remove capability tags later. See How do I use tags to manage Automation Assembler resources and deployments and Creating a tagging strategy.
- Click Add.
You added a vCenter cloud account. To view your cloud accounts, click the green banner in the Launchpad.
Publish content to the Automation Service Broker catalog
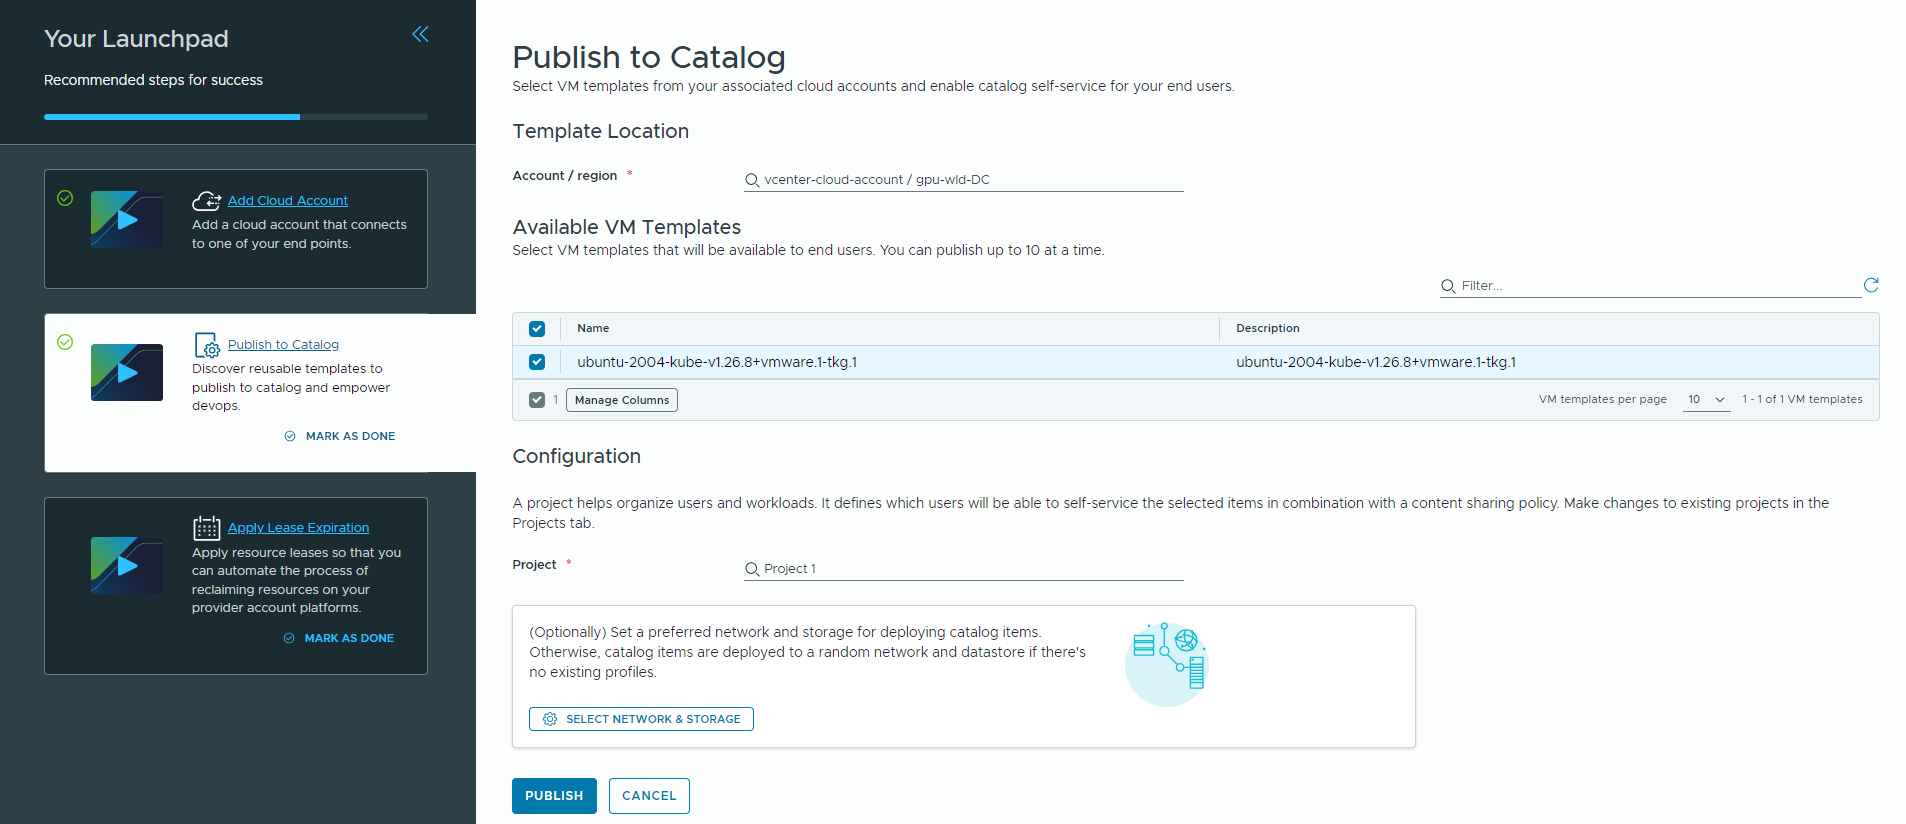
- Click the Publish to Catalog card.
- Select a cloud account.
- Select the VM templates that you want to make available to your users.
You can select up to 10 VM templates at a time. You can select from VM templates that are associated with the cloud account.
- Select a project.
If no projects exist, you can create one in this step.
The project links your users with cloud account regions, so that they can deploy application templates with networks and storage resources to your vCenter instance.
- (Optional) Set a preferred network and storage for deploying catalog items.
If you don't set a preference, catalog items are deployed to the network and storage profile that are configured for the cloud zone. If no network and storage profile exist in the cloud zone, then the catalog items are deployed at random.
The selected network and storage must be in the same cluster. Otherwise, the VM template will not provision.
You added VM templates to the Automation Service Broker catalog where users from your project can request them. To view the catalog, click the green banner in the Launchpad.
Create a lease expiration policy for deployments

- Click the Apply Lease Expiration card.
- Enter a name and description for the lease policy.
- Define the lease.
- Maximum lease is the number of days that the deployment resources are active without being renewed. If they are not renewed, the lease expires and the deployment is destroyed. If a grace period is specified, the user can renew the lease for up to the same number of days that the lease has been active.
- Grace period is the number of days the user has to renew an expired lease before the deployment is destroyed. If you don't define a grace period, it defaults to 1 day.
- Select a project.
If no projects exist, you can create one in this step. The project links your users with cloud account regions, so that they can deploy application templates with networks and storage resources to your vCenter instance.
The deployments that are associated with the specified project are managed based on the defined lease. Other projects are not affected.
- To preview which resources in the selected project the lease policy will impact, click Preview.
- Click Create.
The lease policy is applied to deployments. You can click the green banner to access your lease policy.
