


As a cloud or project administrator, you can create an individual naming template in each Automation Assembler project.
- For more information about enrolling in to the global templates, see Custom naming deployed resources in Automation Assembler.
- For more information about creating global custom naming templates, see Create global custom naming for deployed resources in Automation Assembler.
${project.name}-${resource.siteCode}-${resource.costCenter}-${endpoint.name}-${######} The identifier, provided in the template as
${######}, shows a six digit identifier. The identifier is a counter that ensures uniqueness. The counter is global for the organization and increments across all projects, not only the current project. When you have multiple projects, do not expect a sequence from 000123 to 000124 for deployments in you current project. You can expect an increment from 000123 to 000127.
All resource names must be unique. To ensure uniqueness, use the incremental number property. The numbers increment for all deployments, including deployments that Automation Assembler names. As your system becomes more robust, and because the system applies custom names to many resource types, the numbering can appear random, but the values still ensure uniqueness. The numbers also increment when you run a test deployment.
The following list is a sample of where the custom names are applied. The list is not meant to be definitive.
| Resource Group | Resource Types |
|---|---|
| Virtual machines |
|
| Load balancers |
|
| Networks |
|
| Security groups |
|
| Disks |
|
| NSX |
|
| Microsoft Azure |
|
In addition to the examples provided here, you can also add the user name, the image that is used, other built-in options, and simple strings. As you build the template, hints regarding possible options are provided.
Remember that some of the values you see are only use case examples. You won't be able to use them letter-by-letter in your environment. Think about where you would make your own substitutions, or extrapolate from the example values, in order to fit your own cloud infrastructure and deployment management needs.
Prerequisites
- Verify that you know the naming convention that you want to use for deployments from a project.
- This procedure assumes you have or can create a simple cloud template that you use to test your custom host prefix naming.
Procedure
- On the Provisioning tab, locate the Custom Properties section and create the properties for the site code and cost center values.
This is where you replace the values you see here with ones pertinent to your environment.
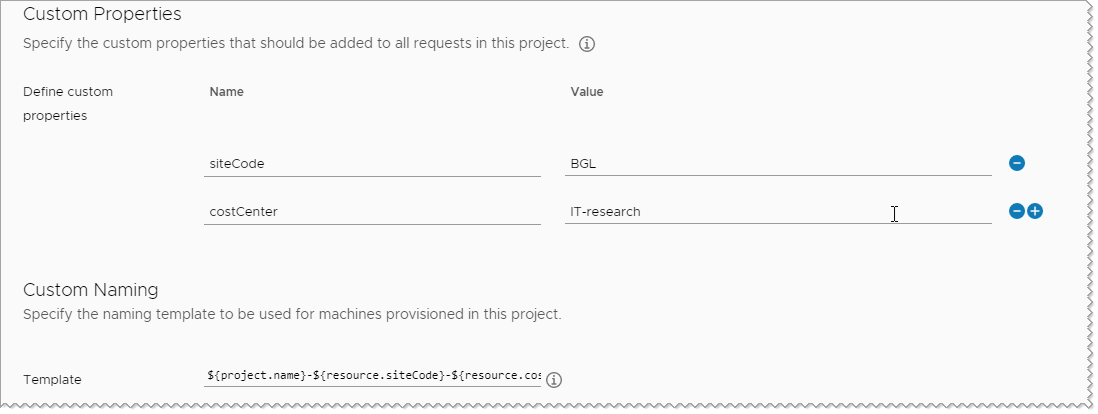
- Create a custom property with the name siteCode and the value BGL.
- Add another custom property with the name costCenter and the value IT-research.
- Deploy a cloud template associated with the project to verify that the custom name is applied to the resource.
- Click the Design tab, and then click a cloud template associated with the project.
- Deploy the cloud template.
The Deployments page opens, showing your deployment in process.
- When deployment is completed, click the deployment name.
- On the Topology tab, notice that your custom name is the resource name in the right pane.

What to do next
Create custom naming templates for your other projects.
