


Automation Pipelines provides a Jenkins plug-in, which triggers Jenkins jobs that build and test your source code. The Jenkins plug-in runs test cases, and can use custom scripts.
To run a Jenkins job in your pipeline, you use a Jenkins server that is on-premises or cloud-based, and add the Jenkins endpoint in Automation Pipelines. Then, you create a pipeline and add a Jenkins task to it.
When you use the Jenkins task and a Jenkins endpoint in Automation Pipelines, you can create a pipeline that supports multi-branch jobs in Jenkins. The multi-branch job includes individual jobs in each branch of a Git repository. When you create pipelines in Automation Pipelines that support multi-branch jobs:
- The Jenkins task can run Jenkins jobs that reside in multiple folders on the Jenkins server.
- You can override the folder path in the Jenkins task configuration so that it uses a different folder path, which overrides the default path defined in the Jenkins endpoint in Automation Pipelines.
- Multi-branch pipelines in Automation Pipelines detect Jenkins job files of type .groovy in a Git repository or a GitHub repository, and start creating jobs for each branch that it scans in the repository.
- You can override the default path defined in the Jenkins endpoint with a path provided in the Jenkins task configuration, and run a job and pipeline that is associated with any branch inside a main Jenkins job.
Prerequisites
- Set up a Jenkins server that runs version 1.561 or later. The server can be either on-premises or cloud-based.
- If you use a Jenkins server on-premises, verify that you can access VMware Aria Automation Assembler where you can add a cloud proxy. For an example, see Setting up Automation Pipelines to model my release process.
- Verify that you are a member of a project in Automation Pipelines. If you are not a member, ask a Automation Pipelines administrator to add you as a member of a project. See How do I add a project in Automation Pipelines.
- Verify that a job exists on the Jenkins server so that your pipeline task can run it.
Procedure
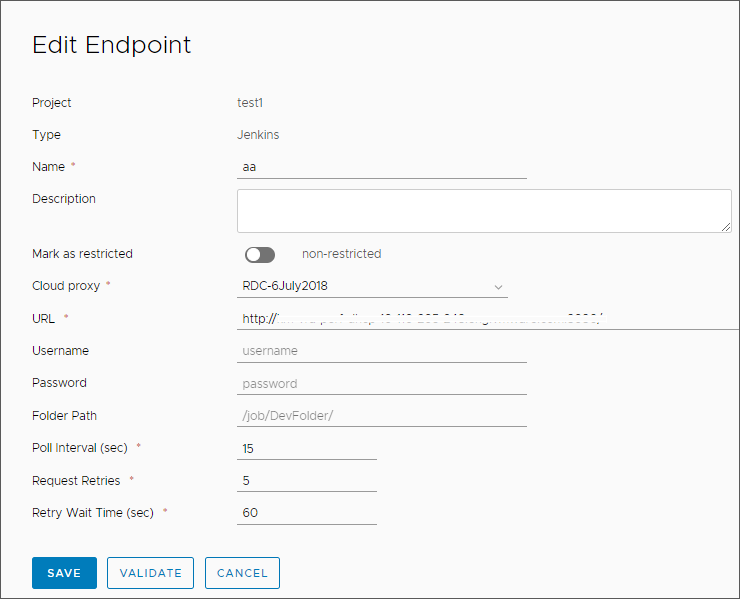
- Add and validate a Jenkins endpoint.
- Click .
- Select a project, and for the type of endpoint select Jenkins. Then, enter a name and a description.
- If this endpoint is a business-critical component in your infrastructure, enable Mark as restricted.
- If this endpoint is on-premises, select a cloud proxy that connects it to Automation Pipelines.
- Enter the URL for the Jenkins server.
- Enter the user name and password to log in to the Jenkins server. Then, enter the remaining information.
Table 1. Remaining information for the Jenkins endpoint Endpoint entry Description Folder Path Path for the folder that groups your jobs. Jenkins can run all jobs in the folder. You can create sub folders. For example: - folder_1 can include job_1
- folder_1 can include folder_2, which can include job_2
When you create an endpoint for folder_1, the folder path is job/folder_1, and the endpoint only lists job_1.
To obtain the list of jobs in the child folder named folder_2, you must create another endpoint that uses the folder path as /job/folder_1/job/folder_2/.
Folder Path for multi-branch Jenkins jobs To support multi-branch Jenkins jobs, in the Jenkins task, you enter the full path that includes the Jenkins server URL and the complete job path. When you include a folder path in the Jenkins task, that path overrides the path that appears in the Jenkins endpoint. With the custom folder path in the Jenkins task, Automation Pipelines only displays jobs that are present in that folder. - For example: https://server.yourcompany.com/job/project
- If the pipeline must also trigger the main Jenkins job, use: https://server.yourcompany.com/job/project/job/main
URL Host URL of the Jenkins server. Enter the URL in the form of protocol://host:port. For example: http://192.10.121.13:8080 Polling Interval Interval duration for Automation Pipelines to poll the Jenkins server for updates. Request Retry Count Number of times to retry the scheduled build request for the Jenkins server. Retry Wait Time Number of seconds to wait before retrying the build request for the Jenkins server. - Click Validate, and verify that the endpoint connects to Automation Pipelines. If it does not connect, correct any errors, then click Save.
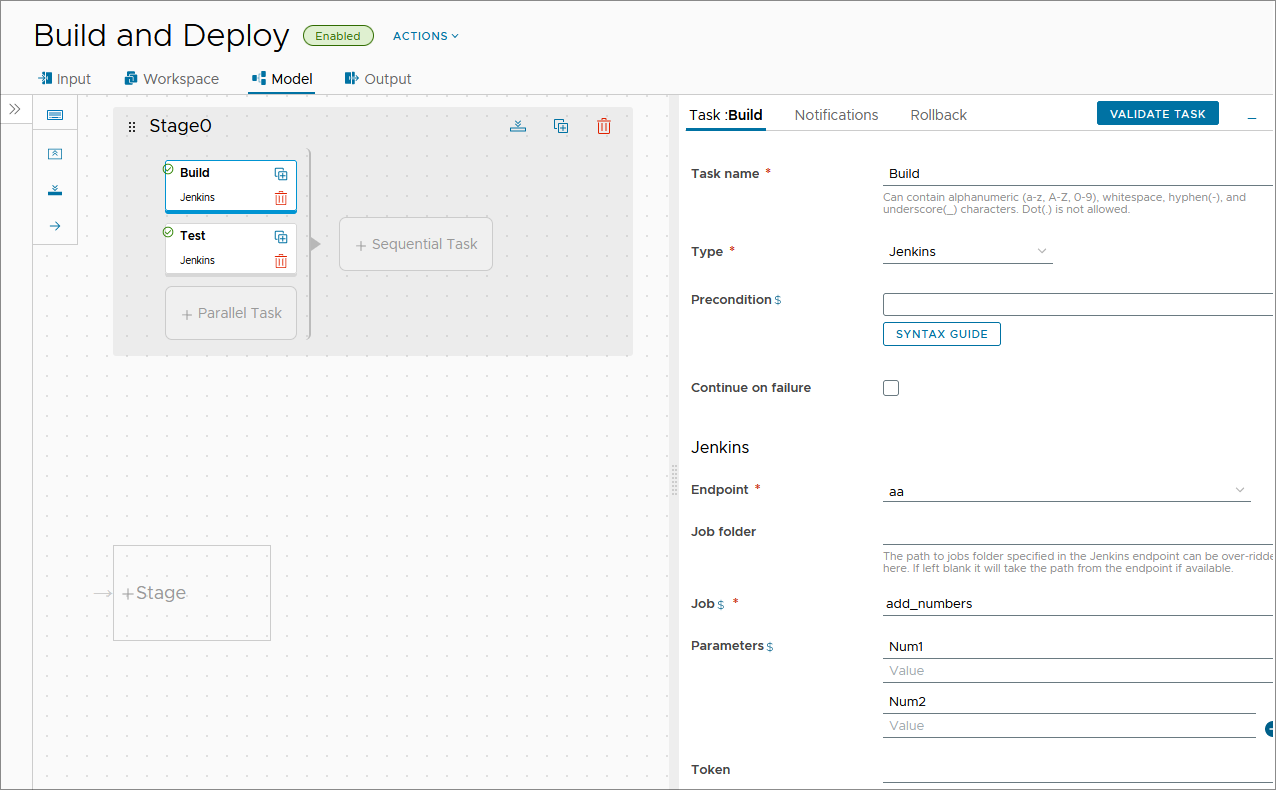
- To build your code, create a pipeline, and add a task that uses your Jenkins endpoint.
- Click .
- Click the default stage.
- In the Task area, enter a name for the task.
- Select the task type as Jenkins.
- Select the Jenkins endpoint that you created.
- From the drop-down menu, select a job from the Jenkins server that your pipeline will run.
- Enter the parameters for the job.
- Enable and run your pipeline, and view the pipeline execution.
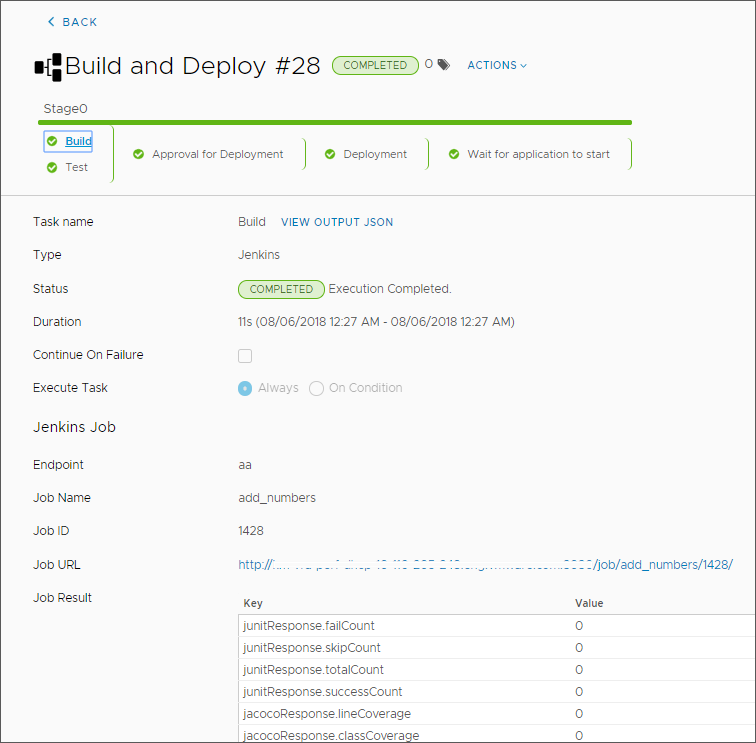
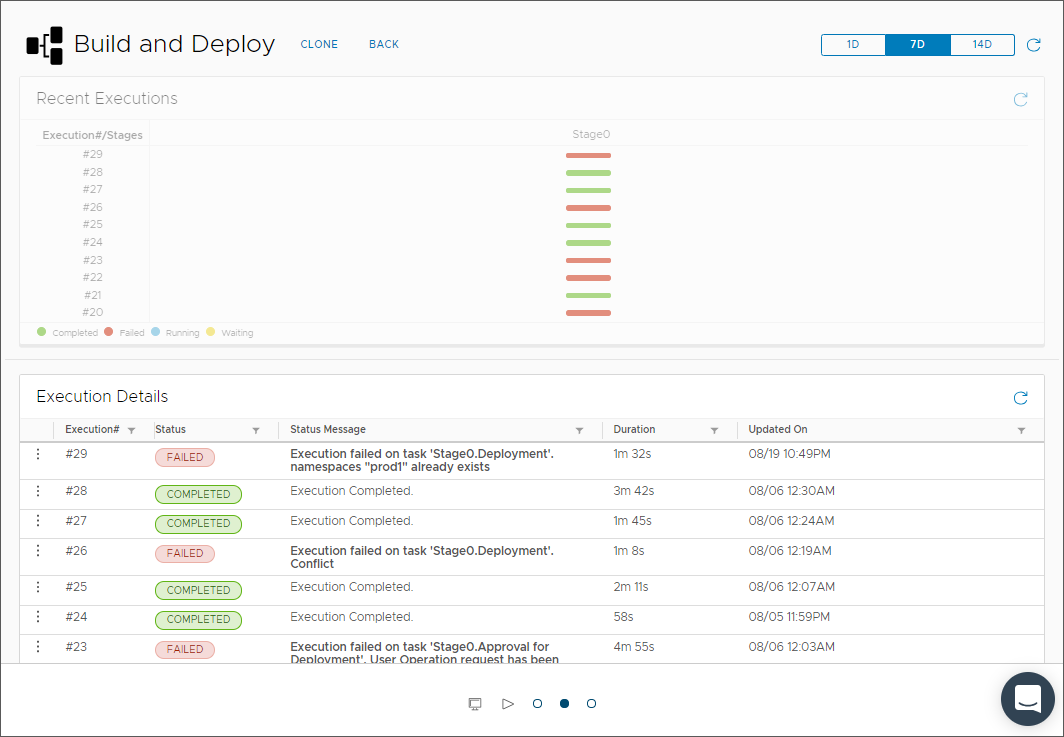
- Look at the execution details and status on the pipeline dashboard.
You can identify any failures, and why it failed. You can also see trends about the pipeline execution durations, completions, and failures.
Results
Congratulations! You integrated Automation Pipelines with Jenkins by adding an endpoint, creating a pipeline, and configuring a Jenkins task that builds your code.
Example: Example YAML for a Jenkins build task
For the type of Jenkins build task used in this example, the YAML resembles the following code, with notifications turned on:
test:
  type: Jenkins
  endpoints:
    jenkinsServer: jenkins
  input:
    job: Add two numbers
    parameters:
      Num1: '23'
      Num2: '23'
What to do next
Review the other sections to learn more. See Connecting Automation Pipelines to endpoints.
