


Binding a pipeline task means that you create a dependency for the task when the pipeline runs. You can create a binding for a pipeline task in several ways. You can bind a task to another task, bind it to a variable and expression, or bind it to a condition.
How to apply dollar bindings to cloud template variables in a cloud template task
You can apply dollar bindings to cloud template variables in a Automation Pipelines pipeline cloud template task. The way you modify the variables in Automation Pipelines depends on the coding of the variable properties in the cloud template.
If you must use dollar bindings in a cloud template task, but the current version of the cloud template that you're using in the cloud template task doesn't allow it, modify the cloud template in Automation Assembler and deploy a new version. Then, use the new cloud template version in your cloud template task, and add the dollar bindings where needed.
To apply dollar bindings on the types of properties that the Automation Assembler cloud template provides, you must have the correct permissions.
- You must have the same role as the person who created the cloud template deployment in Automation Assembler.
- The person who models the pipeline and the person who runs the pipeline might be two different users and might have different roles.
- If a developer has the Automation Pipelines Executor role and models the pipeline, the developer must also have the same Automation Assembler role of the person who deployed the cloud template. For example, the required role might be Automation Assembler administrator.
- Only the person who models the pipeline can create the pipeline and create the deployment because they have permission.
To use an API token in the cloud template task:
- The person who models the pipeline can give an API token to another user who has the Automation Pipelines Executor role. Then, when the Executor runs the pipeline, it uses the API token and the credentials that the API token creates.
- When a user enters the API token in the cloud template task, it creates the credentials that the pipeline requires.
- To encrypt the API token value, click Create Variable.
- If you don't create a variable for the API token, and use it in the cloud template task, the API token value appears in plain text.
To apply dollar bindings to cloud template variables in a cloud template task, follow these steps.
You start with a cloud template that has input variable properties defined, such as integerVar, stringVar, flavorVar, BooleanVar, objectVar, and arrayVar. You can find the image properties defined in the resources section. The properties in the cloud template code might resemble:
formatVersion: 1
inputs:
  integerVar:
    type: integer
    encrypted: false
    default: 1
  stringVar:
    type: string
    encrypted: false
    default: bkix
  flavorVar:
    type: string
    encrypted: false
    default: medium
  BooleanVar:
    type: boolean
    encrypted: false
    default: true
  objectVar:
    type: object
    encrypted: false
    default:
      bkix2: bkix2
  arrayVar:
    type: array
    encrypted: false
    default:
      - '1'
      - '2'
resources:
  Cloud_Machine_1:
    type: Cloud.Machine
    properties:
      image: ubuntu
      flavor: micro
      count: '${input.integerVar}'
You can use dollar sign variables ($) for image and flavor. For example:
resources:
  Cloud_Machine_1:
    type: Cloud.Machine
    properties:
      input: '${input.image}'
      flavor: '${input.flavor}'
To use a cloud template in a Automation Pipelines pipeline, and add dollar bindings to it, follow these steps.
- In Automation Pipelines, click .
- Add an Automation Templates task to the pipeline.
- In the template task, for Template source select Automation Assembler, enter the cloud template name, and select the cloud template version.
- Notice that you can enter an API token, which provides credentials for the pipeline. To create a variable that encrypts the API token in the cloud template task, click Create Variable.
- In the Parameter and Value table that appears, notice the parameter values. The default value for flavor is small and the default value for image is ubuntu.
- Let's say that you must change the cloud template in Automation Assembler. For example, you:
- Set the flavor so that it uses a property of type array. Automation Assembler allows comma-separated values for Flavor when the type is array.
- Click Deploy.
- On the Deployment Type page, enter a deployment name, and select the version of the cloud template.
- On the Deployment Inputs page, you can define one or more values for Flavor.
- Notice that the Deployment inputs include all the variables defined in your cloud template code, and appear as defined in the cloud template code. For example:
Integer Var,String Var,Flavor Var,Boolean Var,Object Var, andArray Var.String VarandFlavor Varare string values, andBoolean Varis a check box. - Click Deploy.
- In Automation Pipelines, select the new version of the cloud template, and enter values in the Parameter and Value table. Cloud templates support the following types of parameters, which enable Automation Pipelines bindings by using dollar sign variables. Slight differences exist between the user interface of the Automation Pipelines cloud template task and the user interface of the Automation Assembler cloud template. Depending on the coding of a cloud template in Automation Assembler, entering values in the cloud template task in Automation Pipelines might not be allowed.
- For flavorVar, if the cloud template defined the type as string or array, enter a string or a comma-separated value array. An example array resembles test, test.
- For BooleanVar, in the drop-down menu select true or false. Or, to use a variable binding, enter $ and select a variable binding from the list.
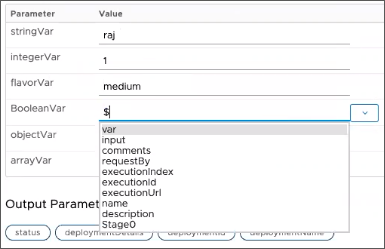
- For objectVar, enter the value with curly brackets and quotation marks in this format: {"bkix":"bkix":}.
- The objectVar will be passed to the cloud template, and can be used in various ways depending on the cloud template. It allows a string format for a JSON object, and you can add key-value pairs as comma-separated values in the key-value table. You can enter plain text for a JSON object, or a key-value pair as a normal stringified format for JSON.
- For arrayVar, enter the comma-separated input value as an array in this format: ["1","2"].
- In the pipeline, you can bind an input parameter to an array.
- Click the Input tab.
- Enter a name for the input. For example, arrayInput.
- In the Parameter and Value table, click in arrayVar and enter ${input.arrayInput}.
- After you save the pipeline and enable it, when the pipeline runs, you must provide an array input value. For example, enter ["1","2"] and click Run.
Now you have learned how to use dollar sign ($) variable bindings in a cloud template in a Automation Pipelines pipeline cloud template task.
How to pass a parameter to a pipeline when it runs
You can add input parameters to your pipeline to have Automation Pipelines pass them to the pipeline. Then, when the pipeline runs, a user must enter the value for the input parameter. When you add output parameters to your pipeline, the pipeline tasks can use the output value from a task. Automation Pipelines supports using parameters in many ways that support your own pipeline needs.
For example, to prompt a user for the URL to their Git server when a pipeline with a REST task runs, you can bind the REST task to a Git server URL.
To create the variable binding, you add a URL binding variable to the REST task. When the pipeline runs and reaches the REST task, a user must enter their URL to the Git server. Here's how you would create the binding:
- In your pipeline, click the Input tab.
- To set the parameter, for Auto inject parameters click Git.
The list of Git parameters appears, and includes GIT_SERVER_URL. If you must use a default value for the Git server URL, edit this parameter.
- Click Model, and click your REST task.
- On the Task tab, in the URL area, enter $, then select input and GIT_SERVER_URL.
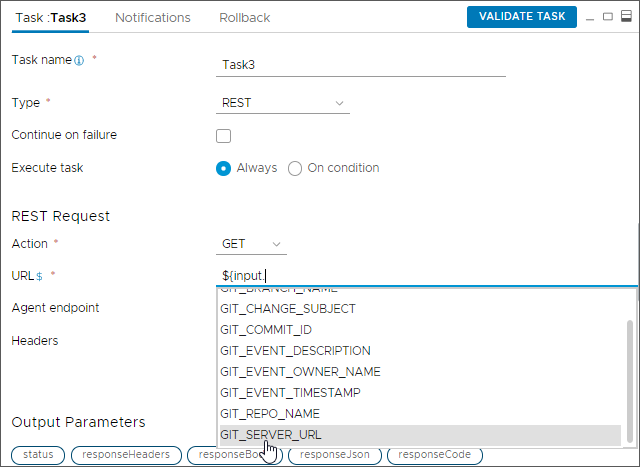
The entry resembles: ${input.GIT_SERVER_URL}
- To verify the integrity of the variable binding for the task, click Validate Task.
Automation Pipelines indicates that the task validated successfully.
- When the pipeline runs the REST task, a user must enter the URL of the Git server. Otherwise, the task does not finish running.
How to bind two pipeline tasks by creating input and output parameters
When you bind tasks together, you add a binding variable to the input configuration of the receiving task. Then, when the pipeline runs, a user replaces the binding variable with the required input.
To bind pipeline tasks together, you use the dollar sign variable ($) in the input parameters and output parameters. This example shows you how.
Let's say you need your pipeline to call a URL in a REST task, and output a response. To call the URL and output the response, you include both input and output parameters in your REST task. You also need a user who can approve the task, and include a User Operations task for another user who can approve it when the pipeline runs. This example shows you how to use expressions in the input and output parameters, and have the pipeline wait for approval on the task.
- In your pipeline, click the Input tab.
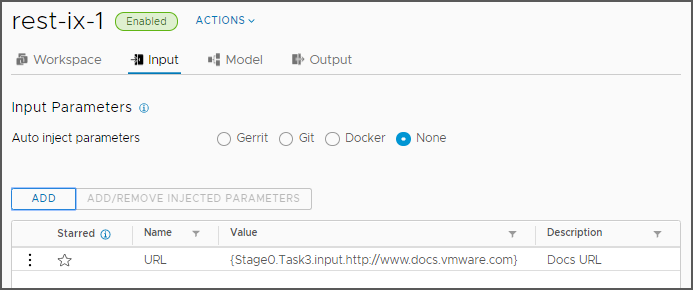
- Leave the Auto inject parameters as None.
- Click Add, and enter the parameter name, value, and description, and click OK. For example:
- Enter a URL name.
- Enter the value:
{Stage0.Task3.input.http://www.docs.vmware.com} - Enter a description.
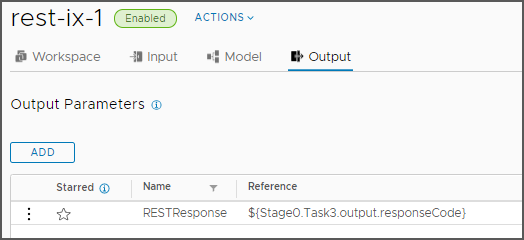
- Click the Output tab, click Add, and enter the output parameter name and mapping.
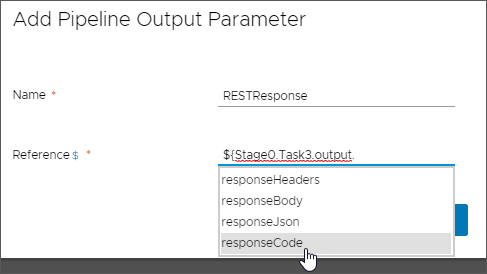
- Enter a unique output parameter name.
- Click in the Reference area, and enter
$. - Enter the task output mapping by selecting the options as they pop up. Select the Stage0, select Task3, select output, and select responseCode. Then, click OK.
- Save your pipeline.
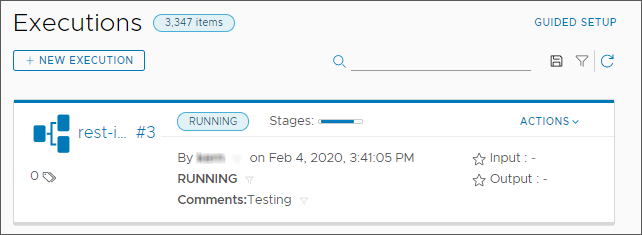
- From the Actions menu, click Run.
- Click .
- Click the pipeline execution, and examine the input parameters and output parameters that you defined.

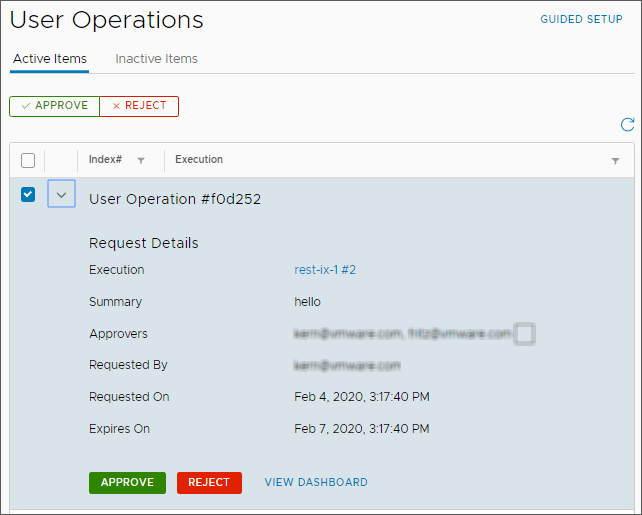
- To approve the pipeline, click User Operations, and view the list of approvals on the Active Items tab. Or, stay in the Executions, click the task, and click Approve.
- To enable the Approve and Reject buttons, click the check box next to the execution.
- To see the details, expand the drop-down arrow.
- To approve the task, click APPROVE, enter a reason, and click OK.
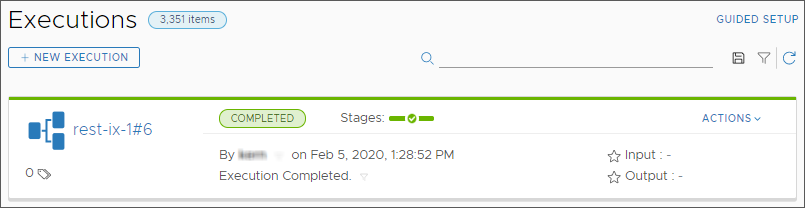
- Click Executions and watch the pipeline continue.
- If the pipeline fails, correct any errors, then save the pipeline and run it again.
How do I learn more about variables and expressions
To see details about using variables and expressions when you bind pipeline tasks, see What variables and expressions can I use when binding pipeline tasks in Automation Pipelines.
To learn how to use the pipeline task output with a condition variable binding, see How do I use variable bindings in a condition task to run or stop a pipeline in Automation Pipelines.
