


This section explains the process to convert a single-node deployment to a three-node cluster.
In this procedure, the Avi Load Balancer Controller node that is already deployed in the singe-node deployment is referred to as the incumbent Avi Load Balancer Controller.
To convert a single-node Avi Load Balancer Controller deployment into a three-node deployment, follow the steps below:
Install a single new Controller node. During installation, configure the following settings:
Node management IP address
Gateway address
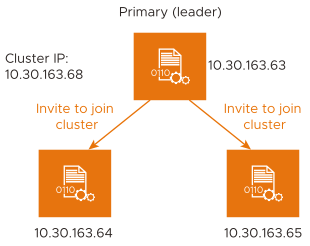
Connect the management interface of each new Controller node to the same network as the incumbent Controller. After the incumbent Controller detects the two new Controller nodes, the incumbent Controller becomes the primary (leader) Controller node for the three-node cluster.
Use a web browser to navigate to the management IP address of the primary (leader) Controller node.
Navigate to and click Edit. The Edit Cluster window appears.
In the Controller Cluster IP field, specify the shared IP address for the Controller cluster.
In the Public IP Address or Host Name field, specify the management IP address of the new Controller node.
Note:To configure cluster in AWS Cloud, each node of the cluster requires admin account credentials.
Password for the admin account is required for each node of the cluster for configuring cluster in AWS Cloud.
After these steps, the incumbent Controller becomes the primary (leader) for the cluster and invites the other Controllers to the cluster as members.
The Avi Load Balancer then performs a warm reboot of the cluster. This process can take two or three minutes. After the reboot, the configuration of the primary (leader) Controller is synchronized to the new member nodes once the cluster appears online.
To know more about cluster HA, see the links below:
For more information on how to Enable Per-app SE mode for a Service Engine Group, see Per-app SE Mode topic in the VMware Avi Load BalancerConfiguration Guide.
