


This section discusses the steps to configure True Client IP in Avi Load Balancer.
Configuring True Client
Starting with Avi Load Balancer 22.1.3, True Client IP can be enabled and configured using the UI.
To enable True Client IP from the UI,
Navigate to .
Create or edit an Application Profile of type HTTP.
Select the Enable True Client IP check box.
Select the Index Direction to define which direction the client IP index must be counted from.
Enter the index of the entry to be picked from the specified header’s values. The default value is 1 and the first IP value from the user-specified header in the direction specified in the Index Direction will be picked if the value is 1. On increasing the Index in Header value, the IP that corresponds to the index value will be picked. For example, if the Index in Header is 3, the third IP from the specified direction will be picked.
Under Headers to Find True Client IP, click Add and enter the custom header. If no custom header is entered and if the Enable True Client IP check box is selected, the X-Forwarded-For header, if available, is used.
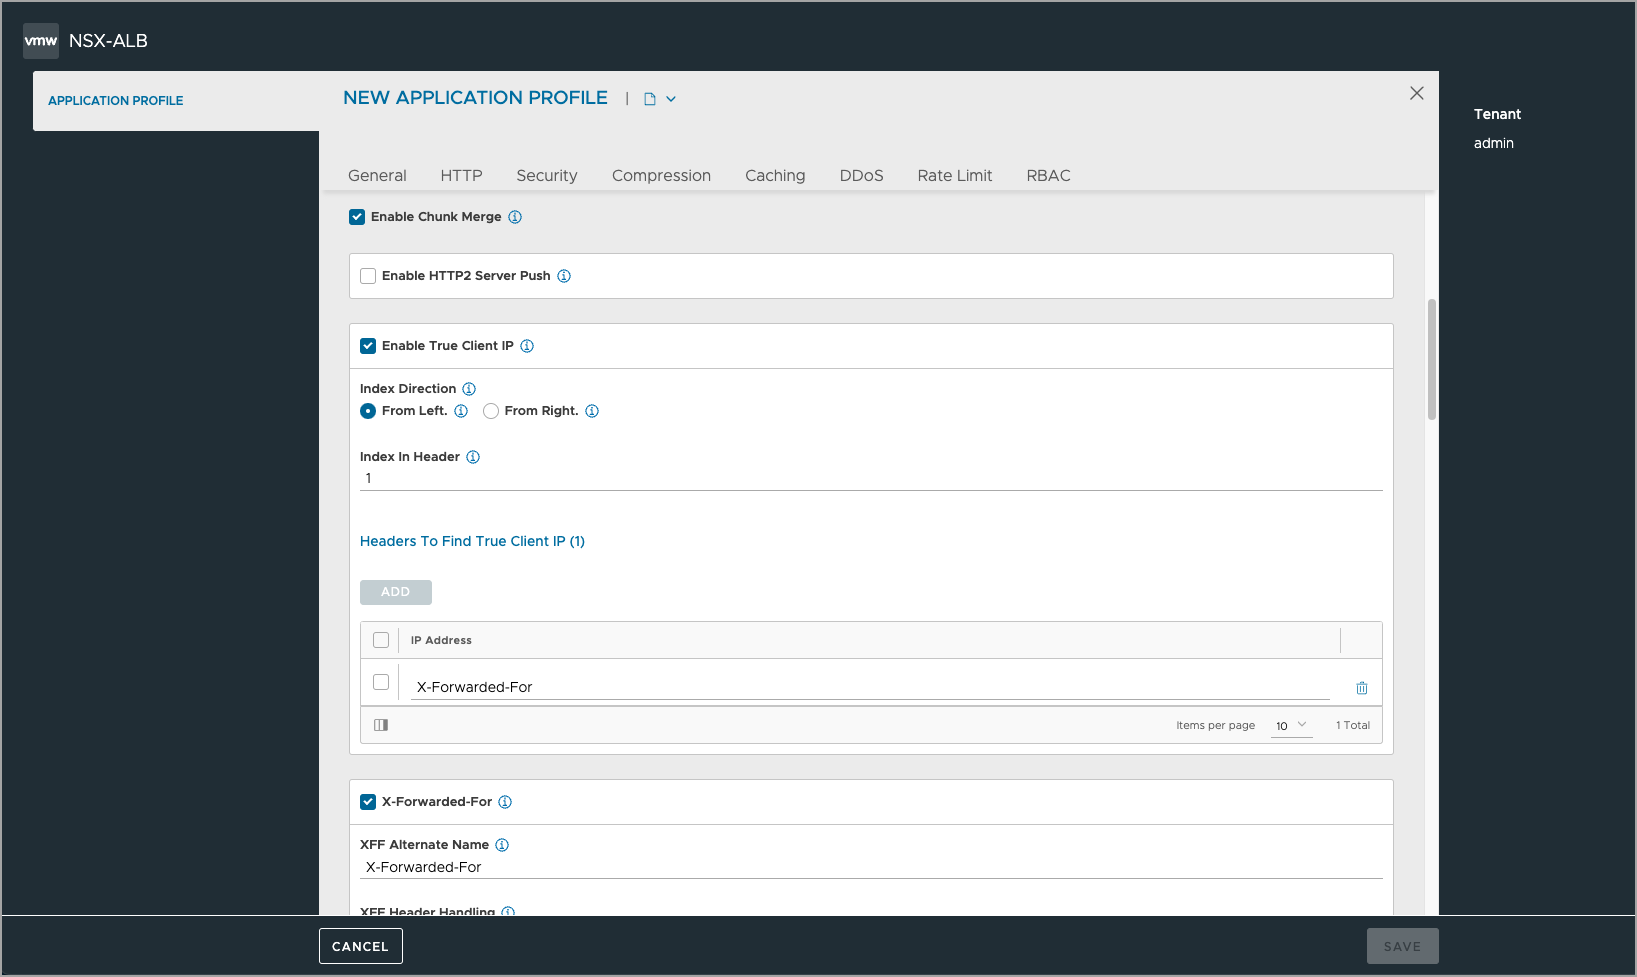
Configure the other fields and click Save.
Follow the steps below to configure True Client IP in Avi Load Balancer using the CLI.
Enabling True Client IP
Enable the use_true_client_ip field for the desired custom HTTP profile.
Access the CLI by logging into the Avi Load Balancer Shell.
Configure the custom HTTP profile by using the following command:
configure applicationprofile <name of the custom http profile>
Enable True Client IP using the following command:
http_profile use_true_client_ip.
Configuring the Parameters
Use the following parameters with the true_client_ip parameter:
Headers(optional), define the desired HTTP header from where the client IP needs to be fetched. If not specified, by default, “X-Forwarded-For” is configured.Direction(optional), define the direction to count the IPs in the specified header value. By default, the value isLeft.Index_in_header(optional), define the position in the configured direction in the specified header’s value. By default, the value is1.
Define the parameters for True_Client_IP (header name, direction, and index in the header) as shown below:
true_client_ip headers <name of the header> <direction> <index in the header>
The valid range for true client IP index is 1-1000.
After configuring the parameters as required, save the configuration.
Use cases
The following features can be configured to use actual client IP:
HTTP Policies
HTTP Security/ Request/ Response policy match based on client IP can be configured.
DataScripts: Client IP based API, Rate limiting API
The following features are affected after enabling True Client IP:
Application Logs: Client IP (v4 and v6) in Application Log
Analytics Policy
Client Log filter match for Client IP
RUM/ Client Insights Sampling – Client IP address to check when inserting RUM script
Rate Limit based on client IP
Compression Filter based on client IP
Match based on client IP in SSO policy
Allow list based on client IP in WAF policy
WAF: Modsec Rules
Allow list based on client IP in Bot Management Policy
IP Reputation
Geo Location-based Features
True Client IP in DOS Analytics Reports
Upgrade
By default, True Client IP is deactivated. Hence while upgrading the Avi Load Balancer, all instances where client IP is referred to will refer to Source IP, and no change in behavior is evident.
If True Client IP is enabled later, all the instances that refer to client IP will refer to True Client IP. To use Source IP specifically in any such places, explicitly change the configuration.
Examples
True Client IP Configuration |
Header Parameter |
Direction Parameter |
Index Count Parameter |
Request Details |
Behavior |
|---|---|---|---|---|---|
Enabled |
X-Forwarded-For |
Left |
3 |
X-Forwarded-For:1.1.1,2.2.2.2,3.3.3.3,4.4.4.4 |
Client IP = 3.3.3.3Source IP=from layer-3 header |
Enabled |
X-Forwarded-For |
Left |
4 |
X-Forwarded-For:1.1.1,2.2.2.2,3.3.3.3,4.4.4.4 |
Client IP = 4.4.4.4Source IP=from layer-3 header |
Enabled |
X-Forwarded-For |
Left |
5 |
X-Forwarded-For:1.1.1,2.2.2.2,3.3.3.3,4.4.4.4 |
Client IP = 4.4.4.4Source IP=from layer-3 header |
Enabled |
X-Forwarded-For |
Left |
4 |
X-Forwarded-For: 1.1.1.1, 2.2.2.2, 3.3.3.3,4.4.4.4X-Forwarded-For: 10.10.10.10, 172.16.1.1,192.168.1.1 |
Client IP = 4.4.4.4Source IP=from layer-3 header |
Enabled |
True-Client-IP |
Left |
4 |
X-Forwarded-For:1.1.1,2.2.22,3.3.3.3,4.4.4.4 |
Client IP = Source IP = from layer-3 header |
Enabled |
True-Client-IP |
Left |
4 |
X-Forwarded-For: 1.1.1.1, 2.2.2.2, 3.3.3.3,4.4.4.4True-Client-IP: 10.10.10.10, 172.16.1.1, 192.168.1.1 |
Client IP = 192.168.1.1Source IP=from layer-3 header |
Not Configured (Default) |
Left |
3 |
X-Forwarded-For: 1.1.1,2.2.2.2,3.3.3.3,4.4.4.4 |
Client IP = 3.3.3.3Source IP=from layer-3 header |
|
X-Forwarded-For |
Not Configured (Default) |
3 |
X-Forwarded-For: 1.1.1,2.2.2.2,3.3.3.3,4.4.4.4 |
Client IP = 3.3.3.3Source IP=from layer-3 header |
|
X-Forwarded-For |
Left |
2 |
X-Forwarded-For: 1.1.1,2-2,3.3.3.3,4.4.4.4 |
Client IP = Source IP = from layer-3header |
|
X-Forwarded-For |
Left |
2 |
X-Forwarded-For: 1.1.1.1, 2.2.2.2, 3.3.3.3, 4.4.4.4 |
Client IP = 2.2.2.2Source IP=from layer-3 header |
|
True-Client-IP |
Left |
2 |
X-Forwarded-For: 1.1.1.1, 2.2.2.2, 3.3.3.3, 4.4.4.4 |
Client IP = Source IP = from layer-3header |
