


This section describes the configuration details of Single Node Controller.
The Avi Load Balancer Controller has a single interface, which is used for various control plane related tasks such as:
Operator access to the Controller through CLI, UI, API.
Communication between the Controller and the Service Engines.
Communication between the Controller and third party entities for automation, observability, etc.
Communication between the Controller and third party Hardware Security Modules (HSMs).
In addition, any static routes to be added to the Controller interfaces should now leverage the cluster configuration instead of /etc/network/interfaces subsystem.
These configurations will be persisted across the Controller reboot and upgrade.
This feature is supported only on the Controllers deployed in vCenter.
This feature enables the use of the secondary interface only for HSMs.
Classification
The following are the classifications to isolate the communication. The labels available are as follows:
-
MGMT: -
This signifies general management communication for the Controller access, as well as the Controller initiating communication, for instance, logging, third party API calls, and so on.
-
SE_SECURE_CHANNEL: -
This label is used to classify secure communication between the Service Engine and the Controller.
-
HSM -
This is used to classify communication between the Controller and an HSM device.
With this classification, the traffic can be moved from the default, main interface to the secondary interface, if configured.
MGMT can only be performed by the primary (eth0) interface.
The
SE_SECURE_CHANNELlabel can be moved to the secondary interface (if there are no SEs connected to the Controller). SE Creation should be done after moving this label to the secondary interface. Prior to 22.1.3,SE_SECURE_CHANNELcould only be with the primary interface (eth0).HSM can be moved to the secondary interface.
Operating Model
By default (prior to 21.1.3), the Controller is provisioned with one interface when being deployed in vCenter (during installation). Starting with version 21.1.3, the user can add multiple secondary interfaces. To add an extra interface, follow these steps:
Shut down the Controller virtual machine and add the interface via vCenter UI.
On powering on the Controller virtual machine, Avi Load Balancer will recognize all the interfaces including the secondary interfaces, and additional configuration through the Avi Load Balancer CLI can be performed.
Hotplug of interfaces (addition to the virtual machine without powering off the virtual machine) is not supported.
For the interface to be recognized within the Avi Load Balancer Controller software and further classification through labels to be performed, Avi Load Balancer ‘cluster’ configuration model should be used.
Configuration Steps for a Single Node Controller
The following are the configuration steps:
Shut down the Controller and add the new interface via the vCenter.
Power on the Controller. The new interface will be visible as eth1, while the primary interface will always be visible as eth0 in the Cluster configuration:
[admin:controller]: > show cluster

+-----------------+----------------------------------------------+

| Field           | Value                                        |

+-----------------+----------------------------------------------+

| uuid            | cluster-83e1ebf5-2c63-4690-9aaf-b66e7a7b5f08 |

| name            | cluster-0-1                                  |

| nodes[1]        |                                              |

|   name          | 10.102.64.201                                |

|   ip            | 10.102.64.201                                |

|   vm_uuid       | 00505681cb45                                 |

|   vm_mor        | vm-16431                                     |

|   vm_hostname   | node1.controller.local                       |

|   interfaces[1] |                                              |

|     if_name     | eth0                                         |

|     mac_address | 00:50:56:81:cb:45                            |

|     mode        | STATIC                                       |

|     ip          | 10.102.64.201/22                             |

|     gateway     | 10.102.67.254                                |

|     labels[1]   | MGMT                                         |

|     labels[2]   | SE_SECURE_CHANNEL                            |

|     labels[3]   | HSM                                          |

|   interfaces[2] |                                              |

|     if_name     | eth1                                         |

|     mac_address | 00:50:56:81:c0:89                            |

+-----------------+----------------------------------------------+
In the above, the second interface (eth1) has been discovered.
Configure the mode and ip details on the secondary interface:
[admin:controller]: > configure cluster

[admin:controller]: cluster> nodes index 1

[admin:controller]: cluster:nodes> interfaces index 2

[admin:controller]: cluster:nodes:interfaces> mode static

[admin:controller]: cluster:nodes:interfaces> ip 100.64.218.90/24

[admin:controller]: cluster:nodes:interfaces> labels HSM

[admin:controller]: cluster:nodes:interfaces> save

[admin:controller]: cluster:nodes> interfaces index 1

[admin:controller]: cluster:nodes:interfaces> no labels HSM

[admin:controller]: cluster:nodes:interfaces> save
In the above,
For the second interface (index 2), the IP and label has been added.
The label HSM has been removed from the primary interface (index 1).
Unconfiguring Secondary Interface for a Single Node Controller
To revert the configuration to use the primary interface only,
Remove the configuration (mode, IP, labels) from the second interface (eth1).
Add the HSM label to the primary interface (eth0).
 [admin:controller]: > configure cluster

 [admin:controller]: cluster> nodes index 1

 [admin:controller]: cluster:nodes> interfaces index 2

 [admin:controller]: cluster:nodes:interfaces> no mode

 [admin:controller]: cluster:nodes:interfaces> no ip

 [admin:controller]: cluster:nodes:interfaces> no labels HSM

 [admin:controller]: cluster:nodes:interfaces> save

 [admin:controller]: cluster:nodes> interfaces index 1

 [admin:controller]: cluster:nodes:interfaces> labels HSM

 [admin:controller]: cluster:nodes:interfaces> save

 [admin:controller]: cluster:nodes> save

 [admin:controller]: cluster> save
Configuring a Static Route
A static route can be configured for the primary as well as secondary through the Cluster configuration.
You should not edit /etc/network/interfaces file. All configurations (IP, Static Route) should be though cluster configuration.
[admin:controller]: > configure cluster

[admin:controller]: cluster> nodes index 1

[admin:controller]: cluster:nodes> static_routes

New object being created

[admin:controller]: cluster:nodes:static_routes> prefix 1.1.1.0/24

[admin:controller]: cluster:nodes:static_routes> next_hop 100.64.218.20

[admin:controller]: cluster:nodes:static_routes> route_id 1

[admin:controller]: cluster:nodes:static_routes> if_name eth1

[admin:controller]: cluster:nodes:static_routes> save

[admin:controller]: cluster:nodes> save

[admin:controller]: cluster> where

Tenant: admin

Cloud: Default-Cloud

+--------------------+----------------------------------------------+

| Field              | Value                                        |

+--------------------+----------------------------------------------+

| uuid               | cluster-83e1ebf5-2c63-4690-9aaf-b66e7a7b5f08 |

| name               | cluster-0-1                                  |

| nodes[1]           |                                              |

|   name             | 10.102.64.201                                |

|   ip               | 10.102.64.201                                |

|   vm_uuid          | 00505681cb45                                 |

|   vm_mor           | vm-16431                                     |

|   vm_hostname      | node1.controller.local                       |

|   interfaces[1]    |                                              |

|     if_name        | eth0                                         |

|     mac_address    | 00:50:56:81:cb:45                            |

|     mode           | STATIC                                       |

|     ip             | 10.102.64.201/22                             |

|     gateway        | 10.102.67.254                                |

|     labels[1]      | MGMT                                         |

|     labels[2]      | SE_SECURE_CHANNEL                            |

|   interfaces[2]    |                                              |

|     if_name        | eth1                                         |

|     mac_address    | 00:50:56:81:c0:89                            |

|     mode           | STATIC                                       |

|     ip             | 100.64.218.90/24                             |

|     labels[1]      | HSM                                          |

|   static_routes[1] |                                              |

|     prefix         | 1.1.1.0/24                                   |

|     next_hop       | 100.64.218.20                                |

|     if_name        | eth1                                         |

|     route_id       | 1                                            |

+--------------------+----------------------------------------------+

[admin:controller]: cluster> save
Configuration for a 3-node Cluster
In case of a 3-node Cluster, the following steps are required:
For the discovery of the secondary interface, the Controller nodes need to be stand-alone, which is not part of a cluster. This is a one-time operation for Avi Vantage to discover the secondary interface.
Once the secondary interfaces have been discovered, the Leader node can be used to form the cluster, as detailed in Deploying an Deploying an Avi Load Balancer Controller Cluster section.
After the cluster is fully formed, the secondary interface configuration for all the nodes can be performed.
[admin:controller]: cluster> nodes index 1

[admin:controller]: cluster:nodes> interfaces index 2

[admin:controller]: cluster:nodes:interfaces> mode static

[admin:controller]: cluster:nodes:interfaces> ip 100.64.218.90/24

[admin:controller]: cluster:nodes:interfaces> labels HSM

[admin:controller]: cluster:nodes:interfaces> save

[admin:controller]: cluster:nodes> interfaces index 1

[admin:controller]: cluster:nodes:interfaces> no labels HSM

[admin:controller]: cluster:nodes:interfaces> save

[admin:controller]: cluster:nodes> save

[admin:controller]: cluster> nodes index 2

[admin:controller]: cluster:nodes> interfaces index 2

[admin:controller]: cluster:nodes:interfaces> mode static

[admin:controller]: cluster:nodes:interfaces> ip 100.64.218.100/24

[admin:controller]: cluster:nodes:interfaces> labels HSM

[admin:controller]: cluster:nodes:interfaces> save

[admin:controller]: cluster:nodes> interfaces index 1

[admin:controller]: cluster:nodes:interfaces> no labels HSM

[admin:controller]: cluster:nodes:interfaces> save

[admin:controller]: cluster:nodes> save

[admin:controller]: cluster> nodes index 3

[admin:controller]: cluster:nodes> interfaces index 2

[admin:controller]: cluster:nodes:interfaces> mode static

[admin:controller]: cluster:nodes:interfaces> ip 100.64.218.110/24

[admin:controller]: cluster:nodes:interfaces> labels HSM

[admin:controller]: cluster:nodes:interfaces> save

[admin:controller]: cluster:nodes> interfaces index 1

admin:controller]: cluster:nodes:interfaces> no labels HSM

[admin:controller]: cluster:nodes:interfaces> save

[admin:controller]: cluster:nodes> save

[admin:controller]: cluster> save
There is no requirement to log in to the node for the interface discovery to succeed. The only requirement is for the interface to be in a connected state in the VM, and for the Controller to have been powered on.
The cluster formation and the secondary interface configuration should be performed as separate steps.
Configuring IPv6 Addresses for Secondary Interface
You can add mode6, IP6, and gateway6 instead of mode, IP, and gateway for the IPv6 interface. The interface configuration does not support dual-stack mode in 22.1.3. Hence, an interface can have either a V4 IP or a V6 IP, not both.
The SE_SECURE_CHANNEL label can be moved to the secondary interface to enable communication to Service Engines. This secondary interface can be either of IPv4 or IPv6. This will help users to have different interfaces for management and Service Engine communication.
You can edit the "Interfaces" and "Static Routes" section based on the requirements for secondary interfaces and labels that cluster needs and make sure to have same labels across all nodes of cluster.
Navigate to . Click Edit.
To form a Controller Cluster2 of three Controller nodes, you should add additional 2 nodes to the cluster. Click ADD to add cluster nodes.
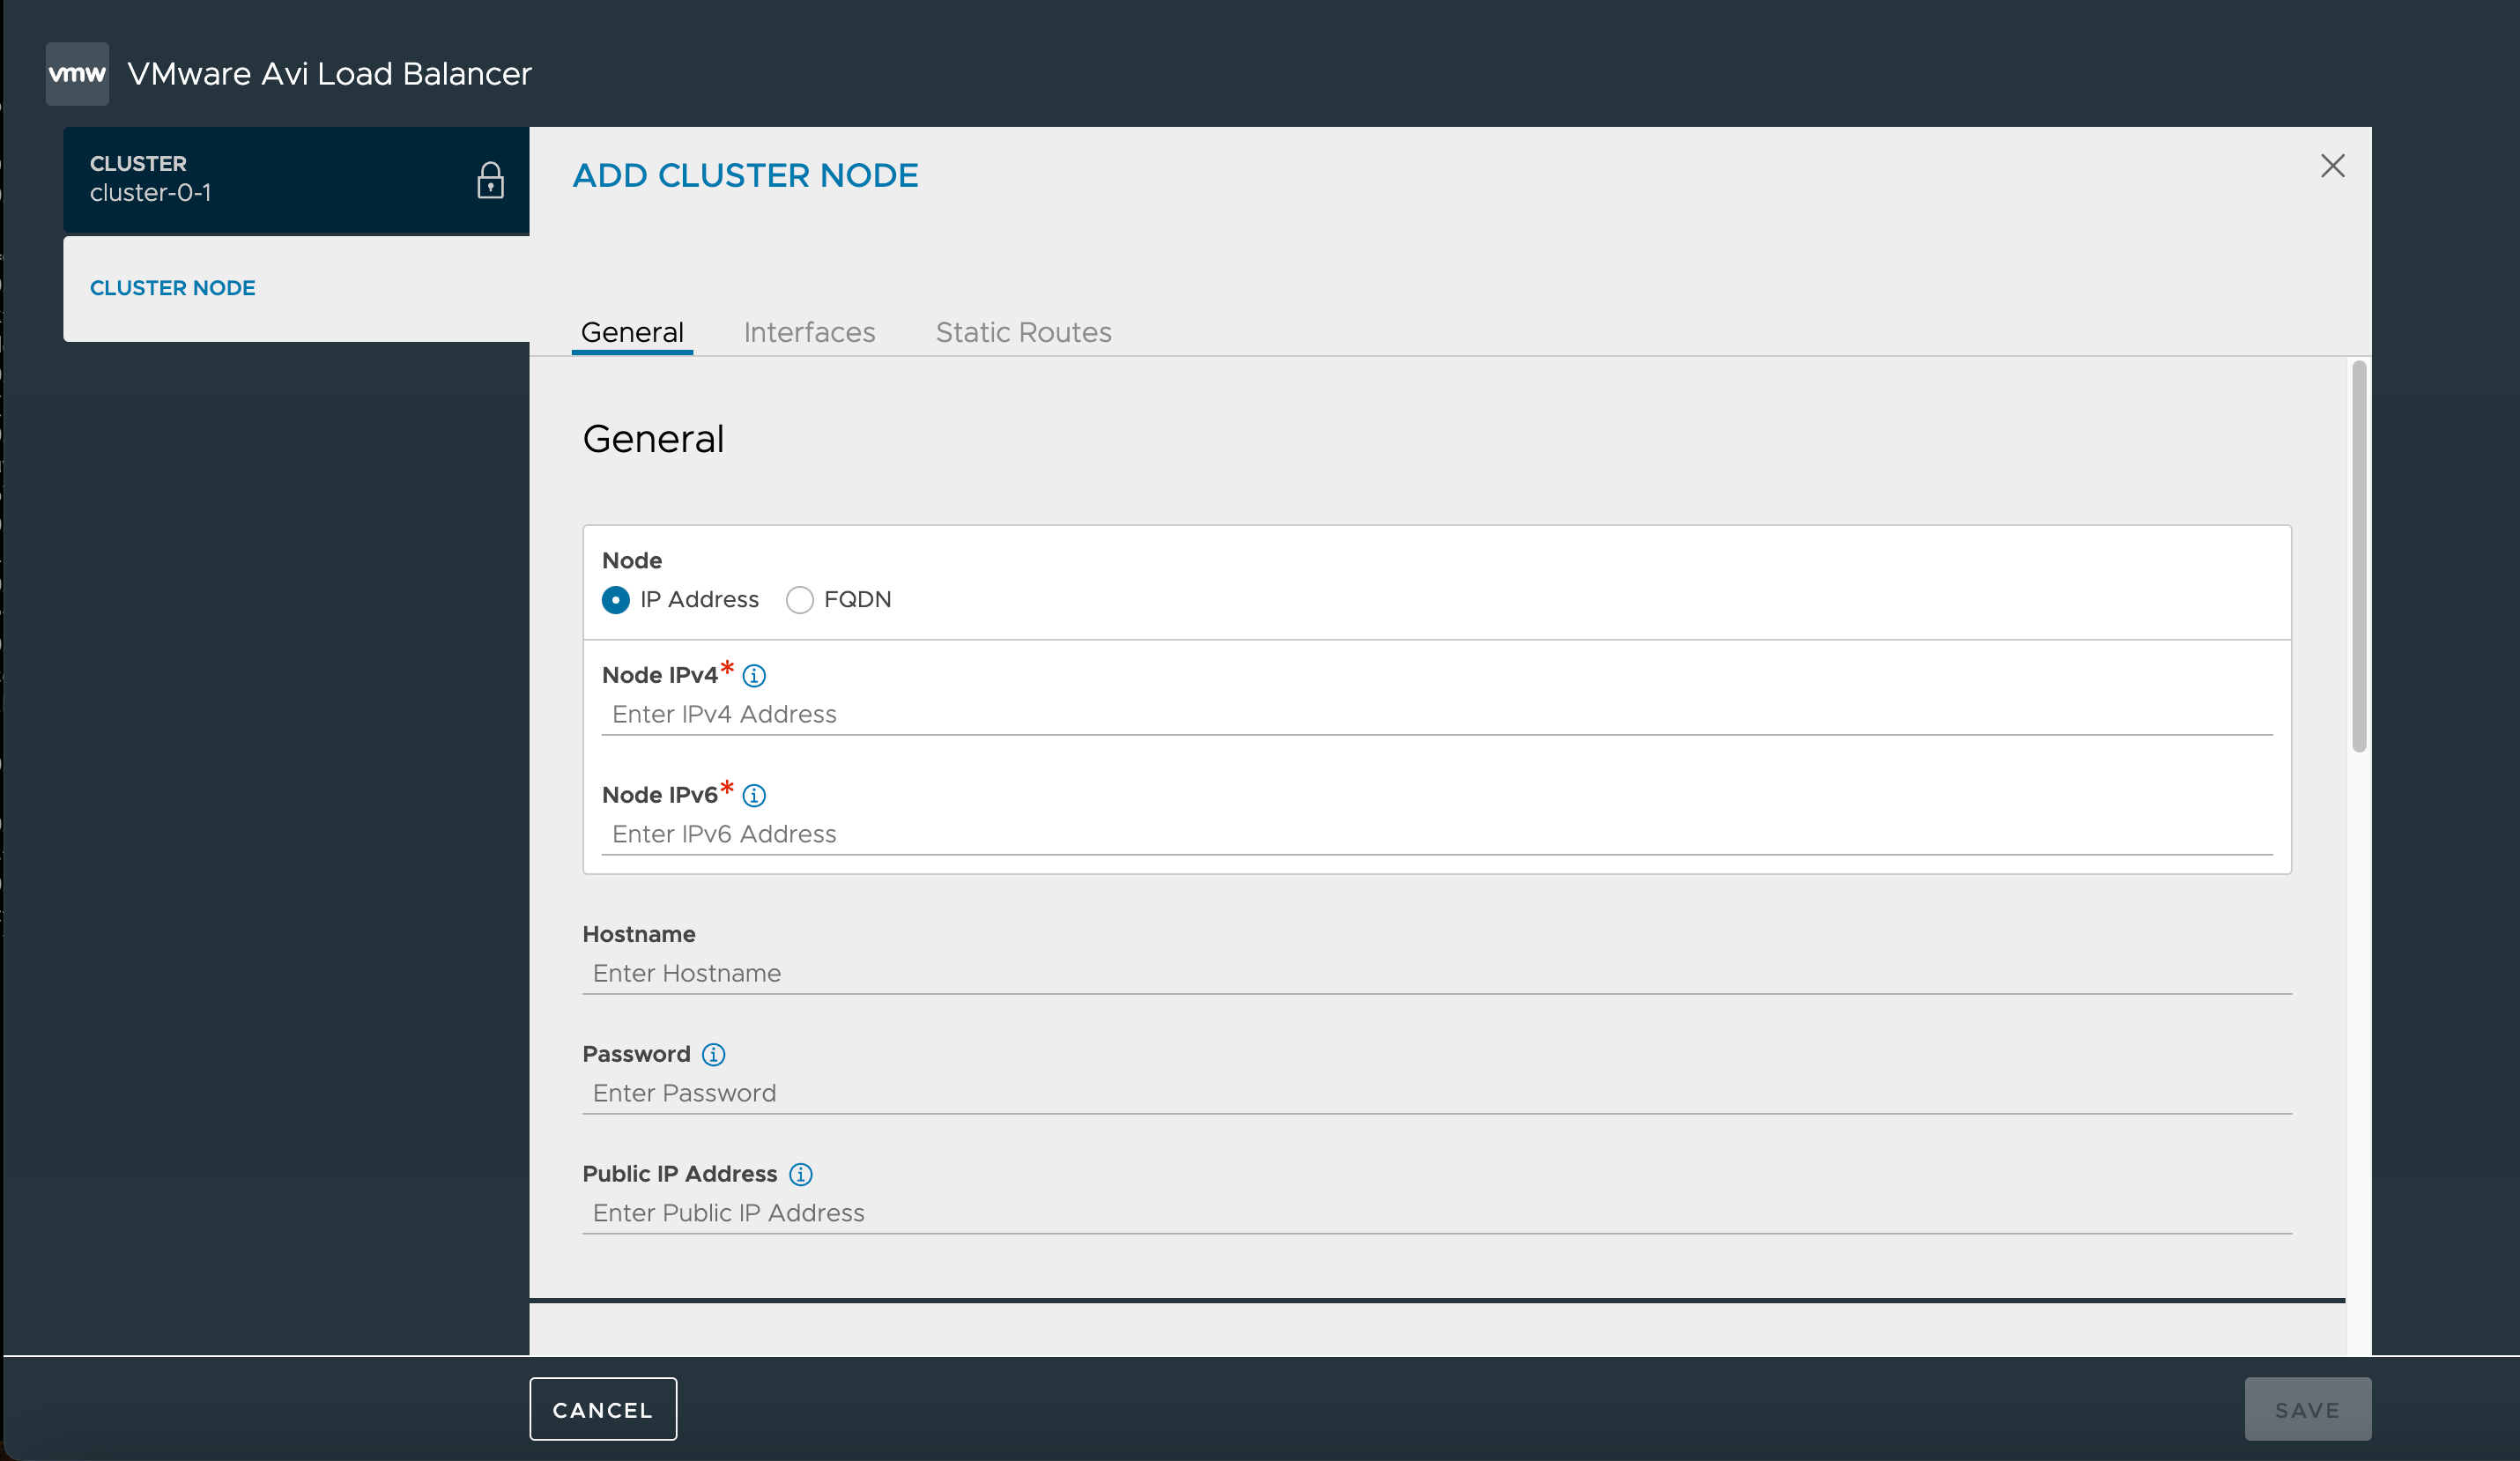
Add Cluster node. For more details on adding cluster nodes, see Configuring Avi Load Balancer Controller Cluster section.
Navigate to Interface pane.
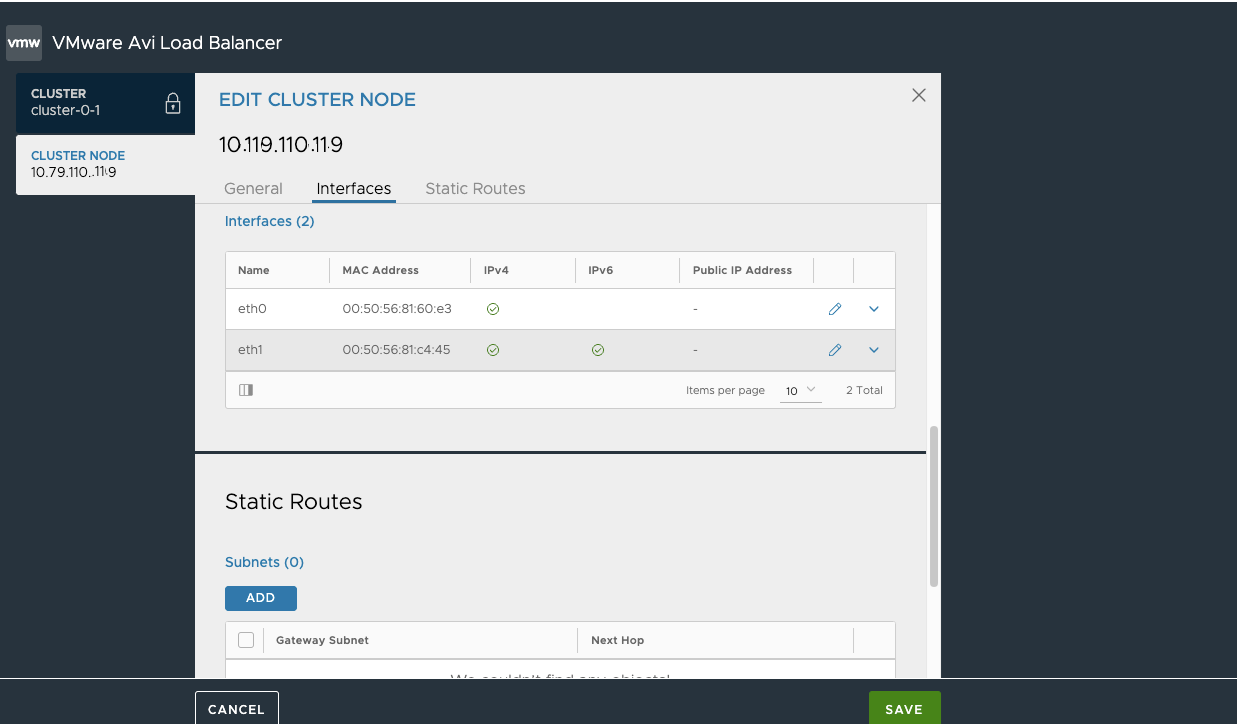
Click Edit icon on the secondary interface item. Note that by default both IPv4 and IPv6 are enabled, and the default mode is Manual for both.
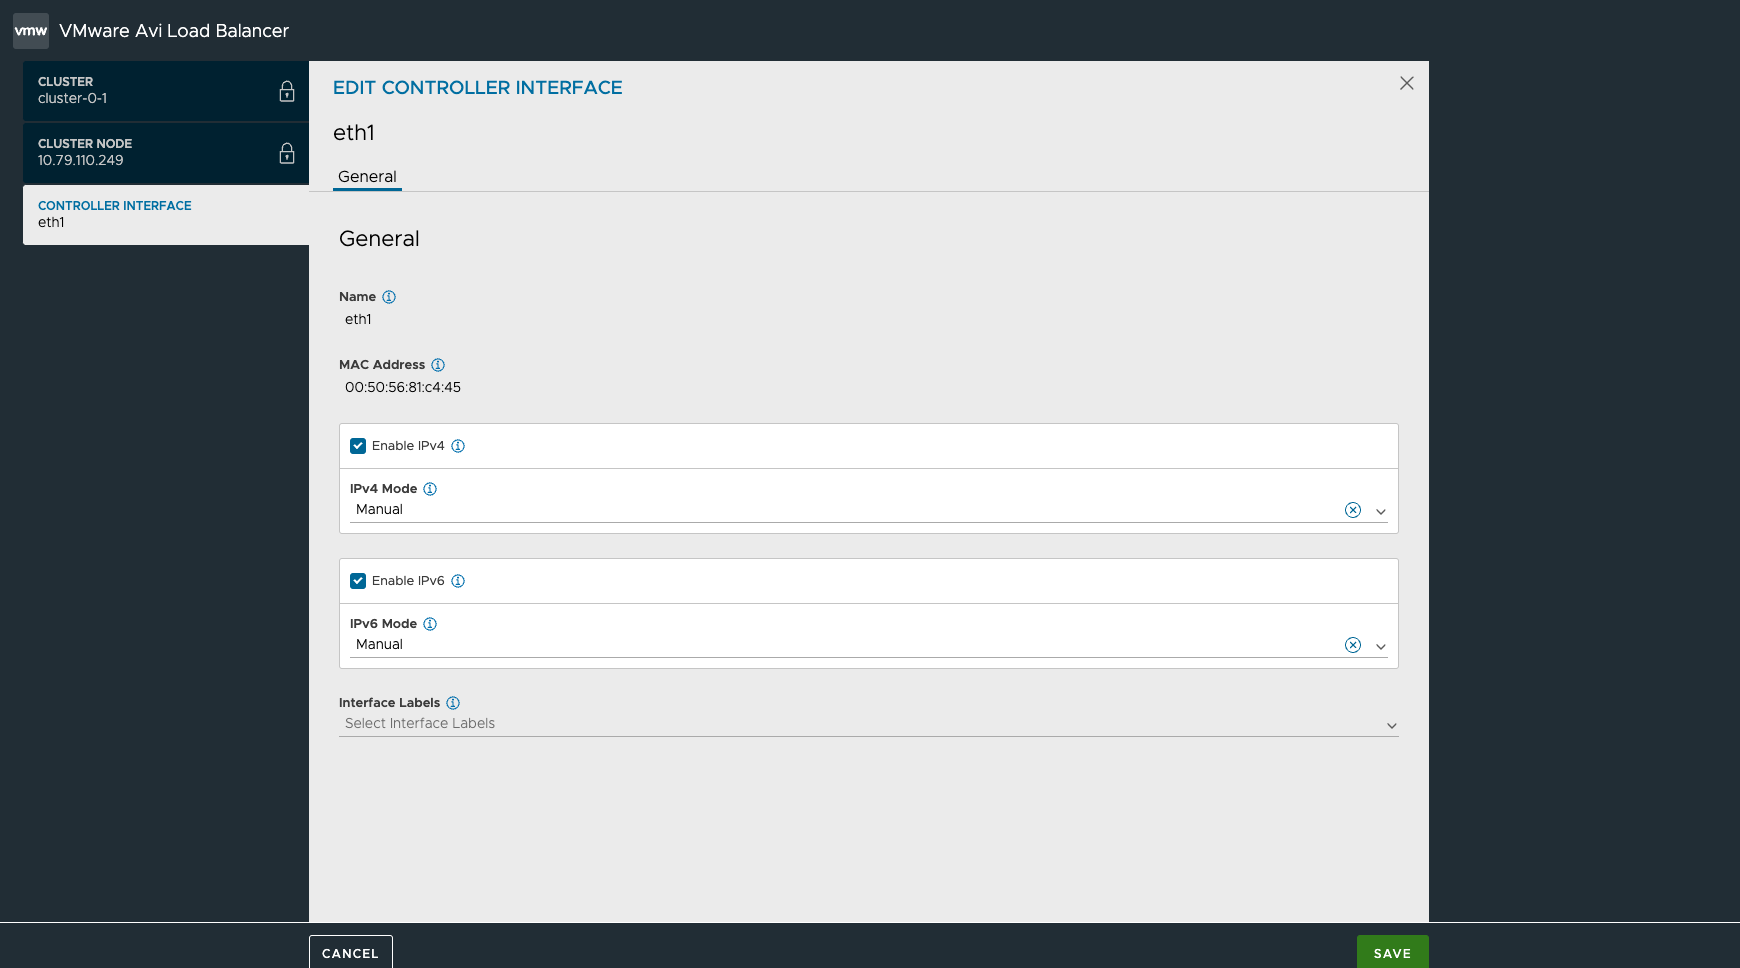
To configure IPv4 address, select Static in IPv4 Mode, specify the IPv4 address/ mask into IPv4 Prefix, and IPv4 Gateway, if applicable.
To configure IPv6 address, select Static in IPv6 Mode, specify the IPv6 address/ mask, and IPv6 Gateway, if applicable
Note:To disable IPv4 or IPv6, uncheck the corresponding check box.
To move an interface label, for instance, SE Secure Channel Label from management interface to secondary interface, click Edit icon on the management interface item and click SE Secure Channel Label option from drop-down menu.
Click SAVE.
