


You can deploy a workflow and make it active and accessible from outside environments.
Deploying a workflow makes it active and accessible from outside of VMware BMA.
Prerequisites
To deploy a workflow, you must have at least one API, stage, and endpoint.
Procedure
- In the VMware BMA window, click the Workflows tab.
- Click the ellipse icon
 next to the workflow that you want to deploy.
 - Click Deploy.
The Deploy Workflow window appears.
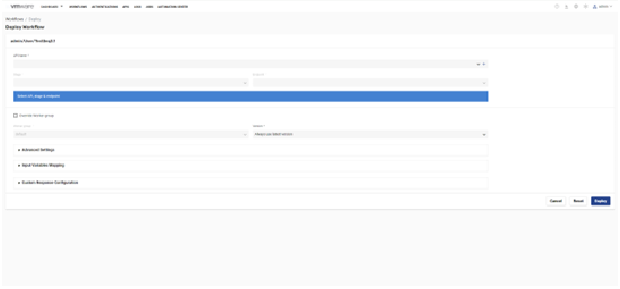
- From the API Name drop-down menu, select an API.
- From the Stage drop-down menu, select a stage.
- From the Endpoint drop-down menu, select an endpoint.
Note: The unique link for the deployment appears. You can copy and paste it in the URL bar to access the deployment externally.
- (Optional) Select the Override Worker Group checkbox to select the worker group of your choice and its version or else you can leave it unselected.
Note: If you select the Use Current Version option then the workflow freezes in time, not being able to change at all. If you select the Always Use Latest Version option then the workflow is always up-to-date.
- Click Advanced Settings.
The Advanced Settings section expands with the list of properties that defines how a workflow should run and if the result should include statics or not.
- In the Override section, select the checkbox of the property that you want to change and change the property.
Note: If you do not want to change the properties then you can leave it as it is. The following table explains the properties and its description
Property Description Flow should run It decides the way in which the workflow runs. - Select Synchronous to run the workflows synchronously.
- Select Asynchronous to run the workflows asynchronously.
Run mode It decides whether the workflow should have dedicated logs or not. - Select Run with logs for the workflow to have a dedicated logs.
Note: It runs the workflow at a slower rate.
- Select Run real time for the workflow to have no logs and run in real time.
Note: It runs the workflow faster.
Statistics as part of result It decides whether the workflow execution result must have the statistics in it. - Select Include statistics if you want to include statistics in the workflow execution result.
- Select Don’t Include statistics if you do not want to not include statistics in the workflow execution result.
Response timeout (in ms) It decides the time interval after which there is a communication loss between the worker and API. Message timeout (in ms) It decides the time interval after which an internal message states that there is a communication loss between the worker and API. Error status code It is the status code of the error generated after the timeout. - Click Input Variables Mapping.
The Input Variables Mapping section expands with the list of input variables.Note: The Input Variables Mapping section allows you to map input variables to the workflow as parameters and assign custom names to the variables. This gives you more control and flexibility in your data mapping process when deploying workflows.
- In the Enable section, select the checkbox of the input variable that you want to change and change it.
The following table describes the fields in the Input Variables Mapping section.
Parameter Description Input variables It displays the list of input variables. Request part This section allows you to define if a variable will be a system value, query parameter, headers, or body. Field name Assigning field name will additionally customize the variables by giving them alternative names which will be used for the deployment. Note: Input variables of non-string types will produce warning messages. You can still proceed with the deployment as they will be converted into strings. - Click Custom Response Configuration.
The Custom Response Configuration section expands with the options to have additional control over setting up the deployment response.The following table describes the fields in the Custom Response Configuration section.
Parameter Description Status Code It describes the status code of the response. It ranges from 100 to 599 or text. Body It defines the description for the response. Format It defines the format of the response. It can be in JSON, string, or binary format. - Click Deploy.
The workflow is deployed successfully.
