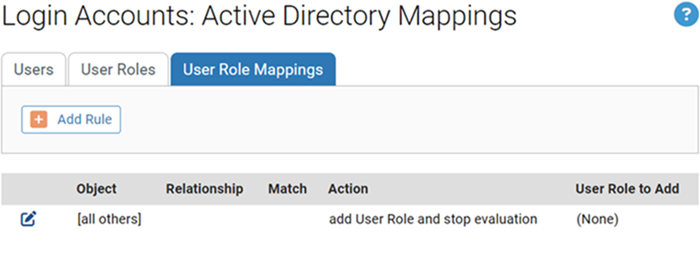
After the AD-based User Roles interface is enabled, a new tab, “Mappings,” will be visible when you view the Login Accounts page. Clicking on this tab opens the Active Directory User Role Mappings page. This is where you create rules to map computers with specified AD data to certain roles.
You can create mapping rules that test for matching AD data including organizational units, domains, security groups, computer names, and user names. Keep the following in mind when creating mapping rules:
- App Control does not support policy mapping for AD object names that contain double quotes. Object names with double quotes cannot be handled properly by the directory object browser you use to create a mapping rule.
- In general, create as few rules as possible and use them to test for groups rather than individual objects.
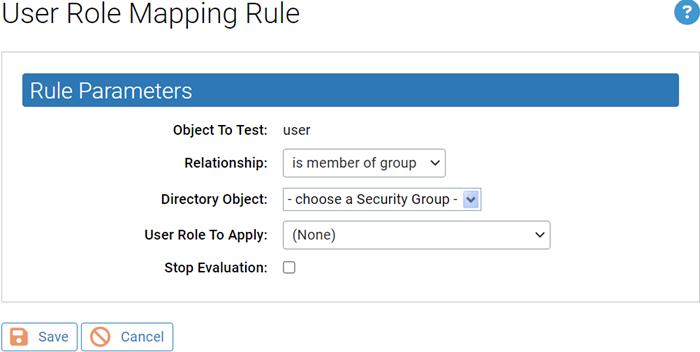
The following table shows the rule parameters you provide for a mapping rule.
| Parameter |
Description |
|---|---|
| Object to Test |
The object that will be tested to see whether it matches the rule. This is always “user”. |
| Relationship |
The relationship being evaluated between the Directory Object specified in the rule and the AD data from the user attempting to log in. The choices are:
|
| Directory Object |
The object in AD that the data from the tested object must match. Clicking the right end of this field opens an AD browser from which you can search for an object from your AD environment. The choices for the Directory object field change depending upon which Relationship you choose. If you choose “is not in any domain,” no Directory object is necessary. The object browser for choosing the directory object is similar to the one for AD policy mapping. See AD Object Browser Options for a more detailed description of this browser. |
| User Role to Apply |
The role to apply to a computer if its tested object matches the rule. The dropdown menu shows all available roles. |
| Stop Evaluation |
Checking this box causes evaluation of users against mappings to stop when this rule is reached. If this is the first rule that matches a user, the role it assigns will be the only role they have. Leaving the box unchecked allows evaluation to continue to the next ranked rule. |
The result of providing these parameters is a rule that can be read like a sentence. The following is how you might set up one rule.
| Parameter |
Example (value in bold) |
|---|---|
| Computer Object to Test |
If a User… |
| Relationship |
… is in OU or domain … |
| Directory Object |
…matching OU = Support,DC=hq,DC=xyzcorp,DC=local … |
| User Role to Apply |
… assign the Help Desk role to the user... |
| Stop Evaluation |
… and do not assign roles from any lower-ranked rules, even if this user matches their conditions. |
The procedure that follows shows how to configure a mapping rule. Although entry of most of the parameters are reasonably straightforward, pay particular attention to the Directory Object field, which requires use of a special AD browser.
Create AD Mapping Rules
Use this procedure to create an AD role mapping rule.
Procedure
- Click the User Role Mappings tab. The Active Directory Mappings page appears with the User Role Mappings table.
Note: If you have upgraded from a pre-8.0 version of Carbon Black App Control (Bit9 Server) and were using AD group mapping there, a series of default mappings appear. Otherwise the table only has a default mapping to no role.
 Note: If no Mapping tab appears, the AD mapping interface has not been enabled. Go to the General tab of the System Administration page and enable the feature.
 - On the Active Directory Mappings tab, click Add Rule. This displays the User Role Mapping Rule panel in which you enter the rule parameters.