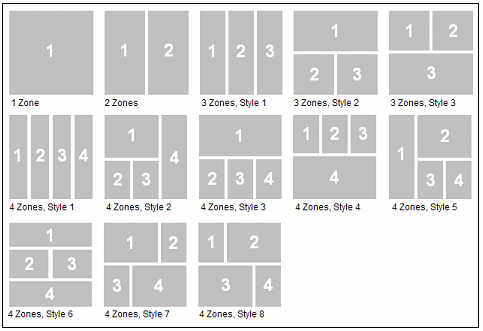
The Dashboard Layout menu shows the current dashboard layout and lets you select a different layout from a set of 13 templates.
The templates create zones in which portlets are placed,. In some layouts, these zones have different widths. After you select a layout, you can move portlets from zone to zone so they have appropriate width for their content.

Layouts are labeled with the number of zones and a style number if there is more than one style for that number of zones. The default layout is two equal columns,; this layout is the only 2 Zones layout. The number of zones does not equal the number of portlets – each zone usually has multiple portlets.
Portlet Distribution in Layouts
When you switch between layouts or add portlets, portlets are assigned to zones based on the following rules:
- If you switch to a layout that has the same or more zones as your current one, portlets remain in their assigned zone. For example, if you switch from “2 Zones” to “3 Zones, Style 1,” all of the portlets in zone 1 remain in zone 1 and all of the portlets in zone 2 remain in zone 2 until you move them. There is no attempt to map portlets that are in wide zones in one layout to wide zones in a different layout.
- If you switch to a layout that has fewer zones than the current one, portlets are remapped to new zones. Portlets from even-numbered zones in the former layout go to even zones in the new, and odd to odd, except when going to the one-zone layout, where all portlets go to the single zone.
- When you add portlets to a dashboard, they are distributed sequentially to each zone, starting with zone 1. So if you add three portlets during one editing session, one each goes to zones 1, 2, and 3.
- The console retains the distribution of portlets in layouts you have used. If you change layout and then return to one you used previously, the portlets display in the same locations they did before if you have not added or removed portlets.