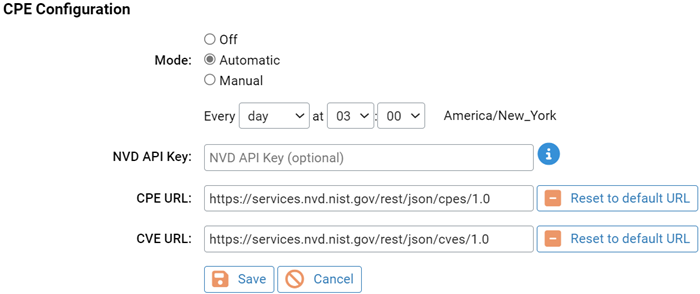
You can control the CPE Configuration by specifying the synchronization settings. By default, the CPE Configuration is turned OFF and no matching or synchronization is occurring. Also, you can initiate synchronization and matching with the CPE library.
Procedure
- From the top menu, click Assets> Applications and then click the CPE Applications tab.
- Click Configure CPE.

The CPE Configuration page is displayed.

- Specify the Mode setting:
- Off: Use this setting to turn off matching and synchronization.
If the Mode setting was previously Manual or Automatic and a synchronization was executed, the table remains populated after setting the Mode to Off.
- Automatic: Use this setting to specify a synchronization interval. You can select a specific hour, day, week, month, or year and specify the precise time.
- Manual: Use this setting to execute synchronization and matching on demand.
Tip: After you save your changes in a later step, follow the instructions if you want to immediately initiate synchronization and matching with the CPE library.
- Off: Use this setting to turn off matching and synchronization.
- Optionally, specify an NVD API Key.
An API key provides a more reliable and slightly faster method of updating data from API requests. You can request an API key from the NIST website.
- Specify the CPE URL if it is different from the default: https://services.nvd.nist.gov/rest/json/cpes/1.0.
Click Reset to default URL to return it to: https://services.nvd.nist.gov/rest/json/cpes/1.0.
- Specify the CVE URL if it is different from the default: https://services.nvd.nist.gov/rest/json/cves/1.0.
Click Reset to default URL to return it to: https://services.nvd.nist.gov/rest/json/cves/1.0.
- Click Save.
- Optionally, to initiate synchronization and matching with the CPE library after you saved your changes, on the CPE Applications tab of the Applications page, click Execute sync and matching now.
A progress bar is displayed showing the progress of the synchronization. The initial update can take a few hours because of the addition of the CVE data.
 Note: If you selected Automatic for the Mode setting for the first time, the CPE Applications table remains unpopulated until the time interval is satisfied.