You can create Event Rules that will automatically delete files when certain events occur, such as a report of a malicious file.

Unlike deletions done using commands, Event Rule deletions have no confirmation dialog. If an event matches the rule, the files specified in the rule are immediately scheduled for deletion, without feedback on the console. You can, however, create Alerts that inform you when a file deletion is requested or completed.

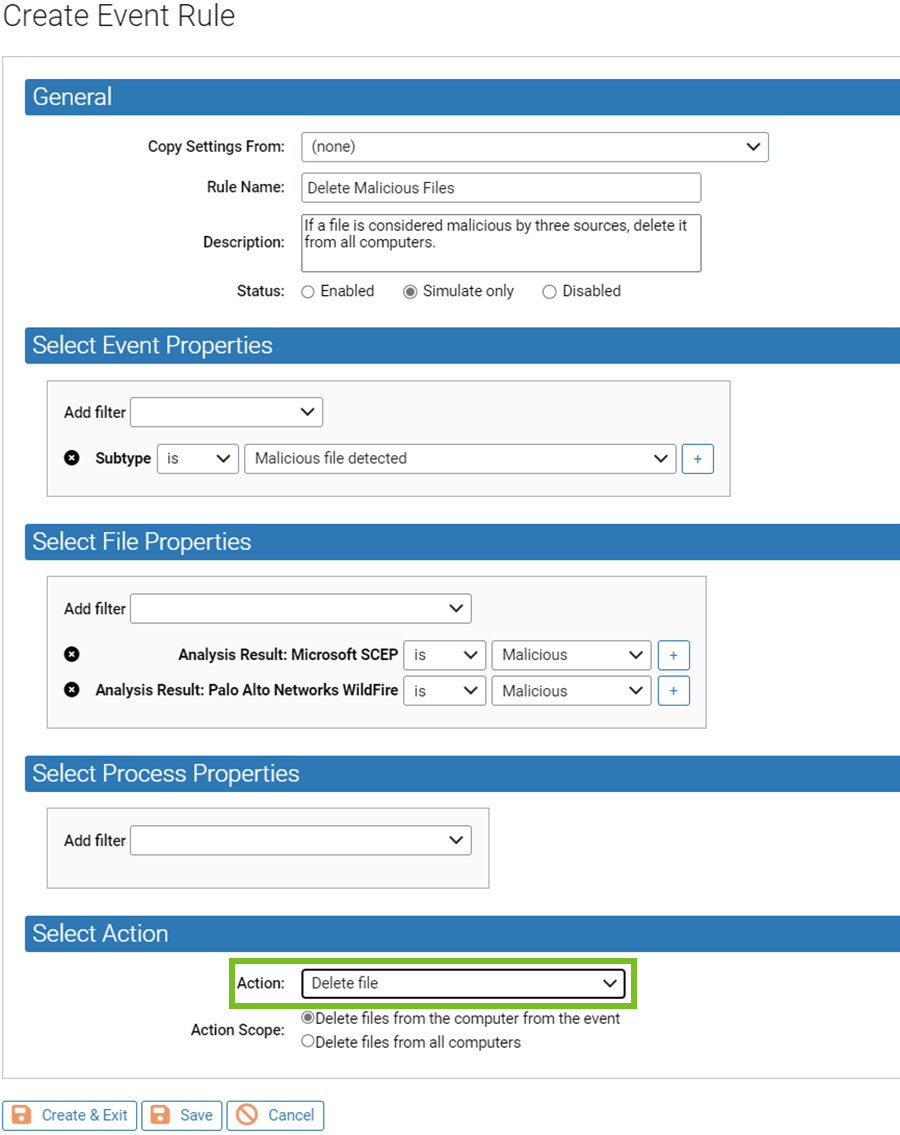
Event Rules that delete files do offer you the same scope options as delete commands: you can either delete all instances of a file on one computer or you can delete all instances of the file from all computers.

Create Event Rule that Deletes Files (example)

Use this procedure to create an Event Rule that deletes files. This is an example of how to do an automated file deletion request.

Procedure

  1. On the console menu, choose Rules > Event Rules.
  2. On the Event Rule page, click the Create Rule button.
  3. In the Rule Name field, provide a unique name for the rule. For example, you might name the rule Delete Malicious Files.
  4. In the Description field, provide a longer description of the rule if you choose.
  5. In the Status field, choose Simulate only. This means that actions specified by the rule will be simulated. Events will be generated indicating what the rule would have done if enabled, but the actions specified will not actually be taken.
    Caution: Simulate only is strongly advised for initial testing of a new event rule, especially for a Delete file rule. Rule status can be changed to Enabled when you are sure that it the rule does not have any negative effects. See Testing a Rule before Enabling for more about this choice.
  6. In the Select Event Properties panel, use the Add filter menu to choose one or more event properties, including at least one Subtype filter. This is also the preferred location for specifying file names and paths. For your delete rule, you might choose a filter that specifies Subtype is Malicious file detected.
  7. In the Select File Properties panel, use the Add filter menu to choose one or more file properties with which to further refine the conditions under which this rule will be triggered. For example, you might add filters that require more evidence that a file is malicious, such as:

    Analysis Result: Palo Alto Networks is Malicious

  8. In the Select Process Properties panel, use the Add filter menu to choose one or more process properties with which to further refine the conditions under which this rule will be triggered. You might not need to specify anything in this field.
  9. In the Select Action panel, choose Delete file on the Action menu. If you don’t see this choice, check that you have permission to delete files – see User Role Permissions.
    The Create Event Rule page showing the Action menu with the Delete file option selected
  10. Once you choose Delete file, an Action Scope field with two radio buttons appears – choose one:
    • Delete files from the computer from the event – This option deletes all instances of the matching file on the computer that reported the event.
    • Delete files from all computers – This option deletes all instances of the matching file on all computers.
  11. When you have completed the rule definition, click Save to remain on the page or Create & Exit to create the rule and leave the Create Event Rule page.
  12. If you configured the rule in Simulate Only mode as recommended, monitor the Processed Events section of the Edit Event Rule page for this rule to see what would have been deleted. Adjust the rule if necessary, and when you are satisfied that it will not delete files that shouldn’t be deleted, change its Status to Enabled.