


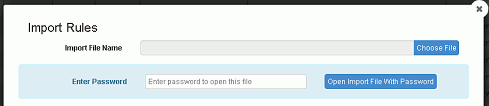
When you want to import rules from another server, you need access to a rules file. In addition, if the file is protected with a password, you need the password to open it through the import dialog and select the rules to import.
Selecting Rules to Import
When you enter the name of a rules file in the Import Rules dialog, the file is checked to determine whether it is properly formed and if the rule type matches the page on which the import is being attempted. If the file is password-protected, you are prompted to enter the password. Assuming it passes these checks, the rules it contains are listed in the Select Rules to Import table.
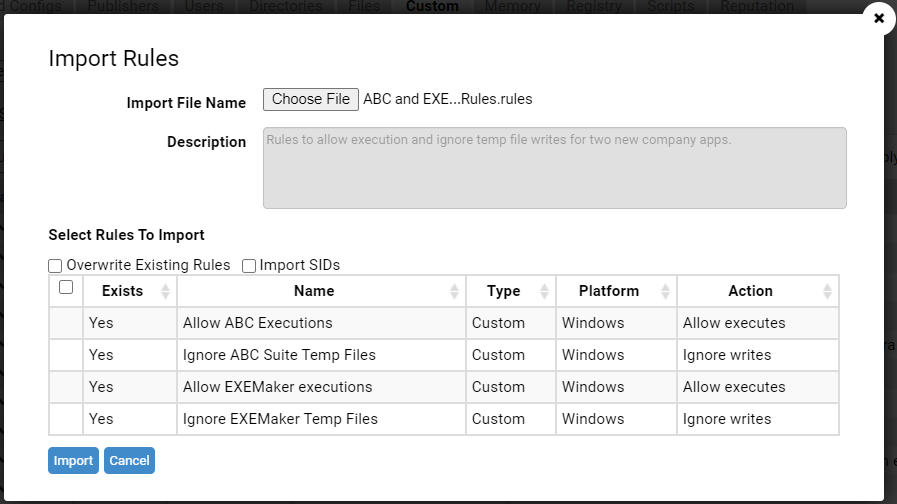
The following table describes the fields on the Import Rules pop-up, most of which are described in more detail later in this section.
| Field |
Description |
|---|---|
| Import File Name |
The name of the file from which rules are imported to this server. Enter file names using the Choose File button and file chooser dialog. |
| Description |
The description provided when the rules were exported, if any. |
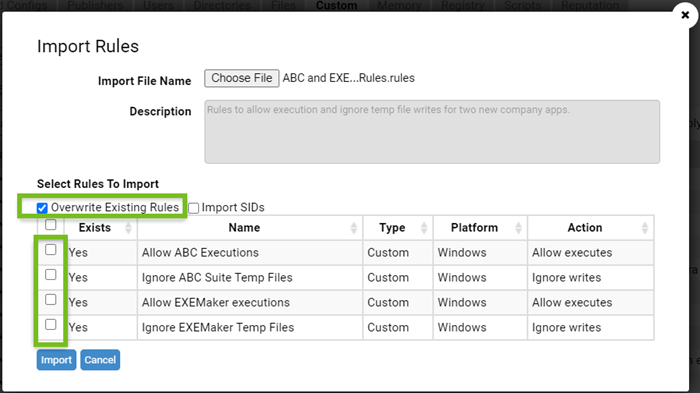
| Overwrite Existing Rules |
If not checked (the default), there is no checkbox next to rules that already exist on the target server. If checked, all rules in the table have checkboxes, and you may choose to overwrite an existing rule. |
| Import SIDs |
If not checked, user and group specifications in rules are not imported if those users or groups are not well-known Security IDs (SIDs), such as Local Administrator. If checked, all user and group specifications in rules are imported. Note that there is a matching option for exporting rules, and so some rules in an exported file might not include user and group specifications that are in the original rule. |
| Enter Password |
Appears only if a password was specified during rule export. If present, shows a field in which to enter the password to open this file and an Open Import File with Password button. |
| Rules Table |
All rules included in the import file are listed in a table. The row for each rule includes the following columns:
|
Each rule on a Carbon Black App Control Server has a globally unique identifier (GUID), and that ID is included when it is exported to a file. When a rules file is chosen for import, the GUIDs of the incoming rules are compared to the GUIDs of existing rules, and if a rule already exists on the server, that fact is shown on the Import Rules dialog.
Depending upon the source of the rules (internal to your organization, the Carbon Black community, Carbon Black Support), you might make different decisions about which rules to import. You do not have to import all rules in a file. A checkbox next to each available rule allows you to choose which rules to import.
By default, any rules in the import file that already exist on the server do not have a checkbox next to them. However, there is a checkbox named Overwrite Existing Rules that activates checkboxes for these rules, allowing you to import any rule (including existing rules) listed on the page.
Differences in Settings for Imported Rules
Rules contain a variety of field types, including processes and paths, actions to take, and notifiers to use if a block is involved. Most of the settings for an imported rule remain the same as they are on the server from which they are exported, but there are some variations.
The variations depend on the following factors:
- Whether an imported rule is new or updates an existing rule on the target server
- Whether the rule specifies that it applies only to certain policies
- Whether the rule specifies that it applies to certain users or groups
The following setting differences depend upon whether a rule is new or already existing on the server:
| Option | Description |
|---|---|
| Enabled or Disabled | New rules are disabled when imported and must be enabled to take effect. This gives you the ability to customize a rule, including providing any site-specific policy or user fields, before enabling it. When existing rules are overwritten by an import, the enable/disable settings on the target server are kept. |
| Rank – | New rules are ranked at the highest level when imported. Existing rules that are overwritten by an import maintain their previous relative rank on the target server (moving down in rank accordingly if new rules were also part of the import) . |
| Notifier | If a new imported rule requires a notifier (i.e., if it blocks an action), the default notifier is used. If an imported rule overwrites an existing rule, the notifier specified in the existing rule is kept. |
Some rules are specified to apply only to computers in certain policies. However, policies on one server might not exist on another. If an imported rule is new, any previous policy specification is removed and the rule applies to all policies. If an imported rule overwrites an existing rule, the policy setting in the existing rule on the target server is maintained – any policy specification in the rule from the exporting server is not applied.
Some rules are specified to apply only if certain users or members of certain groups are taking an action. There are user and group names that are well known Security Identifiers (SIDs) that can be expected to be available on all Windows computers. However, users and groups that are not well known might not exist on computers to which rules are imported. If an exported rule specifies users or groups, the results of an import depend on whether the user or group is well known and on whether several things:
- All well-know SIDs are always exported and imported in a rule specification.
- If the Export SIDs checkbox was checked on the Export Rules dialog when the rules were exported, specifications for users and group that are not well-known are also exported with their rules.
- If the Import SIDs checkbox is checked on the Import Rules dialog, specifications for users and group that are not well-known are also imported, if they were exported with the rules.
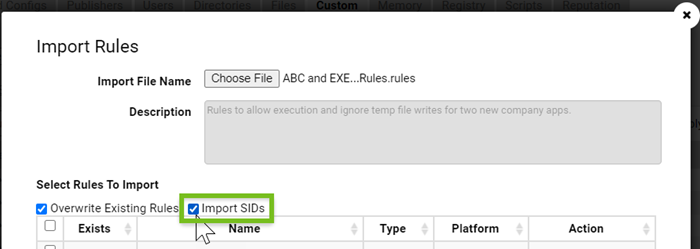
If a both well-known and non-well-known SIDs are specified in an exported rule and the Import SIDs checkbox is not checked, the rule is exported with the well-known users or groups only. If the rule only specifies users or groups that are not well known, the user or group specification is removed from the rule and it applies to all users.
Import Rules from a File
Follow the procedure to import rules from a file.
Procedure
- Click the Choose File button to open a standard Windows file chooser dialog and select the file whose rules you want to import.
If no password is required, the Import Rules pop-up shows a table of the available rules. If the file requires a password, the pop-up shows fields for password entry before displaying any rule names.
Results
The dialog closes and the rules are imported to the server. Rules that are imported appear in bold italic on the rules page for the duration of the current session.
