


To configure an input in the AWS add-on to ingest Carbon Black Cloud data using SQS-based S3, perform the following procedure.
To ingest Carbon Black Cloud Data Forwarder data into Splunk SIEM, we recommend you configure the SQS-based S3 data input.
Note: Events are no longer available in the queue after they have been retrieved. To view historical events or to reload data, use the generic S3 option or copy the events to another prefix to copy it into the queue.
Prerequisites
- Create a Data Forwarder for Splunk SIEM
- Install the AWS add-on into your Splunk SIEM environment. See Splunk Add-on for AWS.
Procedure
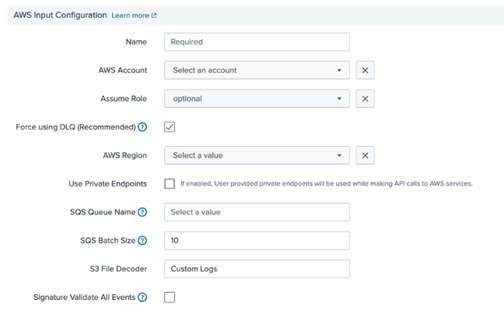
- Configure your AWS account on the Configuration page in the AWS Add-on.
- In the AWS add-on, create a new input on the Inputs page by selecting Create New Input > Custom Data Type > SQS-based S3.
- Specify a name for the input.
- Select the AWS account you configured with the AWS add-on.
- Optional: If you configured IAM roles, select the created role.
- Select the AWS Region where you configured the SQS queue and S3 bucket.
- Select the SQS queue from the dropdown list.
Note: If you do not see your SQS queue, make sure that you selected the correct AWS region and that the SQS queue was created in that region.
- Set the batch size for Splunk to pull from your SQS queue. The default bath size is 10 messages.
- Set the S3 File Decoder to Custom Logs.
- Use one of the following Source Types depending on the data you configured for the Data Forwarder:
- Alerts:
vmware:cbc:s3:alerts - Events:
vmware:cbc:s3:events - Watchlist Hits:
vmware:cbc:s3:watchlist:hits
Note: You must create a separate input for each data type. - Alerts:
- Select the index that matches the base index you configured in the Carbon Black Cloud app.
Note: Both Alerts and Events must be configured to the base index.
- Deselect the checkbox for Signature Validate All Events.
- Optional: In Advanced Settings, you can increase the polling cycle for fetching messages from the SQS. The default value is 300 seconds.
