


VMware Cloud Director uses SSL handshakes to secure communications between clients and servers.
Signed certificates are signed by authorized Certificate Authorities (CA) and, as long as the local OS truststore has a copy of the root and of the intermediate certificates of the CA, they are trusted by browsers. Some CAs require that you submit the requirements for a certificate, others require you to submit a Certificate Signing Request (CSR). In both scenarios, you are creating a self-signed certificate, and you generate a CSR that is based on that certificate. The CA signs your certificate with their private key, which you can then decrypt with your copy of their public key, and establish a trust.
When you renew an expired SSL certificate, you don't need to provide VMware Cloud Director with any data about the expired certificate. This means that after you import the required SSL certificates into the VMware Cloud Director appliance, you don't need to back them up.
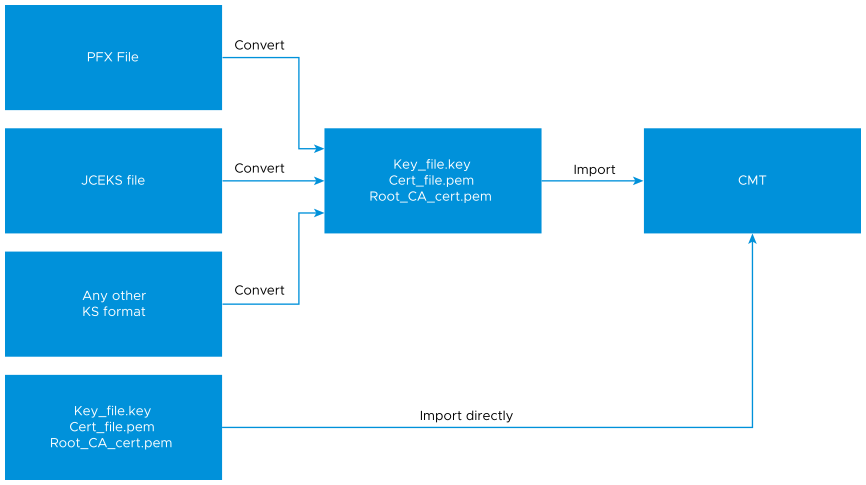
You can import PEM files directly into the VMware Cloud Director appliance. If your certificate files are in another format, you can use OpenSSL to convert them to PEM before importing them to VMware Cloud Director with the cell management tool.
Certificate Management in the VMware Cloud Director Appliance
You can manage the cell HTTP certificate using the Service Provider Admin Portal. The cell management tool's certificates command is removed. For these reasons, certificate management for 10.6 and later versions differs significantly from earlier versions.
By default, when deploying VMware Cloud Director appliance instances, VMware Cloud Director generates self-signed certificates and uses them to configure the VMware Cloud Director cell for secure communication. After you deploy an appliance, you can reconfigure the cell to use signed certificates.
When upgrading from version 10.5.0 and earlier to version 10.5.1 and later, VMware Cloud Director migrates the existing HTTP certificate of each cell from on-disk into the Certificate Library of the System organization. If the on-disk HTTP certificate was previously shared across each cell in the server group, for example, like a wildcard certificate, VMware Cloud Director adds only one copy to the Certificate Library and each cell will be a consumer of the library item.
Starting with VMware Cloud Director 10.5.1, in addition to the certificate that VMware Cloud Director uses for the HTTPS communication of the cell, VMware Cloud Director also uses a second certificate to secure Java Management Extensions (JMX) communication. JMX is used to facilitate cell-to-cell communication. With JMX, each cell can invoke remotely operations on other cells in the server group. The first time a VMware Cloud Director 10.6.x cell starts, VMware Cloud Director automatically generates a JMX certificate and adds it to both the Certificate Library and Trusted Certificates of the System organization.
Replace or Renew the Certificates of the VMware Cloud Director Cell
You might want to replace or renew the certificates of the VMware Cloud Director cell if the certificates expire, if you want to replace self-signed with well-signed certificates, and so on.
Prerequisites
-
After deployment, the VMware Cloud Director appliance generates self-signed certificates with a 2048-bit key size. Evaluate the security requirements for your installation before choosing an appropriate key size. VMware Cloud Director does not support key sizes less than 1024 bits as per NIST Special Publication 800-131A.
If you need to generate new certificates for your Certificate Authority (CA) to sign, see Generating Self-Signed Certificates for the VMware Cloud Director HTTPS Endpoint.
- Verify that none of the certificates in the certificate chain you are about to create have certificates that use SHA1. VMware Cloud Director does not accept certificates whose signature algorithms use SHA1, for example,
sha1WithRSAEncryption. - Before you upload the HTTP material to the Certificates Library, you must prepare the certificate chain that will be served by the server.
If you have intermediate certificates, for example, intermediate-certificate-file-{1-n}.cer, append them to your HTTPS certificate.
In rare cases, you might also append the root certificate root-CA-certificate.cer. This is not common, and generally, it is not applicable if your CA is one of the well-known certificate authorities whose certificate is distributed using the most modern browsers. Consult with your CA for more information and to determine whether you must append your root certificate.
cat intermediate-certificate-file-1.cer intermediate-certificate-file-2.cer >> your-http-certificate.pem
Where intermediate-certificate-file-1.cer and intermediate-certificate-file-2.cer are the names of intermediate certificates.
- Verify that the certificate is in the PEM-encoded X.509 format and its associated private key is in the PEM-encoded PKCS #8 format. You can upload only these formats to the Certificates Library.
- Import the certificate and its associated private key into the certificate library of the
Systemorganization. See Import Certificates to the Certificates Library Using Your VMware Cloud Director Service Provider Admin Portal. - Change the Certificates of a Cell.
- Repeat steps 1 and 2 for each appliance in the cluster.
Replace or Renew the VMware Cloud Director Appliance Management Certificates
- Log in directly or SSH to the OS of the VMware Cloud Director appliance as root.
- To stop the VMware Cloud Director services, run the following command.
/opt/vmware/vcloud-director/bin/cell-management-tool -u administrator cell --shutdown
- Generate self-signed certificates for the embedded PostgreSQL database and the VMware Cloud Director appliance management UI by running the following command.
/opt/vmware/appliance/bin/generate-appliance-certificates.sh
Note: Starting with VMware Cloud Director 10.5.1.1, thegenerate-certificates.shscript is renamed togenerate-appliance-certificates.shand the script renews only the VMware Cloud Director appliance certificates. The VMware Cloud Director certificate renewal and replacement is no longer part of the script.This command automatically puts into use the newly generated certificates for the embedded PostgreSQL database and the appliance management UI. The PostgreSQL and the Nginx servers restart.
- (Optional) If you want to have a CA sign the newly generated certificates, obtain the CA-signed certificates, copy them, and restart the services.
- Create a certificate signing request in the vcd_ova.csr file.
openssl req -new -key /opt/vmware/appliance/etc/ssl/vcd_ova.key -reqexts SAN -config <(cat /etc/ssl/openssl.cnf <(printf "\n[SAN]\nsubjectAltName=DNS:vcd2.example.com,DNS:vcd2,IP:10.100.101.10\n")) -out vcd_ova.csr
- Send the certificate signing request to your CA. If you must specify a web server type, use Jakarta Tomcat.
- When you obtain the CA-signed certificate, copy the CA-signed certificate to overwrite the original.
cp ca-signed-vcd_ova.pem /opt/vmware/appliance/etc/ssl/vcd_ova.crt
- Restart the
nginxandpostgresservices.systemctl restart nginx.service systemctl restart vpostgres.service
- Create a certificate signing request in the vcd_ova.csr file.
- Restart the VMware Cloud Director service.
service vmware-vcd start
