


To match your corporate branding standards and to create a fully custom cloud experience, customize the VMware Cloud Director portals by using the BrandingThemes API and corresponding UI. In addition, you can modify and add custom links to the two upper-right menus in the VMware Cloud Director portals, and to the login and logout pages.
Starting with VMware Cloud Director 10.4.1, you can customize the VMware Cloud Director portals by using a new VMware Cloud Director API and UI. The VMware Cloud Director UI provides a live preview of all changes so that you can see the modifications instantly without the need to save the theme. The BrandingThemes API and corresponding UI are an alpha feature, deactivated by default. To use it, you must activate it from the Branding API feature flag located under Administration. You can convert the existing legacy themes to the new theme format.
If you want to use the legacy VMware Cloud Director branding implementation, see Customizing the VMware Cloud Director Portals by Using the Legacy API.
manage-config -n backend.branding.requireAuthForBranding -v false
For information about using the cell management tool, see the VMware Cloud Director Installation, Configuration, and Upgrade Guide.
Portal Branding
Unlike the legacy API, in the BrandingThemes API, the
As part of the installation, VMware Cloud Director contains two themes - light and dark. You can create, manage, and apply custom themes. In addition, you can change the portal name, the logo, the image on the login screen, and the browser icon. The browser title adopts the portal name that you set and login background.
When you create a theme, you can assign it to one or more tenant organizations. You can specify a theme to be the default theme, applicable to all organizations apart from the ones with specifically assigned themes through the Assign option.
For a particular theme, you can selectively override any combination of the portal name, colors, logo, icon, custom links, and login background. Any color value that you do not set uses the corresponding theme base color.
| Theme type | Edit | Delete | Assign | Make default | Export | Clone |
|---|---|---|---|---|---|---|
| Built-in themes | - | - | ✓ | ✓ | ✓ | ✓ |
| Custom theme | ✓ | ✓ | ✓ | ✓ | ✓ | ✓ |
| Converted theme | - | ✓ | ✓ | ✓ | ✓ | ✓ |
| Assigned theme | ✓ | ✓ | ✓ | ✓ | ✓ | ✓ |
| Default theme | ✓ | - | - | - | ✓ | ✓ |
Create a Custom VMware Cloud Director Portal Theme
To create a custom theme for the VMware Cloud Director Service Provider Admin Portal and the VMware Cloud Director Tenant Portal, you can use the Customize Portal plug-in.
When making any changes to the theme, you can instantly see how the selection would change the appearance of the theme.
Prerequisites
- From the top navigation bar, select Administration.
- In the left panel, under Settings, select the Feature Flags tab.
- Select the Branding API, and click Enable.
- For the changes to take effect, log out and log in again to the VMware Cloud Director Service Provider Admin Portal.
Procedure
- From the primary left navigation panel, under More, select Customize Portal.
- Select the Themes tab.
- From the Create theme drop-down menu, select a light-based or dark-based theme.
- (Optional) Select the Colors tab, and select a color for each element of the theme.
- Change the platform branding.
- Select the Branding tab.
- Enter a platform name.
The platform name replaces the VMware Cloud Director name on the top navigation bar, the login page, and the browser title. If you want the theme to use the organization name at runtime, enter
${TENANT_NAME}as a platform name. - Upload a platform logo.
The platform logo replaces the VMware logo on the top navigation bar and the login page.
- Upload a browser favicon.
The favicon, or browser tab icon, is the icon that appears next to the page title in a browser tab.
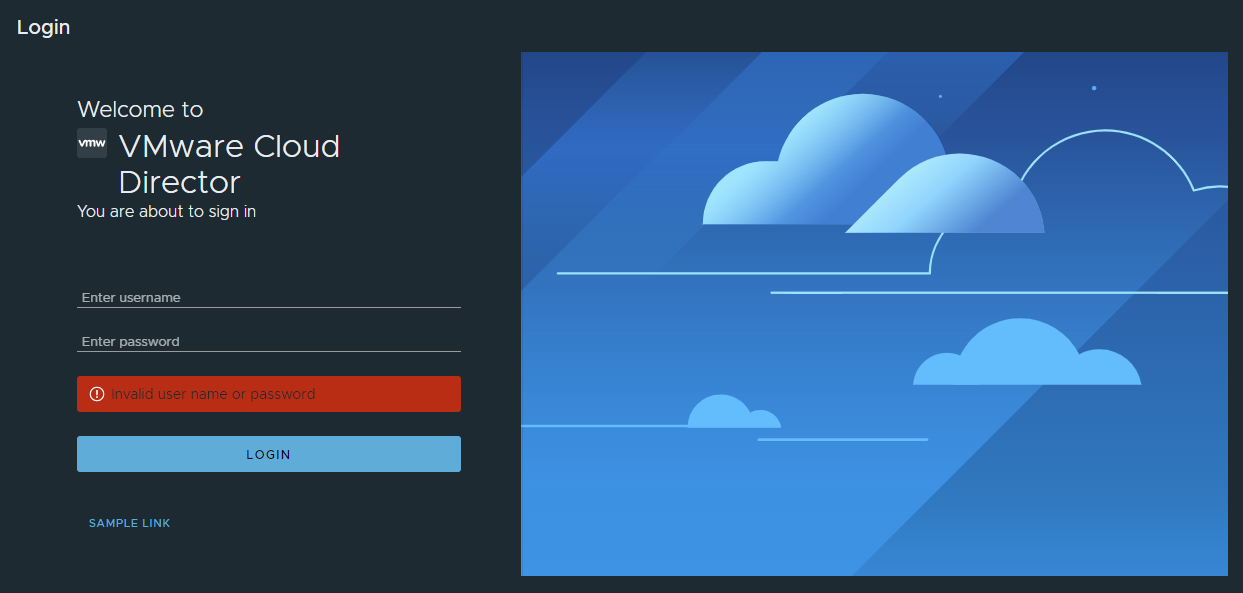
- Upload a background image for the login page.
The login background image fills the full size of the screen and part of it is hidden below the login form. In addition, the image is centered and fills the screen entirely without distorting the image, changing width to height ratio, or leaving blank spots. Depending on the browser window size and screen resolution settings, some parts of the background image might not appear. Consider using a background with a pattern or an image that looks complete even if parts of it do not appear.
- (Optional) In the Links tab, customize the platform links.
- Enter new URLs for the Help, About, and Download VM Remote Console menu items.
The Help and About menu items are located in the Help menu on the right side of the top navigation bar. The Download VM Remote Console option is located in the menu of a VM.
The Override items replace the existing links for the Help, About, and Download VM Remote Console menu items. By default, Download VM Remote Console redirects the users to https://my.vmware.com to download VMRC, which requires users to have registered accounts for downloading. By overriding this link, you can relocate the VMRC installer to your own server. - Create custom links, sections, and separators to the user menu.
The Menu items are new links that you add to the user menu item in the upper-right corner of the portal. If you want the theme to automatically use the tenant name, tenant ID, or session token, use
${TENANT_NAME},${TENANT_ID}, or${SESSION_TOKEN}as placeholders.Variable Description ${TENANT_NAME} Organization name ${TENANT_ID} Organization ID ${SESSION_TOKEN} x-vcloud-authorization token 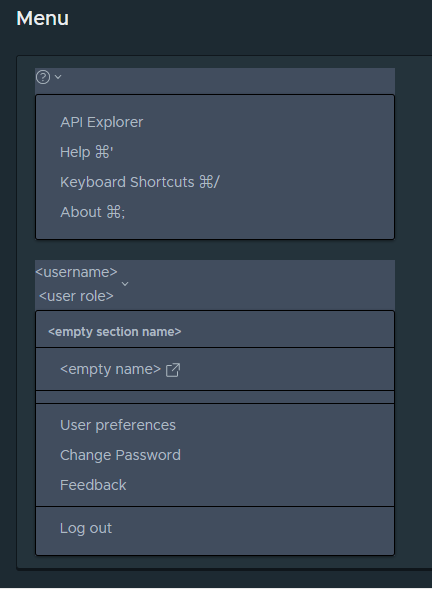
You can organize these custom links by selecting the Section and Separator menu items. A Section menu item adds a header to the menu, a Separator menu item adds a line to the menu.
- Add a link to the login page.
For example, you can add links to the terms and conditions on your platform, privacy and accessibility information, trademarks, and so on.
- Add a link to the logout page.
For example, you can add links to the terms and conditions on your platform, privacy information, accessibility information, trademarks, and so on.
- Enter new URLs for the Help, About, and Download VM Remote Console menu items.
- Click Save.
What to do next
From the Actions menu on the theme, you can make the theme a default one, assign the theme to an organization, export, clone, and delete the theme. You can assign to the Service Provider Admin Portal a theme different from the default theme. You can use the export option to clone a theme by importing it again to VMware Cloud Director.
The default theme changes affect all organizations apart from the ones with specifically assigned themes through the Assign option.
If an assigned theme becomes the default, it stops being explicitly assigned to organizations. When you change the default theme, VMware Cloud Director removes it from all organizations to which the theme was assigned to and replaces it with the new default.
Import a Custom VMware Cloud Director Portal Theme
You can export a custom portal theme from one VMware Cloud Director site and import it to another site.
Prerequisites
- Verify that you have an exported theme ZIP file. You can export an existing theme from its Actions menu.
- If you want to edit manually a ZIP file and use custom CSS for a theme, export the theme ZIP file and extract the file, make CSS changes to the theme, and compress the files to ZIP format again.
Procedure
- From the primary left navigation panel, under More, select Customize Portal.
- Select the Themes tab, and click Import.
- Select a theme ZIP file, and click Open.
Results
What to do next
From the Actions menu on the theme, you can make the theme a default one, assign the theme to an organization, export and delete the theme.
The default theme changes affect all organizations apart from the ones with specifically assigned themes through the Assign option.
If an assigned theme becomes the default, it stops being explicitly assigned to organizations. When you change the default theme, VMware Cloud Director removes it from all organizations to which the theme was assigned to and replaces it with the new default.
Convert a Legacy VMware Cloud Director Theme
You can convert themes modified through the legacy VMware Cloud Director branding implementation to themes that you can view and edit by using the VMware Cloud Director Service Provider Admin Portal or the new API endpoint.
Converted themes are read-only and marked as legacy. If you want to edit a converted theme, you must clone the theme and make changes to the clone. You can convert a legacy theme multiple times. You can identify the different conversions by the time stamp in their names.
Prerequisites
Verify that you have at least one theme modified through the legacy VMware Cloud Director branding implementation.
