


Use the VI Configuration wizard in the SDDC Manager UI to create a new workload domain.
The SDDC Manager UI supports running multiple VI workload domain creation tasks in parallel.
Procedure
- Select the principal storage type and click Begin.
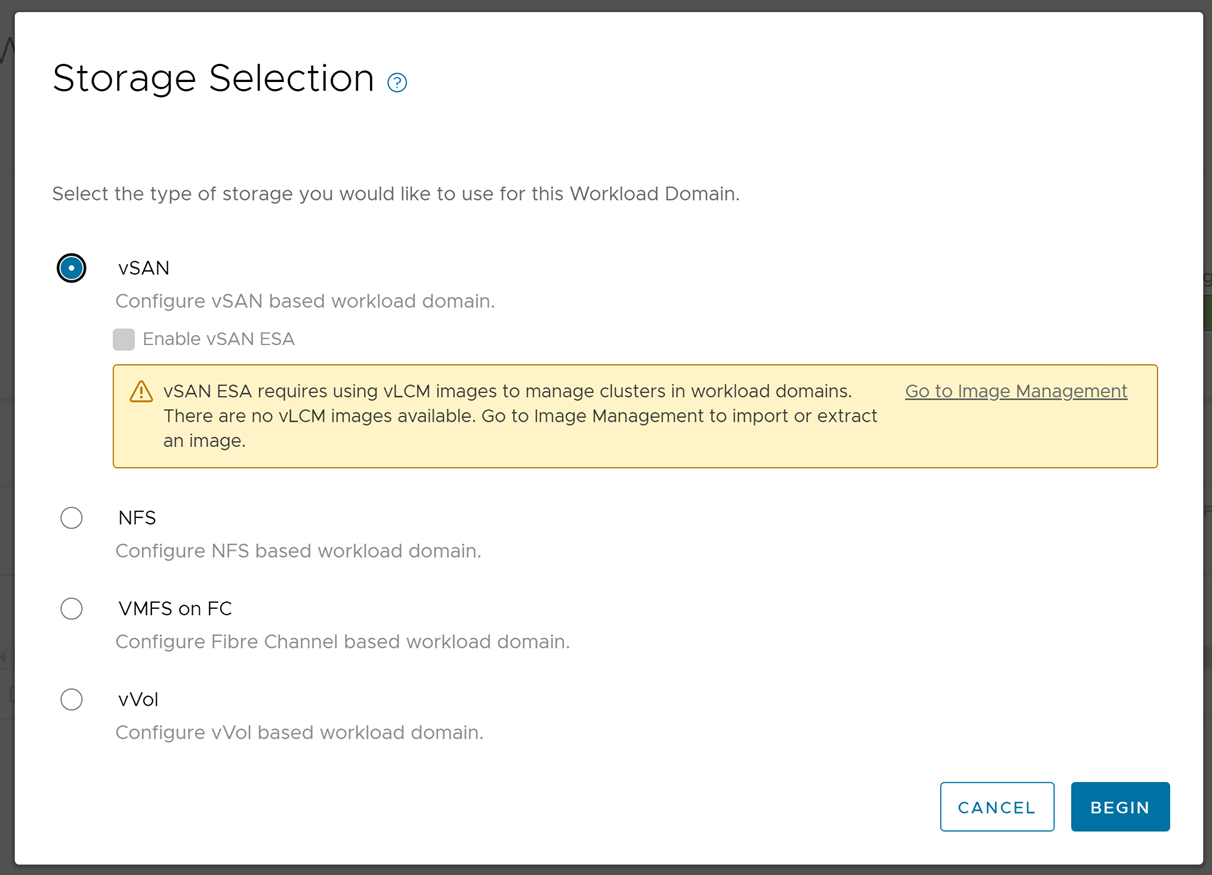
To enable vSAN Express Storage Architecture (ESA), you must have a vLCM image to manage clusters.- If you need to create a new cluster image, go to the management domain's vCenter to create the image.
- If there are no vLCM images available, go to Image Management () to extract or import a cluster image. See Extract a vSphere Lifecycle Manager Image and Import a vSphere Lifecycle Manager Image for more information.
For more information on vSAN ESA, see https://core.vmware.com/blog/introduction-vsan-express-storage-architecture and vSAN Express Storage Architecture (ESA) Frequently Asked Questions (FAQ).
Specify Names, vCenter Single Sign-On Domain, and vSphere Lifecycle Manager Method
Provide names for the VI workload domain and organization, choose a vCenter Single Sign-On domain, and select whether the VI workload domain will use vSphere Lifecycle Manager images or baselines.
- Two-node clusters are not supported in a VI workload domain that uses vSphere Lifecycle Manager baselines. See Prerequisites for a Workload Domain for additional requirements for two-node cluster.
Prerequisites
Verify that you have met the prerequisites described in About VI Workload Domains.
Procedure
Specify vSphere Cluster Details
Provide a name for the workload domain vSphere cluster. If you are using vSphere Lifecycle Manager images, select a cluster image to apply to the hosts.
Prerequisites
You must have a cluster image available if the workload domain is using vSphere Lifecycle Manager images. See Managing vSphere Lifecycle Manager Images in VMware Cloud Foundation.
Procedure
Specify Compute Details
Specify the details for the vCenter Server that gets deployed for the workload domain.
Procedure
Specify Networking Details
Provide information about the NSX Manager cluster to use with the VI workload domain. If you already have an NSX Manager cluster for a different VI workload domain, you can reuse that NSX Manager cluster or create a new one.
See VMware Configuration Maximums for information about the maximum number of workload domains that can be managed by a single NSX Manager instance.
Procedure
- On the Networking page of the wizard, select an option for the VI workload domain's NSX Manager instance.
Option Description Create New NSX instance Choose this option to create a new NSX Manager instance for the workload domain. Note:- You must create a new NSX Manager instance if this is the first VI workload domain in your VMware Cloud Foundation instance.
- You must create a new NSX Manager instance if your VI workload domain is joining a new SSO domain.
- Provide the NSX Manager cluster details:
- FQDNs for three NSX Managers nodes
- NSX Manager cluster FQDN
- NSX Manager Admin password
- NSX Manager Audit password
Use Existing NSX instance Choose this option to use an existing NSX Manager instance from another VI workload domain. Important:- You cannot share an NSX Manager instance between VI workload domains that are in different SSO domains.
- In order to share an NSX Manager instance, the VI workload domains must use the same update method. The VI workload domains must both use vSphere Lifecycle Manager baselines or they must both use vSphere Lifecycle Manager images.
- Select the NSX Manager instance.
Note: NSX Managers for workload domains that are in the process of deploying are not able to be shared and do not appear in the list of available NSX Managers.
- Click Next.
Select the vSAN Storage Parameters
At the vSAN Storage step of the creation wizard, specify the availability you want provisioned for the VI workload domain. This page appears only if you are using vSAN storage for this workload domain.
- Storage Type: Local vSAN datastore.
- Storage Policy: Auto-policy management.
Note: Based on the type of cluster and number of hosts, vSAN creates and assigns a default datastore policy for best capacity utilization after the cluster configuration is completed. Policy details can be viewed in the vSphere Client ( ).
If you are using vSAN OSA, SDDC Manager determines uses the settings you specify to determine:
- The minimum number of hosts that it needs to fulfill those selections
- The specific hosts in your environment that are available and appropriate to fulfill those selections
- The virtual infrastructure features and their specific configurations that are needed to fulfill those selections
Procedure
Specify the VMFS on FC Datastore
If you are using VMFS on FC storage for the workload domain, you must specify the VMFS on FC datastore name.
Procedure
- On the Storage page, enter the name of the VMFS on FC datastore.
- Click Next.
Specify vVols Storage Details
If you use vVols storage for the workload domain, you must specify the vVols storage details.
Procedure
Select Hosts
The Host Selection page displays available hosts along with hosts details. Hosts that are powered off, cannot be accessed via SSH, or have not been properly commissioned are not displayed.
- Select only healthy hosts.
To check a host's health, SSH in to the SDDC Manager VM using the vcf administrative user account and type the following command:
sudo /opt/vmware/sddc-support/sos --health-check
When prompted, enter the vcf user password. For more information, see Supportability and Serviceability (SoS) Utility - For optimum performance, you must select hosts that are identical in terms of memory, CPU types, and disks.
If you select unbalanced hosts, the SDDC Manager UI displays a warning message, but you can proceed with the workload domain creation.
- You cannot select hosts that are in a dirty state. A host is in a dirty state when it has been removed from a cluster in a workload domain.
To clean a dirty host, re-image the host.
- You cannot combine DPU-backed and non-DPU hosts in the same cluster.
- When creating a VI workload domain using the SDDC Manager UI, all hosts in a cluster must be associated with the same network pool. You can use the Cloud Foundation API to select hosts from different network pools, if those network pools have the same VLAN ID and MTU settings. We allow L3 Networks for VSAN, VMOTION, using SDDC Manager UI, but not for TEP and MANAGEMENT. For TEP and MANAGEMENT, API needs to be used using Network profiles.
Procedure
Specify Switch Configuration
The Switch Configuration page displays preconfigured switch profiles to be applied to the hosts in the cluster. There is also the option to create a custom switch configuration.
- Default: This profile is recommended and is the default configuration. It provides a unified fabric for all traffic types.
- Storage Separation: This profile is used to physically separate vSAN storage traffic from other traffic types. This separates vSAN storage traffic onto separate physical host NICs and data center switches.
- NSX Separation: This profile is used to physically separate NSX traffic and workload traffic from other traffic types. This separates NSX Edge traffic and overlay traffic onto a separate physical host NICs and data center switches.
- Storage Traffic and NSX Traffic Separation: This profile is used to physically separate storage traffic, NSX Edge traffic, and workload traffic from other traffic types (management and vMotion). This will separate storage traffic, NSX Edge traffic, and overlay traffic onto separate physical host NICs and data center switches.
- Create Custom Switch Configuration: Copy from a preconfigured profile to customize or create distributed switch configuration.
Multiple Distributed Switches (VDS) can be configured. Each VDS can hold one or more network traffic configurations.
- Some network traffic types are mandatory. Switch configuration is incomplete until these mandatory traffic types are configured.
- Network types Management, vMotion, vSAN and NSX-Overlay can be configured only once for a cluster.
- NSX-VLAN and Public network traffic types can be configured in multiple VDSes.
Procedure
- Choose a preconfigured switch configuration profile and click Select and click Next or Create Custom Switch Configuration (Skip to step 3).
- For a preconfigured switch profile:
- Provide the VDS configuration to be applied to the hosts in the cluster.
VLAN ID is required and must be entered before proceeding to the next step.The default VLAN ID is 0. It is not recommended to configure 0 because NSX-Overlay will not work.
- Once the details for the phyiscal network adapters and VLAN ID information is updated, click Next.
Note: The numbering of physical NICs may become out of sync with the VDS numbering. This issue can be worked around by selecting Change Profileto reconfigure the mappings.
- Provide the VDS configuration to be applied to the hosts in the cluster.
- To create a custom switch configuration:
- Click Create Custom Switch Configuration.
- Provide the Distributed Switch Name, MTU, VDS Uplinks properties, and select the network traffic configured on this Distributed Switch (vSAN, Management, vMotion, vSAN, Public, and NSX) from the dropdown.
When mapping uplinks to phyical network adapters, you cannot select a NIC type more than once.

- Click Create Distributed Switch.
Note: You cannot proceed until all mandatory traffic types are configured.
- For Management and vMotion switch configuration, enter the Distributed PortGroup Name, select the Load Balancing policy, and review the uplink information. Click Save Configuration.
- Click Create Distributed Switch.
- For NSX, select the Operational Mode (Standard, Enhanced Datapath, Enhanced Datapath interrupt), Transport Zone Type (NSX-Overlay, NSX-VLAN).
Note: For a VI workload domain with DPU-backed hosts, you must select Enhanced Datapath.If you are using overlay on an NSX cluster, the NSX-Overlay Tranport Zone Name is autofilled.
- Enter the VLAN ID and select the IP Allocation (DHCP or Static IP Pool).
- Enter the NSX-VLAN Transport Zone Name and teaming policy uplink mapping.
- Enter the details for the NSX Uplink Profile.
- Click Save Configuration.
- When all mandatory traffic types are configured, click Next.
Specify NFS Storage Details
If you are using NFS storage for this workload domain, you must provide the NFS share folder and IP address of the NFS server.
Procedure
Select Licenses
On the Licenses page, select a licensing option.
Prerequisites
- VMware vSAN (if using vSAN as the storage option)
NFS does not require a license
- VMware NSX
- VMware vSphere
Since vSphere and vSAN licenses are per CPU, ensure that you have sufficient licenses for the ESXi hosts to be used for the workload domain.
For information on adding component license keys, see Add a Component License Key in the SDDC Manager UI.
Procedure
View Object Names
The Object Names page displays the vSphere objects that will be generated for the VI workload domain. Object names are based on the VI workload domain name.
Procedure
- Review the syntax that will be used for the vSphere objects generated for this domain.
- Click Next.
Review Details and Start the Creation Workflow
At the Review step of the wizard, review the information about the workload domain and start the creation workflow. You can also print the information or download a printable version to print later. It can take up to two hours for the domain to be created.
The Review page displays information about the resources and their configurations that are deployed when the workflow creates and deploys the virtual infrastructure for this workload domain.
The hosts that will be added to the workload domain are listed along with information such as the network pool they belong to, memory, CPU, and so on.
Procedure
What to do next
- Deploy another VI workload domain. You do not have to wait for the current VI workload domain creation task to complete.
- Deploy and configure an NSX Edge cluster. See Managing NSX Edge Clusters in VMware Cloud Foundation.
