Using Microsoft Entra ID as the identity provider for the management domain vCenter Server allows for identity federation across SDDC Manager, vCenter Server, and NSX Manager.
- Create an OpenID Connect application for VMware Cloud Foundation in Microsoft Entra ID.
- Configure Microsoft Entra ID as the Identity Provider in the SDDC Manager UI.
- Update the Microsoft Entra ID OpenID Connect application with the Redirect URI from SDDC Manager.
- Create a SCIM 2.0 Application for VMware Cloud Foundation.
- Assign Permissions for Microsoft Entra ID Users and Groups in SDDC Manager, vCenter Server, and NSX Manager.
Prerequisites
Create an OpenID Connect application for VMware Cloud Foundation in Microsoft Entra ID
Before you can use Microsoft Entra ID as the identity provider in VMware Cloud Foundation, you need to create an OpenID Connect application in Microsoft Entra ID and assign users and groups to the OpenID Connect application.
Procedure
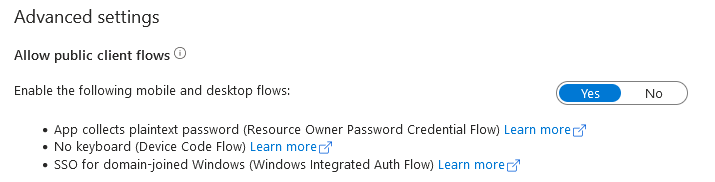
- Click , scroll to the Advanced settings section, slide the toggle to Yes for Enable the following mobile and desktop flows and click Save.
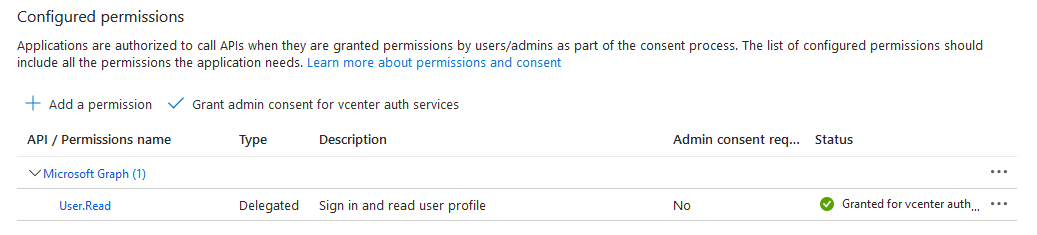
- Click and click Grant admin consent for <tenant_organization_name>. For example, Grant admin consent for vcenter auth services.
What to do next
Configure Microsoft Entra ID as the Identity Provider in the SDDC Manager UI
You can configure VMware Cloud Foundation to use Microsoft Entra ID as an external identity provider, instead of using vCenter Single Sign-On. In this configuration, the external identity provider interacts with the identity source on behalf of vCenter Server.
You can only add one external identity provider to VMware Cloud Foundation.
Prerequisites
- You are customer of Microsoft Entra ID and have an Azure AD account.
- To perform OIDC logins and manage user and group permissions, you must create the following Microsoft Entra ID applications.
- A Microsoft Entra ID native application with OpenID Connect as the sign-on method. The native application must include the grant types of authorization code, refresh token, and resource owner password.
- A System for Cross-domain Identity Management (SCIM) 2.0 application with an OAuth 2.0 Bearer Token to perform user and group synchronization between the Microsoft Entra ID server and the vCenter Server.
- If your network is not publicly available, you must create a network tunnel between your vCenter Server system and your Microsoft Entra ID server, then use the appropriate publicly accessible URL as the SCIM 2.0 Tenant URL.
- vSphere 8.0 Update 2 or later.
- NSX 4.1.2 or later.
Procedure
- Click Change Identity Provider and select Microsoft Entra ID.
- In the Directory Info panel, enter the following information.
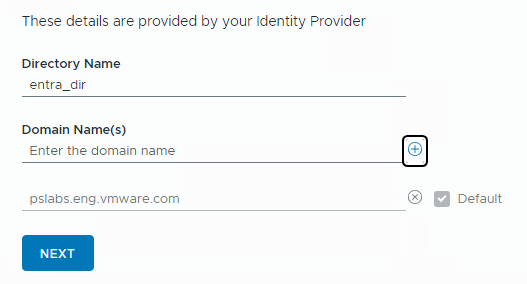
- Directory Name: Name of the local directory to create on vCenter Server that stores the users and groups pushed from Microsoft Entra ID. For example, vcenter-entra-directory.
- Domain Name(s): Enter the domain names that contain the Microsoft Entra ID users and groups you want to synchronize with vCenter Server.
After you enter a domain name, click the Plus icon (+) to add it. If you enter multiple domain names, specify the default domain.
- In the OpenID Connect Configuration panel, enter the following information.
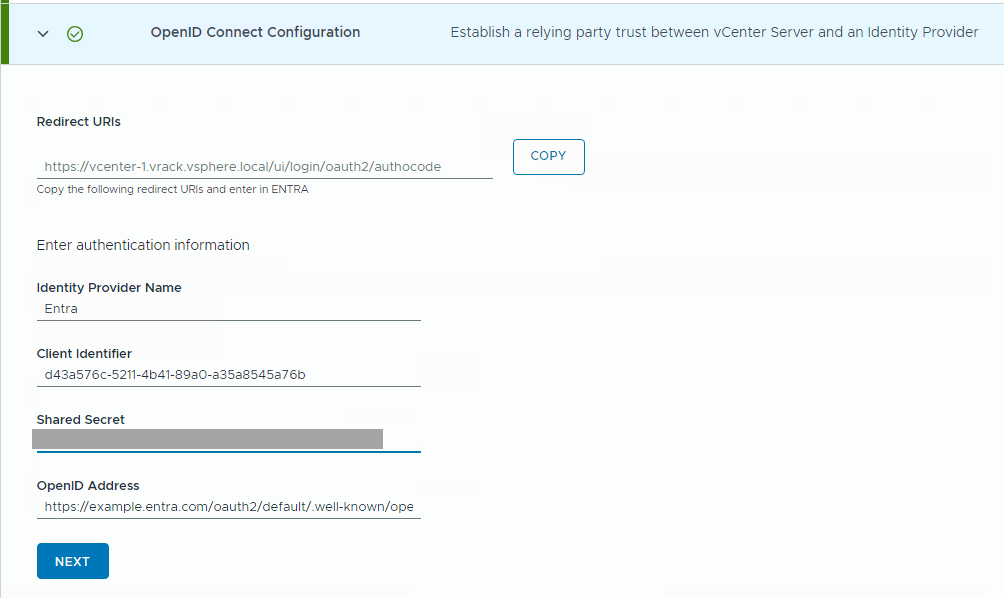
- Redirect URIs: Filled in automatically. You give the redirect URI to your Microsoft Entra ID administrator for use in creating the OpenID Connect application.
- Identity Provider Name: Filled in automatically as Entra.
- Client Identifier: Obtained when you created the OpenID Connect application in Microsoft Entra ID. (Microsoft Entra ID refers to Client Identifier as the Client ID.)
- Shared Secret: Obtained when you created the OpenID Connect application in Microsoft Entra ID. (Microsoft Entra ID refers to Shared Secret as the Client Secret.)
- OpenID Address: Obtained when you created the OpenID Connect application in Microsoft Entra ID. (Microsoft Entra ID refers to OpenID Address as the OpenID Connect metadata document).
Update the Microsoft Entra ID OpenID Connect application with the Redirect URI from SDDC Manager
After you create the Microsoft Entra ID identity provider configuration in the SDDC Manager UI, update the Microsoft Entra ID OpenID Connect application with the Redirect URI from SDDC Manager.
Prerequisites
- Log in to the SDDC Manager UI.
- In the navigation pane, click .
- Click Identity Provider.
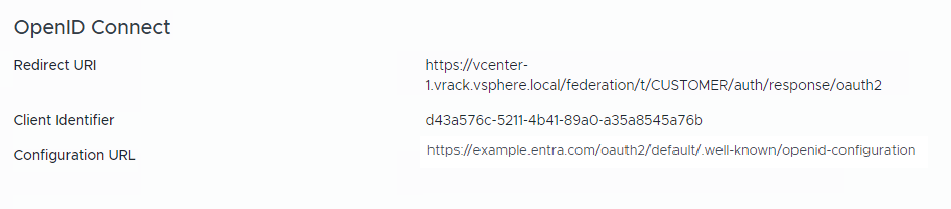
- In the OpenID Connect section, copy and save the Redirect URI.
Procedure
- Log in to the Microsoft Entra Admin Console.
- In the App Registrations screen for your OpenID Connect application, click Authentication.
- Select Add a platform and then select Web.
- In the Redirect URIs text box, paste the copied Redirect URI from SDDC Manager.
- Click Configure.
Create a SCIM 2.0 Application for Using Microsoft Entra ID with VMware Cloud Foundation
Creating a SCIM 2.0 application for Microsoft Entra ID enables you to specify which Active Directory users and groups to push to vCenter Server.
- Microsoft Entra Connect Provisioning Agent
- Microsoft Entra Application Proxy Agent
Prerequisites
- Log in to the SDDC Manager UI.
- In the navigation pane, click .
- Click Identity Provider.
- In the User Provisioning section, click Generate and then copy and save the Secret Token and Tenant URL.
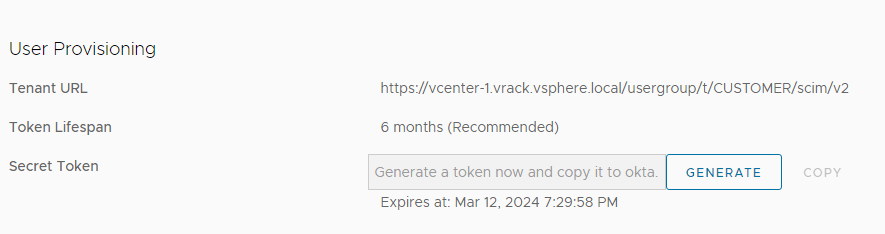
You will use this information to configure the Provisioning settings below.
Procedure
- Log in to the Microsoft Entra Admin Console.
- Navigate to and click New application.
- Search for "VMware Identity Service" and select it in the search results.
- Enter an appropriate name for the SCIM 2.0 application, for example, VCF SCIM 2.0 app.
- Click Create.
- After the SCIM 2.0 application is created, click and specify the Provisioning settings.
- Select Automatic as the Provisioning Mode.
- Enter the Tenant URL and Secret Token that you copied from the SDDC Manager UI and click Test Connection.
Note: If you have a network tunnel between the vCenter Server system and the Microsoft Entra ID server, then use the appropriate publicly accessible URL as the Tenant URL.
- Click Save.
- Expand the Mappings section and click Provision Azure Active Directory Users.
- On the Attribute Mapping screen, click userPrincipalName.
- On the Edit Attribute screen, update the settings and then click OK.
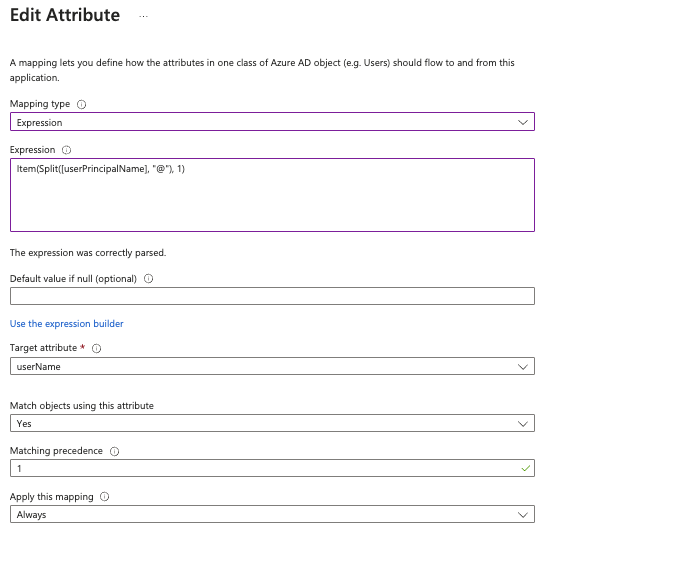
Option Description Mapping type Select Expression. Expression Enter the following text: Item(Split[userPrincipalName], "@"), 1)
- Click Add New Mapping.
- On the Edit Attribute screen, update the settings and then click OK.
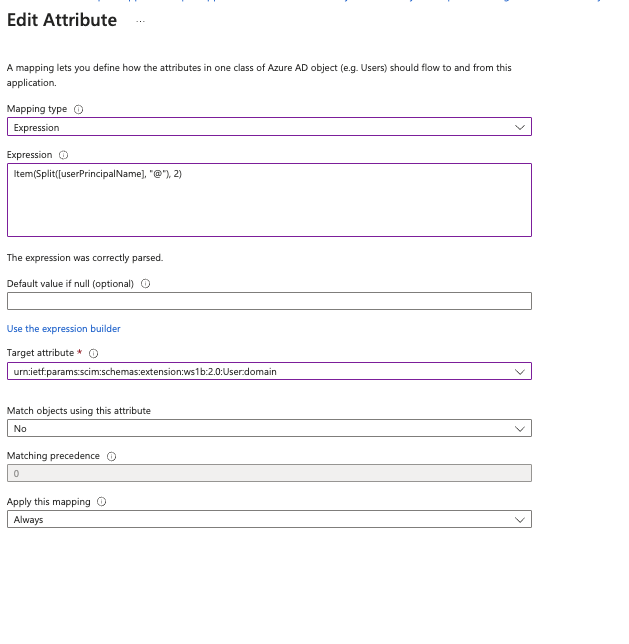
Option Description Mapping type Select Expression. Expression Enter the following text: Item(Split[userPrincipalName], "@"), 2)
Target attribute Select urn:ietf:params:scim:schemas:extension:ws1b:2.0:User:domain. - Click Save.
- Set the Provisioning Status to On.
- Provision users.
- Click .
- Click Add user/group.
- Search for users and groups and click Select.
- Click Assign.
- Click .
- Click Start provisioning.
Assign Microsoft Entra ID Users and Groups as Administrators in SDDC Manager, vCenter Server, and NSX Manager
After you have successfully configured Microsoft Entra ID and synced its users and groups, you can add users and groups as administrators in SDDC Manager, vCenter Server , and NSX Manager. This enables admin users to sign in to one product UI (for example, SDDC Manager) and not be prompted for credentials again when signing in to another product UI (for example, NSX Manager).
Procedure
- Add Microsoft Entra ID users/groups as administrators in SDDC Manager.
- In the SDDC Manager UI, click .
- Click Users and Groups and then click + User or Group.

- Select one or more users or group by clicking the check box next to the user or group.
You can either search for a user or group by name, or filter by user type or domain.Note: Microsoft Entra ID users and groups appear in the domain(s) that you specified when you configured Microsoft Entra ID as the identity provider in the SDDC Manager UI.
- Select the ADMIN role for each user and group.
- Scroll down to the bottom of the page and click Add.
- Add Microsoft Entra ID users/groups as administrators in vCenter Server.
- Log in to the vSphere Client as a local administrator.
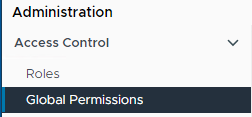
- Select Administration and click Global Permissions in the Access Control area.
- Click Add.
- From the Domain drop-down menu, select the domain for the user or group.
- Enter a name in the Search box.
The system searches user names and group names.
- Select a user or group.
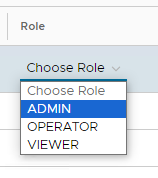
- Select Administrator from the Role drop-down menu.
- Select the Propagate to children check box.
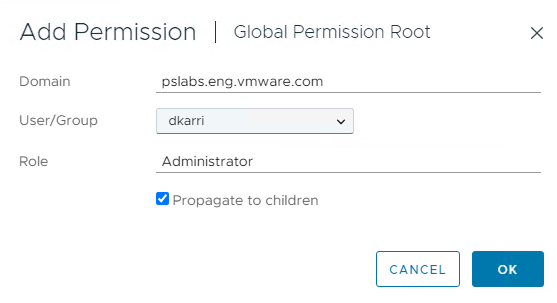
- Click OK.
- Verify logging in to SDDC Manager with an Microsoft Entra ID user.
- Log out of the SDDC Manager UI.
- Click Sign in with SSO.

- Enter a username and password and click Sign In.
- Verify logging in to vCenter Server with an Microsoft Entra ID user.
- Log out of the vSphere Client.
- Click Sign in with SSO.
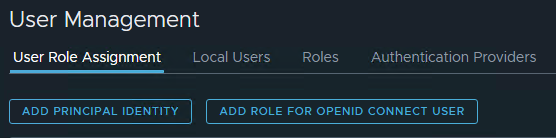
- Add Microsoft Entra ID users/groups as administrators in NSX Manager.
- Log in to NSX Manager.
- Navigate to .

- On the User Role Assignment tab, click Add Role for OpenID Connect User.
- Select vcenter-idp-federation from the drop-down menu and then enter text to search for and select a Microsoft Entra ID user or group.
- Click Set in the Roles column.
- Click Add Role.
- Select Enterprise Admin from the drop-down menu and click Add.
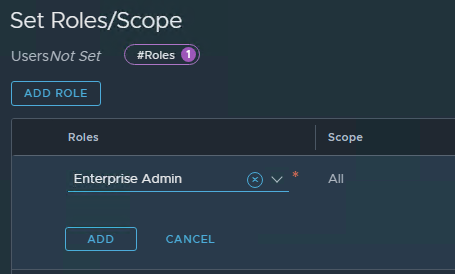
- Click Apply.
- Click Save.
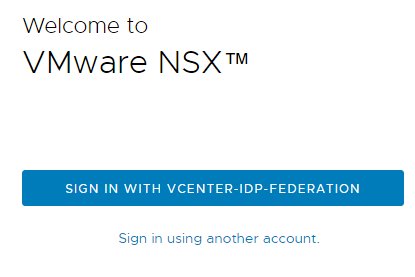
- Verify logging in to NSX Manager with an Microsoft Entra ID user.
- Log out of NSX Manager.
- Click Sign in with vCenter-IPD-Federation.