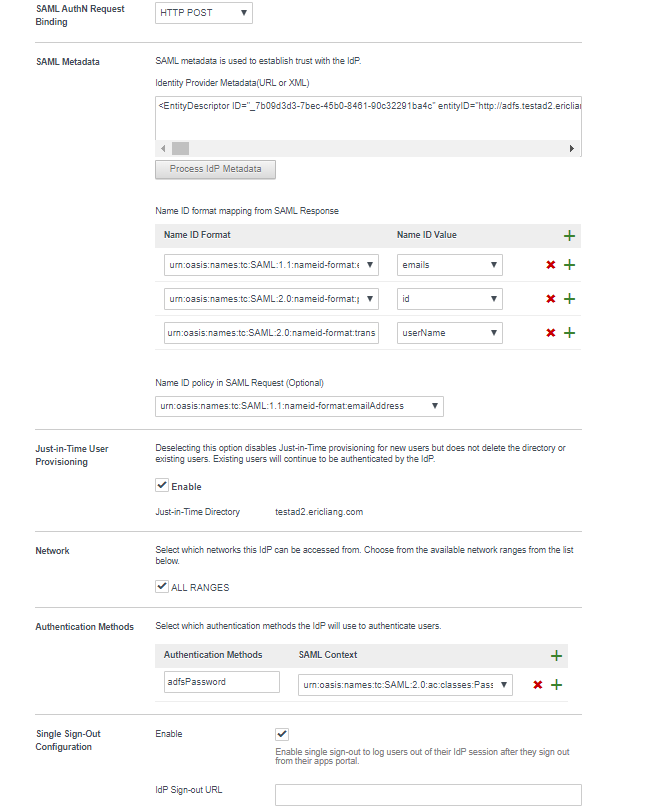
Configure Workspace ONE Access to use your AD FS server as an identity provider.
Procedure
- Log in to Workspace ONE Access with the tenant admin user name and password.
- On the Identity & Access Management tab, click Identity Providers.
- Click Add Identity Provider and select Create Third Party IDP.
- Enter a name and in the SAML Metadata text box, paste the contents of the FederationMetadata.xml file you downloaded from your AD FS server in Add Workspace ONE Access as a Relying Party for AD FS from the AD FS UI and click Process IDP Metadata.
- In the SAML AuthN Request binding drop-down menu, select HTTP Post.
The Name ID format mapping for SAML response table below the text box is populated with the emails, id, and unserName Name IDs.
- urn:oasis:names:tc:SAML:1.1:nameid-format:emailAddress
- urn:oasis:names:tc:SAML:2.0:nameid-format:persistent
- urn:oasis:names:tc:SAML:2.0:nameid-format:transient
- From the Name ID policy in SAML Request (Optional) drop-down menu, select urn:oasis:names:tc:SAML:1.1:nameid-format:email address.
- Enable Just-In-Time User Provisioning.
- In the Just-In-Time User Provisioning section, select the Enable check box.
- In the Directory Name text box, enter the full Active Directory name.
- In the Domains text box, enter the full Active Directory name.
- In the Network section, select the ALL RANGES check box.
- Configure an authentication method.
Authentication Method Steps Password Authentication - In the Authentication Methods text box, type a name for an authentication method.
- In the SAML Context drop-down menu, select urn:oasis:names:tc:SAML:2.0:ac:Classes:PasswordProtectedTransport.
PIV Authentication - In the Authentication Methods text box, type a name for an authentication method.
- In the SAML Context drop-down menu, select urn:oasis:names:tc:SAML:2.0:ac:classes:X509.
- In the Single Sign-Out Configuration section, select Enabled.
- Save the IDP configuration.
Example: IDP Configuration
