

Using an On-Premises DHCP server


With VMware Cloud on AWS, there is the option to use the built-in DHCP server to assign IPs to VMs in the SDDC. It's very simple to configure, and is set-up when the network is created in vCenter → Global Inventory Lists → Logical Networks.
Simply check the DHCP Enabled box, specify the IP Range to use for assigning IPs, and the DNS Domain name to push out. The network information is already populated as part of the required network configuration.
However, there is currently no support to edit the DHCP settings once a network has been created. In addition, some customers already have an IPAM solution that manages DHCP IP assignments on-prem, and would prefer to simply forward DHCP requests to that system.
There is no built-in method to forward DHCP requests to a different DHCP server in VMware Cloud on AWS. But there are a few simple options that will allow for the use of an existing DHCP server using a VM configured as a DHCP relay connected to the network to forward DHCP requests from.
A Note about availability: The method outlined in this guide relies on vSphere HA to ensure availability in case of a VM or host crash. However, this will still result in a brief outage for the DHCP relay services while the VM being used to relay DHCP requests reboots. Due to the broadcast nature of DHCP requests, it's not recommended to configure multiple DHCP relay servers, or a DHCP server and relay agent on the same network, as this can cause unpredictable results. In addition, no data is stored on the DHCP relay VM as requests are simply routed through, so there is no specific need for backups nor concerns of data loss for the DHCP relay VM.
To take advantage of this method, ensure that the networks to relay DHCP for do not have DHCP enabled under vCenter → Global Inventory Lists → Logical Networks. In addition, a scope matching the network in VMware Cloud on AWS being configured through the DHCP relay must be configured on the DHCP server.
This solution is possible using either Linux or Windows-based VMs, depending upon user preference. Here are the steps to get this working:
- Ensure that the VM being used as the DHCP relay:
- Has an interface with a statically assigned IP (that is outside of or excluded from the configured DHCP scope) on the network that dhcp addresses are to be assigned on. It is possible to add multiple interfaces to a single VM to allow it to forward requests for more than one network (as long as each interface to forward DHCP is configured for the DHCP relay to listen on).
- Is able to reach the DHCP server it is forwarding requests to via IP, and that any firewalls allow the DHCP traffic through (UDP port 67 and 68) in both directions between the relay and the server.
Using a Linux-based VM
(CentOS is the example used, but similar steps would be applicable for other Linux varieties as well)
- Install the DHCP package if it is not already present (check for /sbin/dhcrelay or /usr/sbin/dhcrelay):
-
yum install dhcp
-
- Ensure that the VM being used as the DHCP relay:
- Has an interface with a statically assigned IP on the network that dhcp requests need to be relayed from. It is possible to add multiple interfaces to a single VM to allow it to forward requests for more than one network.
- Is able to reach the DHCP server it is forwarding requests to via IP, and that any firewalls allow the DHCP traffic through (UDP port 67 and 68) in both directions between the relay and the server.
- Follow the instructions from the link below to configure the DHCP relay service:
- https://access.redhat.com/documentation/en-us/red_hat_enterprise_linux/7/html/networking_guide/dhcp-relay-agent
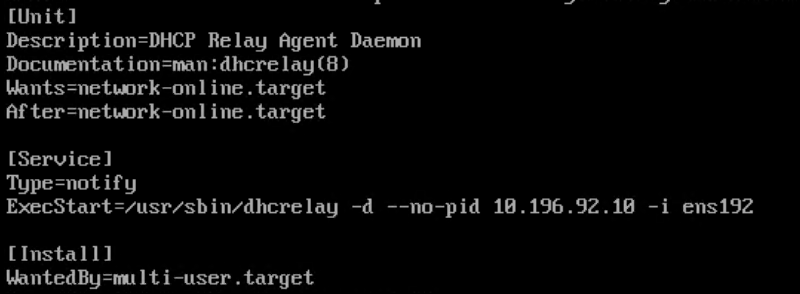
- Add the destination relay server to the end of the /etc/systemd/system/dhcrelay.service file on the ExecStart line. Optionally limit the service to listen only on the interface specified by -I <interface_name> to the same line after the dhcp server. (multiple -i <interface_name> entries can be specified if required)
- The config file would like like the below to send requests to 10.196.92.10, and listen on interface ens192
- Reload the config file and start the service:
-
systemctl --system daemon-reload
-
systemctl restart dhcrelay
-
- https://access.redhat.com/documentation/en-us/red_hat_enterprise_linux/7/html/networking_guide/dhcp-relay-agent
Using a Windows VM
(based on Windows 2016, but 2012 is similar)
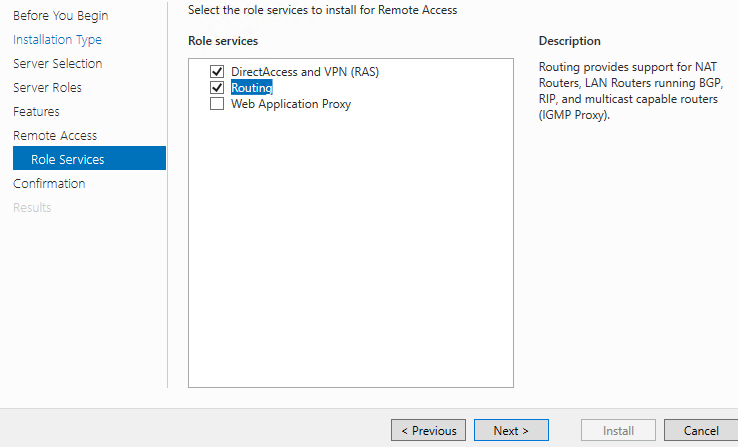
- Add the Remote Access Role. Check the Routing feature (and dependencies) and install.
- Run Routing and Remote Access from the administrative control panel or Tools menu in the Server Manager. Select the relay server, right-click and choose configure and enable routing and remote access.
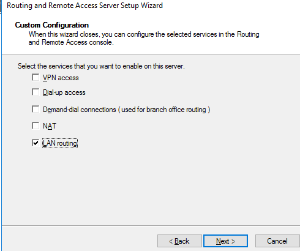
- Select the Custom Configuration option
- Select LAN Routing, and then finish, and Start Service when prompted.
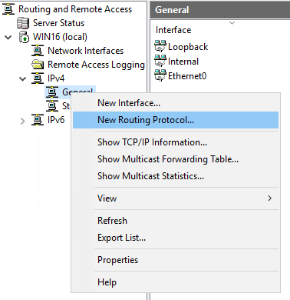
5. Under IPv4 in the Routing and Remote Access panel, right click on General and choose “New Routing Protocol...” and select “DHCP Relay Agent”.

6. Now right-click on DHCP Relay Agent and select "Properties".
- Add the DHCP server IP where forwarded DHCP requests should be sent.

7. Right-click on the DHCP Relay Agent and select New Interface. Select the interface that should listen for DHCP packets and relay them. Repeat this process if there are multiple interfaces that need to forward DHCP requests.

- Ensure the hop count is sufficient for packets to reach the DHCP server in case multiple DHCP relays are being used in sequence. The hop count must be greater than the total number of DHCP relays the packet will be sent through. The default is typically sufficient. This value is not related to the number of network hops between the DHCP relay and DHCP server.