


Cluster Connection
This topic explains how to connect the VMware GemFire® Management Console™ to a cluster.
Prerequisites
To connect the GemFire Management Console to a cluster:
- You must have a GemFire environment running with at least one Locator running.
Connecting to a Cluster
You connect the GemFire Management Console to a cluster from the Clusters Dashboard. For more information about the Clusters Dashboard, see Clusters Dashboard.
-
In the left menu of the Management Console, click Connect.

-
The Connect Cluster dialog screen appears.

-
Enter information in the three sections of the Connect Cluster dialog:
-
Click the Connect Cluster button. If the cluster is connected successfully, a banner appears with the message:
“Cluster Successfully Connected. Connect another cluster or close this window to Return to the main page.”
-
If you have finished connecting clusters, click Close. If you have additional clusters to connect, continue adding clusters until all clusters are connected, then click Close.
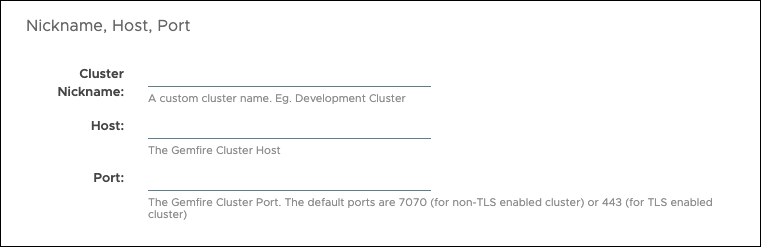
Nickname, Host, Port
In the first section of the Connect Cluster dialog, enter the following:
-
Cluster Nickname: Create and enter a custom name for the cluster. This allows you to give each cluster a unique, meaningful name for identification purposes. You cannot give the same nickname to more than one cluster.
-
Host: Enter the GemFire cluster hostname or the host IPv4 or IPv6 address.
-
Port: Enter the GemFire cluster’s locator HTTP service port. The default ports are
7070or443(for SSL/TLS-enabled clusters).
Security
In the second section of the Connect Cluster dialog, use the dropdown menu next to Cluster Security to select a security option. Your selection must match the security of the GemFire cluster that you are connecting to.
Options:
-
None: Select this option if the GemFire cluster has no security implemented.
-
Username/Password: Select this option if the GemFire cluster has a security manager that uses a username/password system, for example an LDAP system.
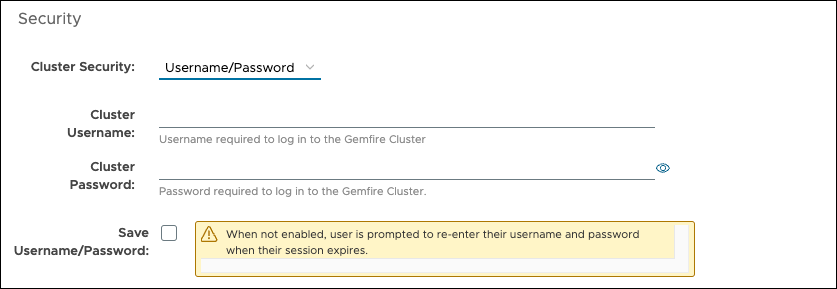
When selected, three additional fields appear to allow the user to enter their Cluster Username and Cluster Password credentials, and to save those credentials so that the user does not have to log in every time they attempt to interact with the cluster.
-
Authentication Token: Select this option if the GemFire cluster has a security manager that uses an authentication token system, for example OAuth.
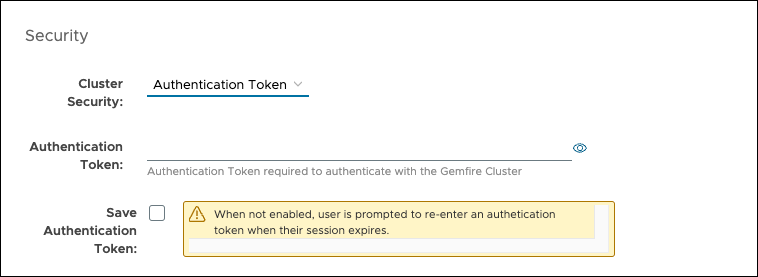
When selected, two additional fields appear to allow the user to enter their Authentication Token and to save that token so that the user does not have to log in every time they attempt to interact with the cluster.
-
Use Management Console Login Credentials: Select this option if the GemFire Management Cluster has been configured to work with an OAuth or LDAP system, and the GemFire cluster has a security manager that also uses the same OAuth or LDAP system. This option logs users into the GemFire cluster with the same credentials that they used to log in to the Management Console.
SSL/TLS
In the third section of the Connect Cluster dialog, if the GemFire cluster has SSL/TLS enabled, select the Connect over SSL/TLS checkbox. For information about configuring SSL/TLS for GemFire, see Configuring SSL/TLS in the GemFire product documentation.
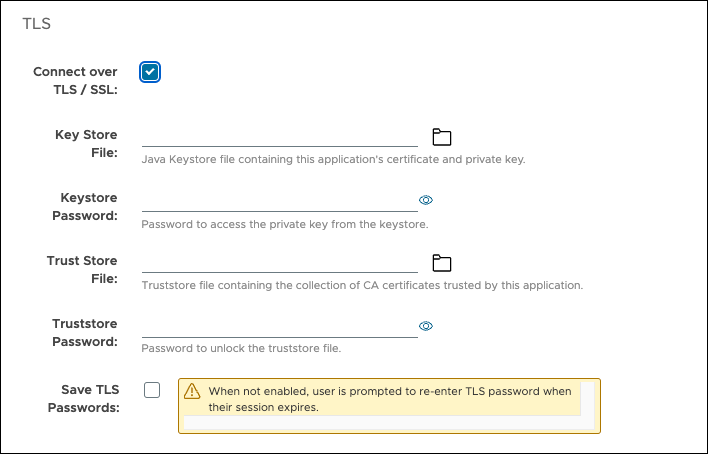
Enter the following information:
-
Key Store File: Add the Key Store File that contains the certificate and private key for the Management Console. Click the folder icon to browse your computer for the file.
-
Key Store Password: Enter the password needed to access the private key from the Key Store.
-
Trust Store File: Add the Trust Store File that contains the collection of CA certificates trusted by the Management Console. Click the folder icon to browse your computer for the file.
-
Trust Store Password: Enter the password needed to access the private key from the Trust Store.
-
Save TLS Passwords: Select this checkbox to save the SSL/TLS passwords. If left unselected, you must re-enter the SSL/TLS passwords after session expiration or logging out and logging back in.
Connecting to VMware GemFire
When you first log in, the Management Console attempts to connect to a local cluster running on localhost at port number 7070. If the Management Console finds a cluster at the default location, it automatically connects to the cluster and labels it with the “default cluster” nickname. You can change the name of this cluster at your discretion.
If a cluster is not found running at the default location or if you run the Management Console in Docker, to connect to a cluster running on the localhost you must enter the cluster’s IP address and port (as described above). You can find the cluster’s IP address in the gfsh output after starting a locator. For Docker, you must provide the IP address because the cluster is not running in the Docker container where the Management Console is running, so they do not have the same localhost.
Connecting to VMware GemFire for Tanzu Application Service
To connect to a VMware GemFire for Tanzu Application Service cluster (you must have a service instance created and running):
-
Create a service key. A service key provides a way to access your service instance outside the scope of a deployed app. On a command line, run:
cf create-service-key SERVICE-INSTANCE-NAME KEY-NAMEWhere:
SERVICE-INSTANCE-NAMEis the name of your service instance.KEY-NAMEis a name that you create. Use this name to refer to your service key when you run other commands.
-
View the newly created service key by running:
cf service-key SERVICE-INSTANCE-NAME KEY-NAMEWhere:
SERVICE-INSTANCE-NAMEis the name of your service instance.KEY-NAMEis a name that you create. Use this name to refer to your service key when you
Running this command returns output in the following format:
{ "distributed_system_id": "0", "gfsh_login_string": "connect --url=https://cloudcache-1.example.com/gemfire/v1 --user=cluster_operator_XXX --password=cluster_operator-password --skip-ssl-validation", "locators": [ "id1.locator.services-subnet.service-instance-id.bosh[55221]", "id2.locator.services-subnet.service-instance-id.bosh[55221]", "id3.locator.services-subnet.service-instance-id.bosh[55221]" ], "remote_cluster_info": { "recursors": { ... } -
Record the
gfsh_login_stringinformation from the output. You will use this information to connect the Management Console to the cluster. -
In the Management Console, click Connect Cluster in the top right of the Clusters home screen. Enter the GemFire cluster information in the dialog that appears:
-
Cluster Nickname: Create and enter a custom name for the cluster. This allows you to give each cluster a unique, meaningful name for identification purposes. You cannot give the same name to more than one cluster.
-
Host: The output from the
gfsh_login_stringin the service key contains the host to enter. You can find this in the--urlparameter between thehttps://and the/gemfire/v1. For example, in thisgfshoutput the host iscloudcache-1.example.com:gfsh_login_string": "connect --url=https://cloudcache-1.example.com/gemfire/v1 -
Port: Enter
443. By default, GemFire clusters running on the Tanzu Application Service must use TLS for connecting. -
Cluster Security: Select Username / Password.
-
If User Account and Authentication (UAA) has been configured, enter the the username and password. If User Account and Authentication (UAA) has not been configured, use the credentials found in the
gfsh_login_stringfor the Cluster Username / Password. For example, in thisgfshoutput the username iscluster_operator_XXXand the password iscluster_operator-password:gfsh_login_string": "connect --url=https://cloudcache-1.example.com/gemfire/v1 --user=cluster_operator_XXX --password=cluster_operator-password -
Choose whether to save the Username/Password.
-
Select the Connect over TLS / SSL checkbox. This enables the Management Console to connect over https instead of http.
-
The additional TLS fields are required only if TLS has been enabled on the cluster when starting the service instance.
-
Complete the SSL/TLS fields by entering the following information (optional):
-
Key Store File: Add the Key Store File that contains the certificate and private key for the Management Console. Click the folder icon to browse your computer for the file.
-
Key Store Password: Enter the password needed to access the private key from the Key Store.
-
Trust Store File: Add the Trust Store File that contains the collection of CA certificates trusted by the Management Console. Click the folder icon to browse your computer for the file.
-
Trust Store Password: Enter the password needed to access the private key from the Trust Store.
-
Choose whether to save the TLS Passwords.
-
Click the “Connect Cluster” button.
-
-
Connecting to VMware GemFire for Kubernetes
To connect the GemFire Management Console to a VMware GemFire for Kubernetes, you must create a load balancer with an external IP address. This IP address will be the host that the Management Console connects to.
