Follow these instructions to use the Informatica Developer Tools client to create a Greenplum Database loader target and mapping to load data into Greenplum Database.
Prerequisites
- Install the VMware Greenplum Connector for Informatica components to Informatica Data Integration Service and the Informatica Developer Tool client machine. See Installing the Connector.
- Configure and start GPSS in the Greenplum Database cluster. See Installing and Configuring GPSS in Greenplum Database.
Process
- Step 1: Create a Connection to Greenplum Streaming Server (GPSS)
- Step 2: Create a Greenplum Database Loader Target
- Step 3: Create a Mapping to the Greenplum Database Target
Step 1: Create a Connection to Greenplum Streaming Server (GPSS)
Follow these steps to create a connection from an Informatica client (Informatica Developer Tool) to a Greenplum Streaming Server (GPSS) instance running in Greenplum Database. After creating the connection, you can use Informatica Developer Tool to create loader targets in the Greenplum Database cluster and load data.
-
Start the Informatica Developer Tool application.
-
Select File > Connect to Repository…, then click Browse to show the available repository services.
-
Select a Repository Service from the Available Services list and click OK.
-
Click Next and enter a User Name and Password to use for connecting to the repository. Click Finish to log in.
-
Right-click the repository connection in the Object Explorer and select New > Project.
-
Enter a name for the new project, and click Finish to add the project to Object Explorer.
-
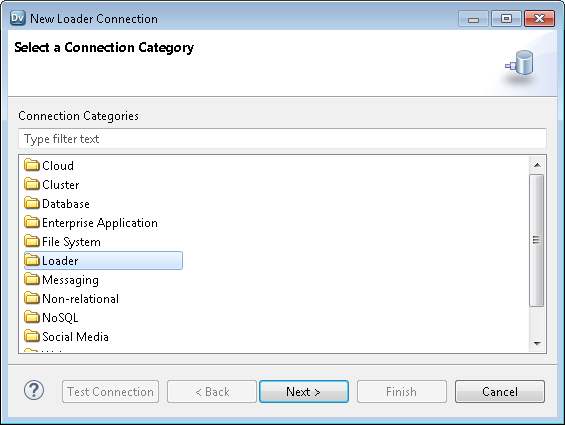
Click the Create Connection icon in the toolbar to display the Select a Connection Category window.
-
Select the Loader connection category, then click Next.

-
Enter a unique Name and ID for the connection, and use the Type menu to select GreenplumEnhancedLoader. If necessary, click Browse to select a non-default location in which to create the connection.

-
Click Next to display the Connection Details window. Enter the following information in the Connection Details window to connect to your Greenplum Database cluster:
- Loader host address, Loader host port: Enter the host name and port number where the GPSS service is listening for connections. These values must correspond to the listen address
HostandPortproperties in the JSON configuration file used to start GPSS. See Installing and Configuring GPSS in Greenplum Database. - Greenplum master address, Greenplum master port: Enter the host name and port number of the Greenplum Database master host.
- Database Name: Enter the name of the database that contains the table(s) where you want to load data from Informatica.
- Greenplum Database Username, Password: Enter the Greenplum Database user name and password to use for loading the data.
- Use SSL: Select this check box to use if you configured GPSS to use
httpscommunication between Informatica and the GPSS service. Leave this box unchecked if you configured GPSS to use unencryptedhttp. - Path of Certificate Authority File: If you chose to use SSL with certificates, enter the path to the local Certificate Authority file on the Informatica client machine. This file must contain the Certificate Authority that signed the certificate for the GPSS service (see Installing and Configuring GPSS in Greenplum Database).
- Schema: Enter the name of the Greenplum Database schema that contains the table(s) where you want to load data from Informatica. The default schema is
public.

- Loader host address, Loader host port: Enter the host name and port number where the GPSS service is listening for connections. These values must correspond to the listen address
-
Click Test Connection to test the connection with the values that you specified. Ensure that you receive a message indicating that the connection succeeded.
-
Click Finish to create the new connection.
Step 2: Create a Greenplum Database Loader Target
After you create a new connection to GPSS, you can use the connection to select Greenplum Database tables as loader targets for loading data from Informatica. Follow these steps:
-
Start the Informatica Developer Tool application.
-
If the Object Explorer view is not visible, display it by selecting Window > Show View > Object Explorer.
-
Right-click the project name that you created under the Informatica repository node, and select New > Data Object…. This prompts you to select a Wizard to use for creating the new object.
-
Select Greenplum5 Data Object from the list of available Wizards. Then click Next to display the New Greenplum5 Data Object wizard.

-
Enter a unique name for the loader target in the Name: field.
-
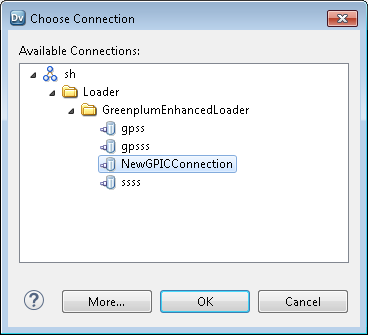
Click the Browse button next to the Connection: field to display the list of configured connections. The GPSS connection appears at the path location_name > Loader > GreenplumEnhancedLoader. Select the name of the loader configuration you created in Creating a New Connection to Greenplum Streaming Server (GPSS), then click OK to return to the Wizard.

-
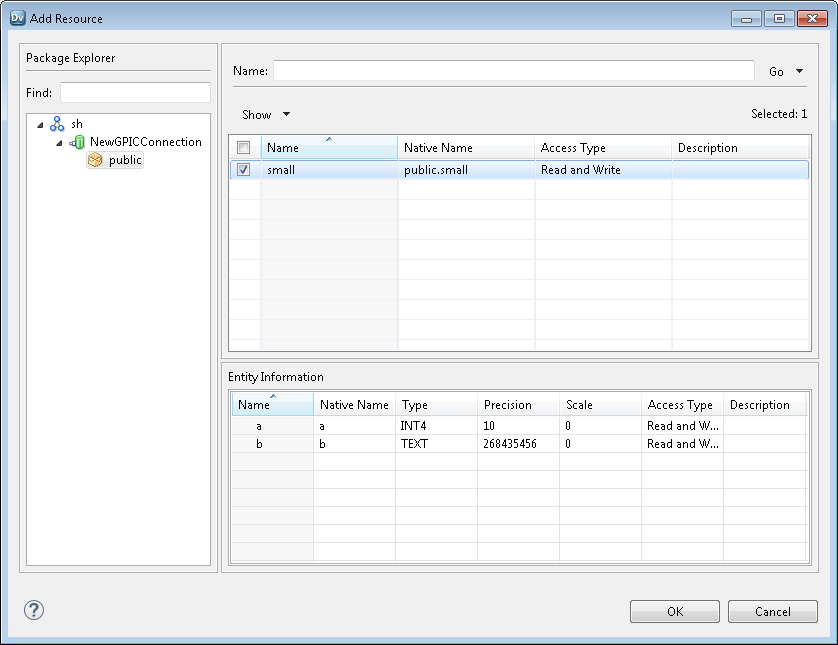
Click the Add button next to the Selected Resource(s): field to display the Add Resource window.
-
Expand the loader connection node to display a list of available Greenplum Database schemas, then select a schema to show its available tables.
-
Click on the name of an available table to display its column information. Use the check box next to a table’s name to select it as a loader target.

-
Click OK to accept the selected table(s) and return to the New Greenplum5 Data Object wizard.
-
Click Finish to use the selected tables as a loader target.
The new target appears in the Object Explorer at the path repository_name > project_name > Physical Data Objects > connection_name > object_name where object_name is the name you provided in the New Greenplum5 Data Object wizard. You can use the target in Informatica workflows to load data into the Greenplum Database cluster.

Step 3: Create a Mapping to the Greenplum Database Target
Follow these instructions to create a mapping to one or more tables in the Greenplum Database loader target:
-
Start the Informatica Developer Tool application.
-
If the Object Explorer view is not visible, display it by selecting Window > Show View > Object Explorer.
-
Right-click the project name that you created under the Informatica repository node, and select New > Mapping to display the Mapping window.
-
Enter a name for the new mapping, and click Finish to create it. The new mapping appears in the Mappings > mapping_name node of your selected project.
-
Click the name of the new mapping in the Object Explorer to display its configuration window.
-
Click and drag the name of the Greenplum Database loader target to the mapping configuration window. This starts the Greenplum5 Data Object Access wizard.
-
Click New Operation… to create a new data operation for the target.
-
Enter a name for the new operation, then click Add next to the Selected Resources field.
-
Select one or more tables that were defined in the Greenplum Database loader target, and click OK.
-
Click Finish on the Data Object Operation window to create the new operation.
-
Click OK on the Greenplum5 Data Object Access wizard to create the new mapping.
After creating the mapping, you can further configure the session properties for the Greenplum Database loader target. See Configuring Greenplum Target Session Properties.