You can deploy OpenStack by using the VMware Integrated OpenStack vApp on your vCenter Server instance.

Note: The following procedure applies only to HA and compact deployments. To deploy in tiny mode, see Create an OpenStack Deployment Using the API.

Prerequisites

  • Prepare your networks and vCenter Server environment. See Preparing Your Environment.
  • Install VMware Integrated OpenStack on your vCenter Server instance. See Install VMware Integrated OpenStack.
  • Verify that all required clusters and datastores are available.
    • Clusters must include the required number of hosts and datastores and must not be consumed by another node.
    • Datastores must be mounted to the correct cluster and must not be already configured.
  • Verify that the DNS server is set correctly and that the network gateway or firewall forwards DNS requests on private networks.

Procedure

  1. In the vSphere Web Client, select Home > VMware Integrated OpenStack.
  2. Open the Summary tab.
  3. Under Connected Server, confirm that the address of the OpenStack Management Server is correct.
  4. Open the Getting Started tab and click Deploy OpenStack in the lower panel.
  5. Select whether you want to create a new deployment or use an exported template to populate settings.
  6. Select HA or Compact from the Deployment mode drop-down menu.
  7. Click Next and enter a name for the deployment.
  8. If you want to use multiple vCenter Server instances, deselect the Use management vCenter Server as Compute vCenter Server check box and enter the FQDN or IP address, administrator credentials, and availability zone of the compute vCenter Server instance.
    Otherwise, select the check box and enter the FQDN or IP address, administrator credentials, and availability zone of your vCenter Server instance.
  9. If the OpenStack Management Server connects to the vCenter Server instance over a private, secure network and you need to disable certificate validation, select the Ignore the vCenter Server certificate validation check box.
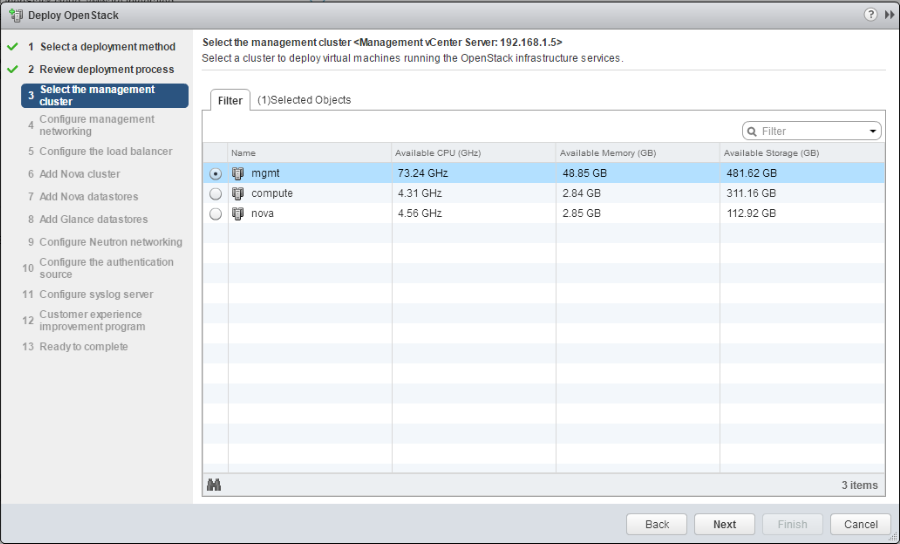
  10. Click Next and select the management cluster that you created during preparation.
    Figure 1. Select the management cluster


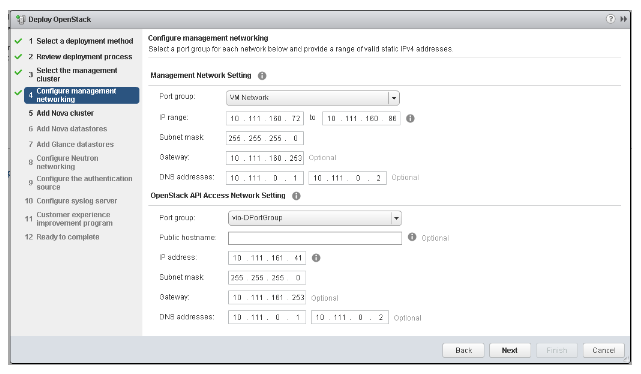
  11. Click Next and provide the settings for the management network and API access network that you defined during preparation.
    If you are deploying in compact mode, you can also enter a public hostname for the API access network.
    Important: The management and API access networks cannot include more than 100 IP addresses each.
    Figure 2. Configure management networking


  12. If you are deploying in HA mode, click Next and enter the hostname and public virtual IP address of the load balancer service.
  13. Click Next and select the compute cluster that you created during preparation.
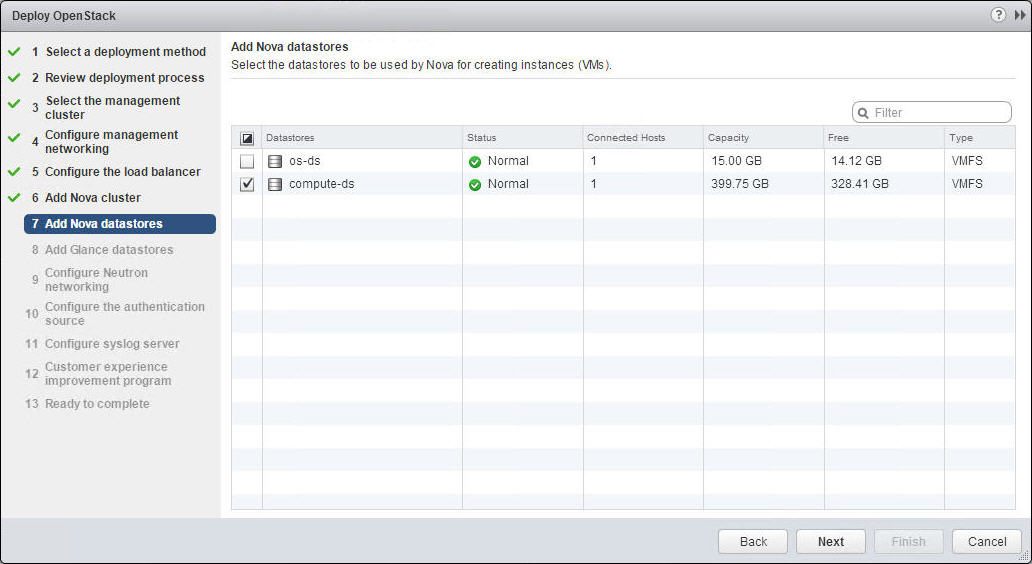
  14. Click Next and select one or more datastores for the compute component to consume.
    The selected datastores are used to create instances.
    Figure 3. Add Nova datastores


  15. Click Next and select one or more datastores for the image service component to consume.
    The selected datastores are used to store images.
  16. Click Next and select a networking mode.
    • If you want to deploy with VDS only, click Virtual Distributed Switch Networking and select the VDS on which to create the port groups backing the provider network.
    • If you want to deploy with NSX Data Center for vSphere, click NSX-V Networking and specify the FQDN or IP address and administrator credentials of your NSX Manager. After the credentials are validated, select the other parameters for your NSX Data Center for vSphere deployment from the drop-down lists. You can also choose whether to enable HA for edge nodes and whether to use an independent metadata service network.
    • If you want to deploy with NSX-T Data Center, click NSX-T Networking and specify the FQDN or IP address and administrator credentials of your NSX Manager. After the credentials are validated, select the other parameters for your NSX-T Data Center deployment from the drop-down lists.
    Important: You cannot change the networking mode after deploying VMware Integrated OpenStack. If you need to switch to a different networking mode, you must redeploy.
  17. Click Next and enter the username and password for the administrator account on the VMware Integrated OpenStack dashboard.
  18. If you want to configure LDAP authentication for a single domain, select the Enable check box in the lower pane and click the Add (plus sign) icon.
    Important: If you configure an LDAP domain in this step, you cannot specify additional LDAP domains later. To use multiple LDAP domains in your deployment, configure the domains after deploying OpenStack.
  19. Click Next. If you want to use vRealize Log Insight to manage logs, enter the parameters of your vRealize Log Insight syslog server.
  20. Click Next and select whether you want to participate in the Customer Experience Improvement Program.
    For more information, see Customer Experience Improvement Program.
  21. Click Next and review your settings. When you are satisfied that the settings are correct, click Finish.

Results

The VMware Integrated OpenStack vApp begins to deploy your OpenStack cloud.

The status of the deployment is displayed as Provisioning. When the status changes to Running, the deployment is complete.
What to do next

Assign the VMware Integrated OpenStack License Key