


You can apply the View/Edit menu item to an imported instance or a draft. This starts an editor that you can use to edit the instructional content of a manual directly in the Content Engine.
Editing ribbon
When you click a text element you want to change, a window with an editing ribbon is displayed. Enter your new text here. You can modify the style and format of the text with the editing ribbon.
Add chapters, articles, and steps
If your current hierarchy is at the chapter level, then you can use the Add New Chapter menu item.
If your current hierarchy is at the articles level, then you can access the Add New Article menu item.
If your pointer is active within an article, then you can access the Add Step menu item to add a page within the article, specify a heading, or add content.
Send text to the lab console
You can use HTML markup to indicate text that lab users can move to their console by clicking the text. Use the Source button to insert HTML code. As a result, the end user can easily send text, such as a user name or password, directly from the manual to the lab console. The following example HTML code allows a lab user to send the text string "some text to send" from the manual directly to the lab console with the click of a button:
<!-- looks for .send-text css class -->
<span class="send-text">some text to send</span>
<button class="send-text" value="some text to send">Call to action</button>
Insert variables into a manual
Lab manual content creators have the ability to display some of the important information in lab manuals with help of variable tags. You can include a variable within a step of a manual. The value of the variable is assigned when the end user finishes the step. For example, you might include a step within your manual that includes the following link: http://example.com/test?foo={{email}}
When an end user takes the lab and clicks the link, the end user's email address is assigned as the value for the variable. As a result {{email}} might become [email protected]. Such variables allow you to make the results of a step customized to the user taking the lab. The Content Engine supports the following variables:
User
Userusername: usernameemail: [email protected]firstName: firstNamelastName: lastName
Lab
labSku: skulabName: lab nameClassclassId: {{classId}}className: {{className}}classSku: {{classSku}}classDescription: {{classDescription}}
Entitlement
entitlementId: entitlement-identitlementKey: {{entitlementKey}}endAllowed: {{endAllowed}}exitAllowed: {{exitAllowed}}resetAllowed: {{resetAllowed}}requiresGrading: {{requiresGrading}}
Progress
progress: {{progress}}requiredMinimumTimeSpent:{{requiredMinimumTimeSpent}}requiredStepsVisitedPercentage: {{requiredStepsVisitedPercentage}}completionStatusForLabCriteria: {{completionStatusForLabCriteria}}
Manual
stepNumber: 6activeStepNumber: {{activeStepNumber}}totalSteps: {{totalSteps}}manualStepCount: {{manualStepCount}}remoteControlMode: {{remoteControlMode}}
Time
timeAllotted: 60timeElapsed: 0timeRemaining: 60expirationDate: {{expirationDate}}time: 1631806973255canExtend: {{canExtend}}extensionsRemaining: 1extensionCount: {{extensionCount}}
Event Lab Groups
groupName: groupNamegroupColor: #FF0000
Miscellaneous
location: {{location}}language: {{language}}locale: {{locale}}tenant: NEEtid: {{tid}}trackingCode: {{trackingCode}}
For the time variable, the system assigns a unique timestamp each time a user completes the step. Example: {{email}}&_={{time}} becomes [email protected]&_12569537329.
The system does not actively update timeElapsed, timeRemaining, extensionsRemaining. Their values are accurate only when the step is displayed to the end user. For example, if the lab has 55 minutes remaining, then timeRemaining displays a value of 55 and does not count down (to 54, 53) while that step remains visible.
To get the supported list of variable tags, contact the VMware Lab Platform support team.
Insert Markup content
The Content Engine supports markup content. Consider the following example of markup content:
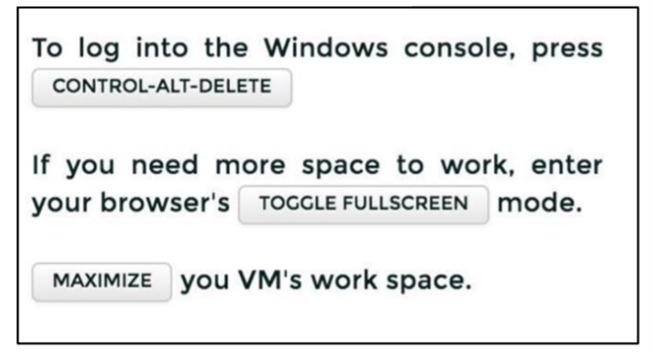
Log into the Windows console, press [vlp:ctrl-alt-del|Control-Alt-Delete].
If you need more space to work, enter your browser's [vlp:fullscreen|Toggle
Fullscreen] mode.
[vlp:maximize|Maximize] you VM's work space
If you use the editor to insert such markup, the resulting instructional manual, in the lab console, would include the following:
Supported Markup commands
The following markup commands are rendered as buttons.
[vlp:power-down|Power Down Active VM][vlp:power-reset|Power Reset Active VM][vlp:power-on|Power On Active VM][vlp:refresh-vm|Refresh VM][vlp:send-text|text to send|Send Text to Console][vlp:next-step|Next Manual Step][vlp:previous-step|Previous Manual Step][vlp:goto-step|5|Goto Step 5][vlp:network-topology|Show Network Topology][vlp:table-of-contents|Show Table of Contents][vlp:increase-font|Increase Manual Font][vlp:decrease-font|Decrease Manual Font][vlp:extend-time|Extend Time][vlp:exit|Exit Lab][vlp:end|End Lab][vlp:reset|Reset Lab][vlp:grade|Grade Lab][vlp:ctrl-alt-del|Control-Alt-Delete][vlp:fullscreen|Toggle Fullscreen][vlp:maximize|Maximize VM]
Markup commands as HTML
You can insert markup commands as HTML and with data-* properties on any tag.
<a data-power-down="">Power Down Active VM </a><br/><a data-power-rest="">Power Reset Active VM</a><br/><a data-power-on="">Power On Active VM</a><br/><a data-refresh-vm="">Refresh VM</a><br/><a data-send-text="">Send Text to Console</a><br/><a data-next-step="">Next Manual Step</a><br/><a data-previous-step="">Previous Manual Step</a><br/><a data-goto-step="5">Goto Step 5</a><br/><a data-network-topology="">Show Network Topology</a><br/><a data-table-of-contents="">Show Table of Contents</a><br/><a data-increase-font="">Increase Manual Font</a><br/><a data-decrease-font="">Decrease Manual Font</a><br/><a data-extend-time="">Extend Time</a><br/><a data-exit="">Exit Lab</a><br/><a data-end="">End Lab</a><br/><a data-reset="">Reset Lab</a><br/><a data-grade="">Grade Lab</a><br/><a data-ctrl-alt-del="">Control-Alt-Delete</a><br/><a data-fullscreen="">Toggle Fullscreen</a><br/><a data-maximize="">Maximize VM</a><br/>
