NSX Advanced Load Balancer can act as a client and resource server for OAuth/ OIDC use cases.
Being a client and resource server, NSX Advanced Load Balancer will get the authorization code from the end user, exchange the authorization code with an access_token, validate the access_token, and allow the client to access the resource based on the token validation and authorization policies based on the claims.
The same virtual service will act as a client and resource server.
Request Flow
The request flow is explained as follows:
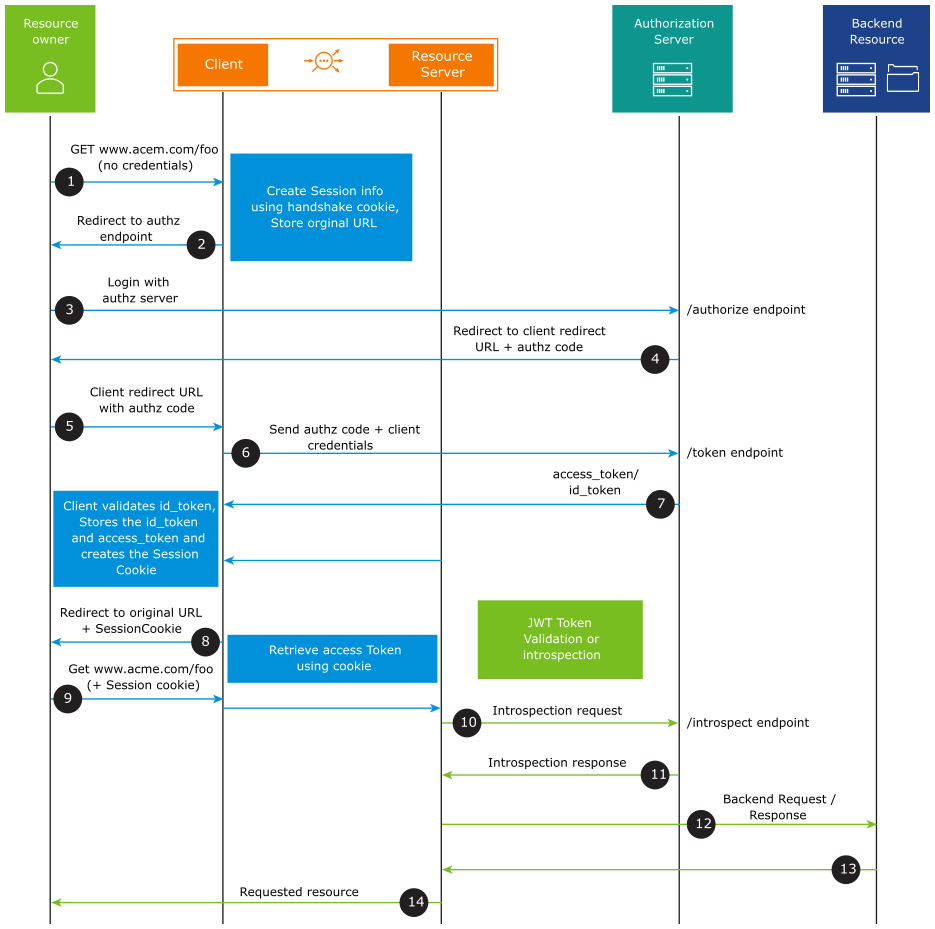
The resource owner tries to access an application.
The client (NSX Advanced Load Balancer) initiates the flow by directing the resource owner’s user-agent to the authorization endpoint. NSX Advanced Load Balancer as a client stores session information including its client identifier and a redirection URI/ call-back URI to which the authorization server will send the user agent back once the access is granted (or denied).
The resource owner sends the request to the authorization server at the authorization endpoint.
The authorization server authenticates the resource owner (using the user agent) and establishes whether the resource owner grants or denies the client’s access request. Assuming the resource owner grants access, the authorization server redirects the user agent back to the client using the redirection URI/call-back URI provided earlier (in the request or during client registration). The redirection URI includes an authorization code.
The resource owner sends a request with the client redirect URL and the authorization code.
The client requests an
access_tokenfrom the authorization server’s token endpoint by including the authorization code received in the previous step. When making the request, the client authenticates with the authorization server using theclient_idandclient_secret.The authorization server authenticates the client and validates the authorization code. If valid, the authorization server responds with
access_tokenand, optionally, a refresh token will be provided. If OIDC is enabled,id_tokenis also issued by the authorization server.NSX Advanced Load Balancer as a client sets a session cookie and sends a request to the resource owner with the resource URL.
The resource owner sends a request with the session cookie. On receiving the request, NSX Advanced Load Balancer retrieves the
access_tokenusing the session cookie.NSX Advanced Load Balancer being the resource server validates the
access_token. If the Access Token is of type JWT, NSX Advanced Load Balancer validates theaccess_tokenon its own. If the Access Token is of type Opaque, NSX Advanced Load Balancer sends the request to the introspection endpoint of the authorization server to validate the opaque token. Starting with NSX Advanced Load Balancer 22.1.3, caching of introspection data is supported to avoid communication between NSX Advanced Load Balancer (resource server) and the authorization server for each request.Based on the validation result, NSX Advanced Load Balancer will either provide access or deny it.
If the
access_tokenis validated, the request is sent to the back end server.The server responds.
NSX Advanced Load Balancer sends the response to the resource owner. Further requests must carry the session ID and steps 10-14 must be followed.
Responsibilities of NSX Advanced Load Balancer Virtual Service as a Client and Resource Server
The responsibilities of the OAuth Client are:
Redirecting an unauthenticated client to an authorization endpoint of the provider - Generating the state and nonce parameter for the same. Currently, the nonce is not generated since it is not mandatory for authorization code flow.
Exchanging code with a token for retrieving Access Token and ID Token (in the case of OIDC).
ID token validation (JWT) - OIDC mandates that access token hash must be validated.
Storing the session information, such as Access Token, Refresh Token and relevant details from the ID Token.
Creating the session cookie and setting the client response.
Delegate the request to the resource server when the end-user presents a proper session cookie.
Refreshing the
access_tokensafter expiry.
The responsibilities of the OAuth Resource Server are:
Validating
access_tokenusing:JWT validation with JWKS URI downloaded from
jwks_uri.Introspection-based validation in the case of an opaque token.
Using Refresh Token to obtain a New Access Token (Using NSX Advanced Load Balancer)
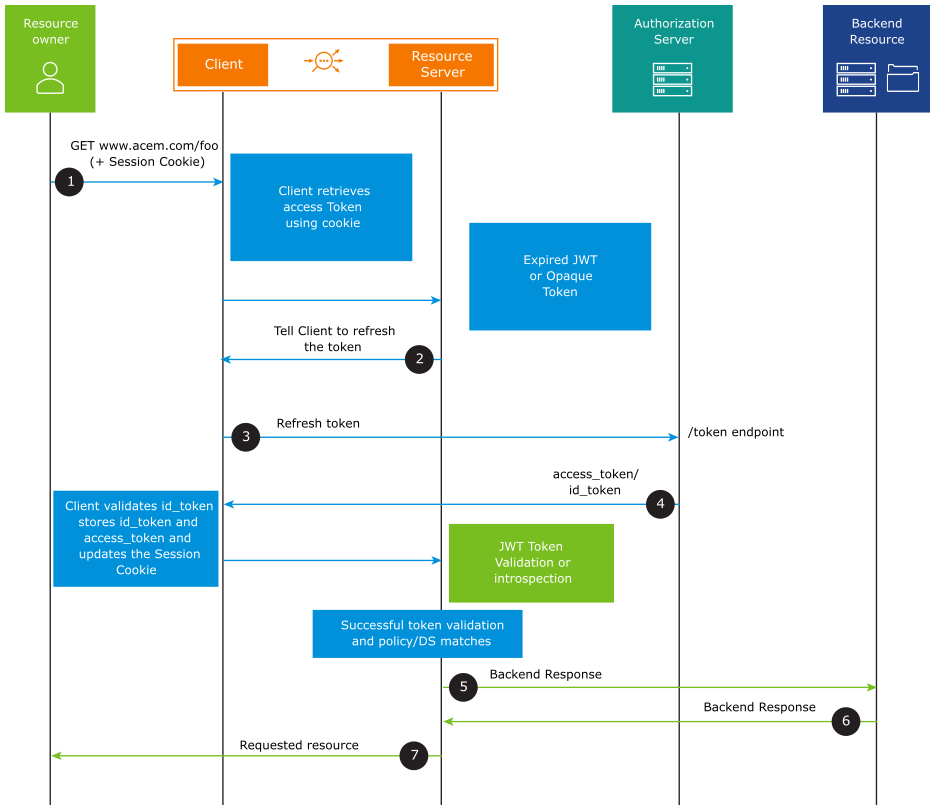
When the request comes to the NSX Advanced Load Balancer Virtual Service, the Access Token is retrieved using the session cookie. If the Access Token is expired, NSX Advanced Load Balancer sends the refresh token to the token endpoint of the authorization server to get a new access_token. The authorization server responds with an access_token and id_token. NSX Advanced Load Balancer (client) validates the id_token, stores the id_token, and access_token, and updates the session cookie. Then the access_token is validated. If the validation is successful, access to the resource is granted.
Using UserInfo Endpoint
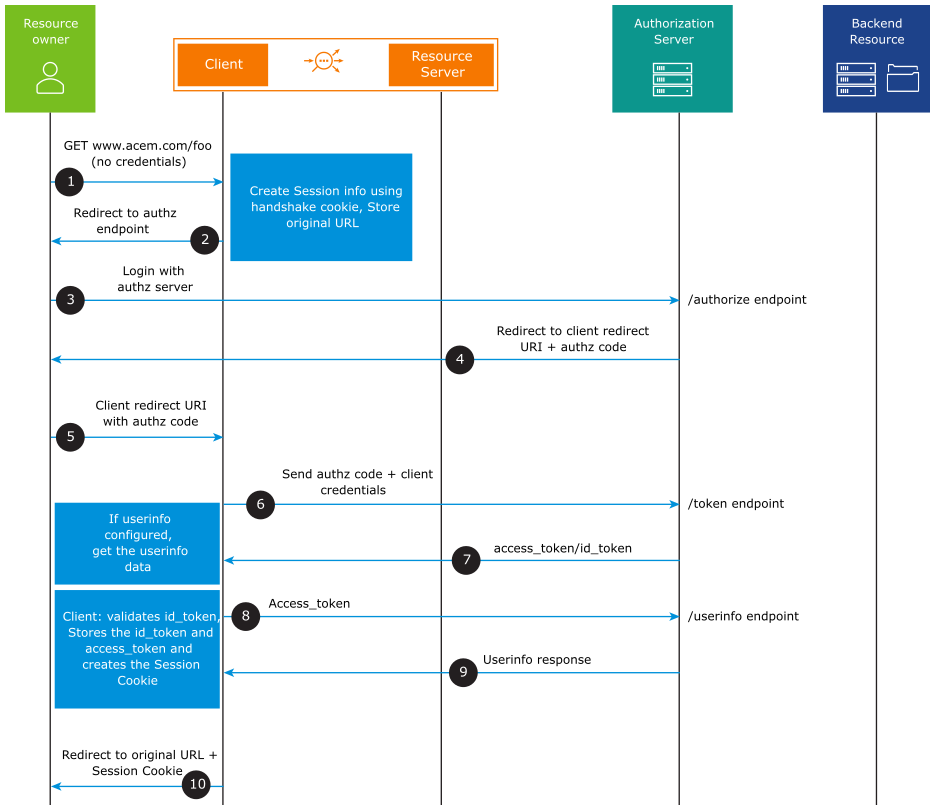
After the cookie is issued to the client, the rest of the request flow is the same as depicted in the request flow diagram above.
The UserInfo endpoint can be used to retrieve identity information about a user. Extract the user information from the UserInfo endpoint, if the UserInfo flag is configured under the OIDC parameters. If the UserInfo flag is not configured under the OIDC parameters, the user information is extracted from one of the claims in the id_token.
Configuring using UI
The following are the unique hosts associated with various endpoints used in the authorization profile. For instance, OKTA is used as an authorization server for this configuration guide.
Type of Endpoint |
Endpoint |
|---|---|
Authorization Endpoint |
|
Token Endpoint |
|
Introspection Endpoint |
|
jwks_uri |
|
Issuer |
|
Userinfo Endpoint |
Here,
unique_fqdn = dev-477407.oktapreview.comCreate a Pool with servers = unique hosts/ FQDN or IP address + ports as shown in step 2.
It is recommended to use OAuth with HTTPS. So, the pool must have SSL enabled with port 443.
Some Authorization servers can have different FQDN/ hosts for different endpoints. In that case, all the hosts must be added as servers in the pool configuration.
Configuring Pool
The following are the steps to configure pool:
Navigate to .
Click CREATE POOL or edit the existing pools.
Specify the details in the fields. For complete configuration steps, see Create Pool.
Select the Type as Oauth.
Under Servers tab, enter the details in the Select Servers By field and click ADD.
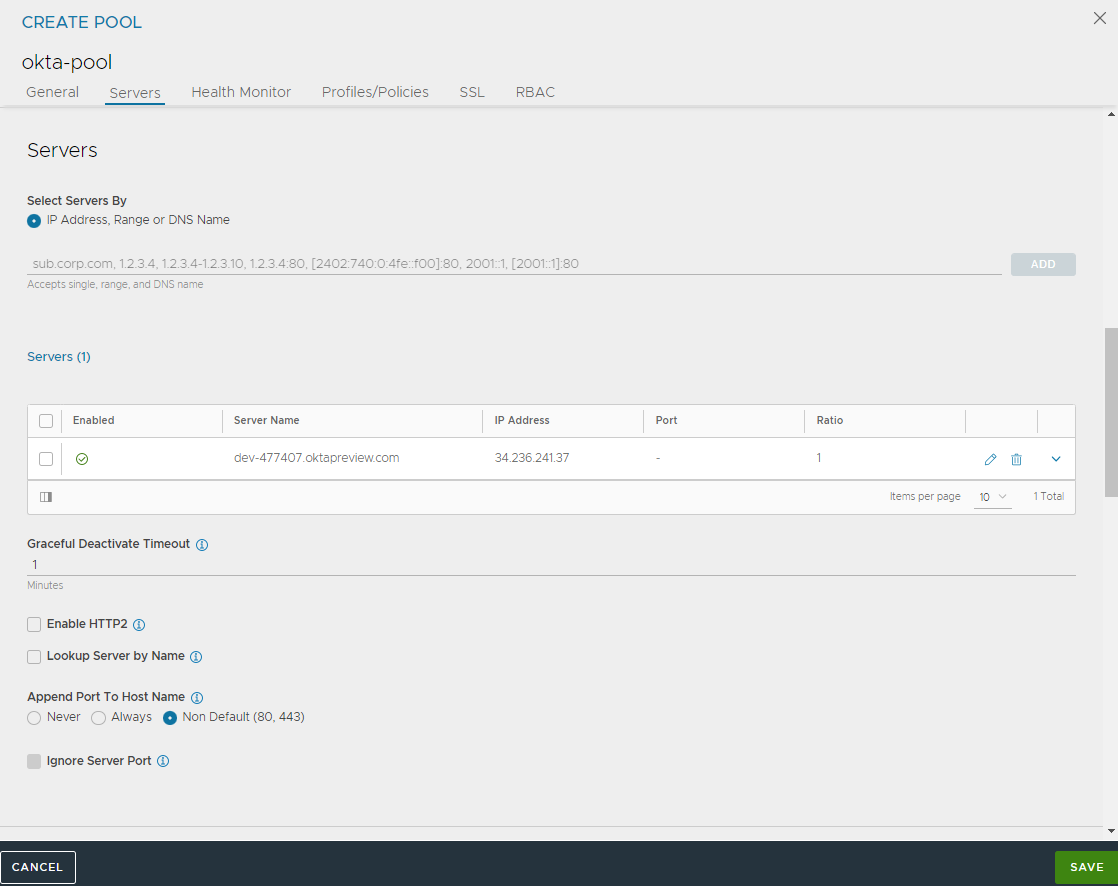
Click Save.
Configuring Authentication Profile
The following are the steps to configure authentication profile:
Navigate to .
Click Create or edit the existing Virtual Services.
Navigate to .
Under Access Policy, select OAUTH.
Select Create Profile from the Auth Profile drop-down menu.
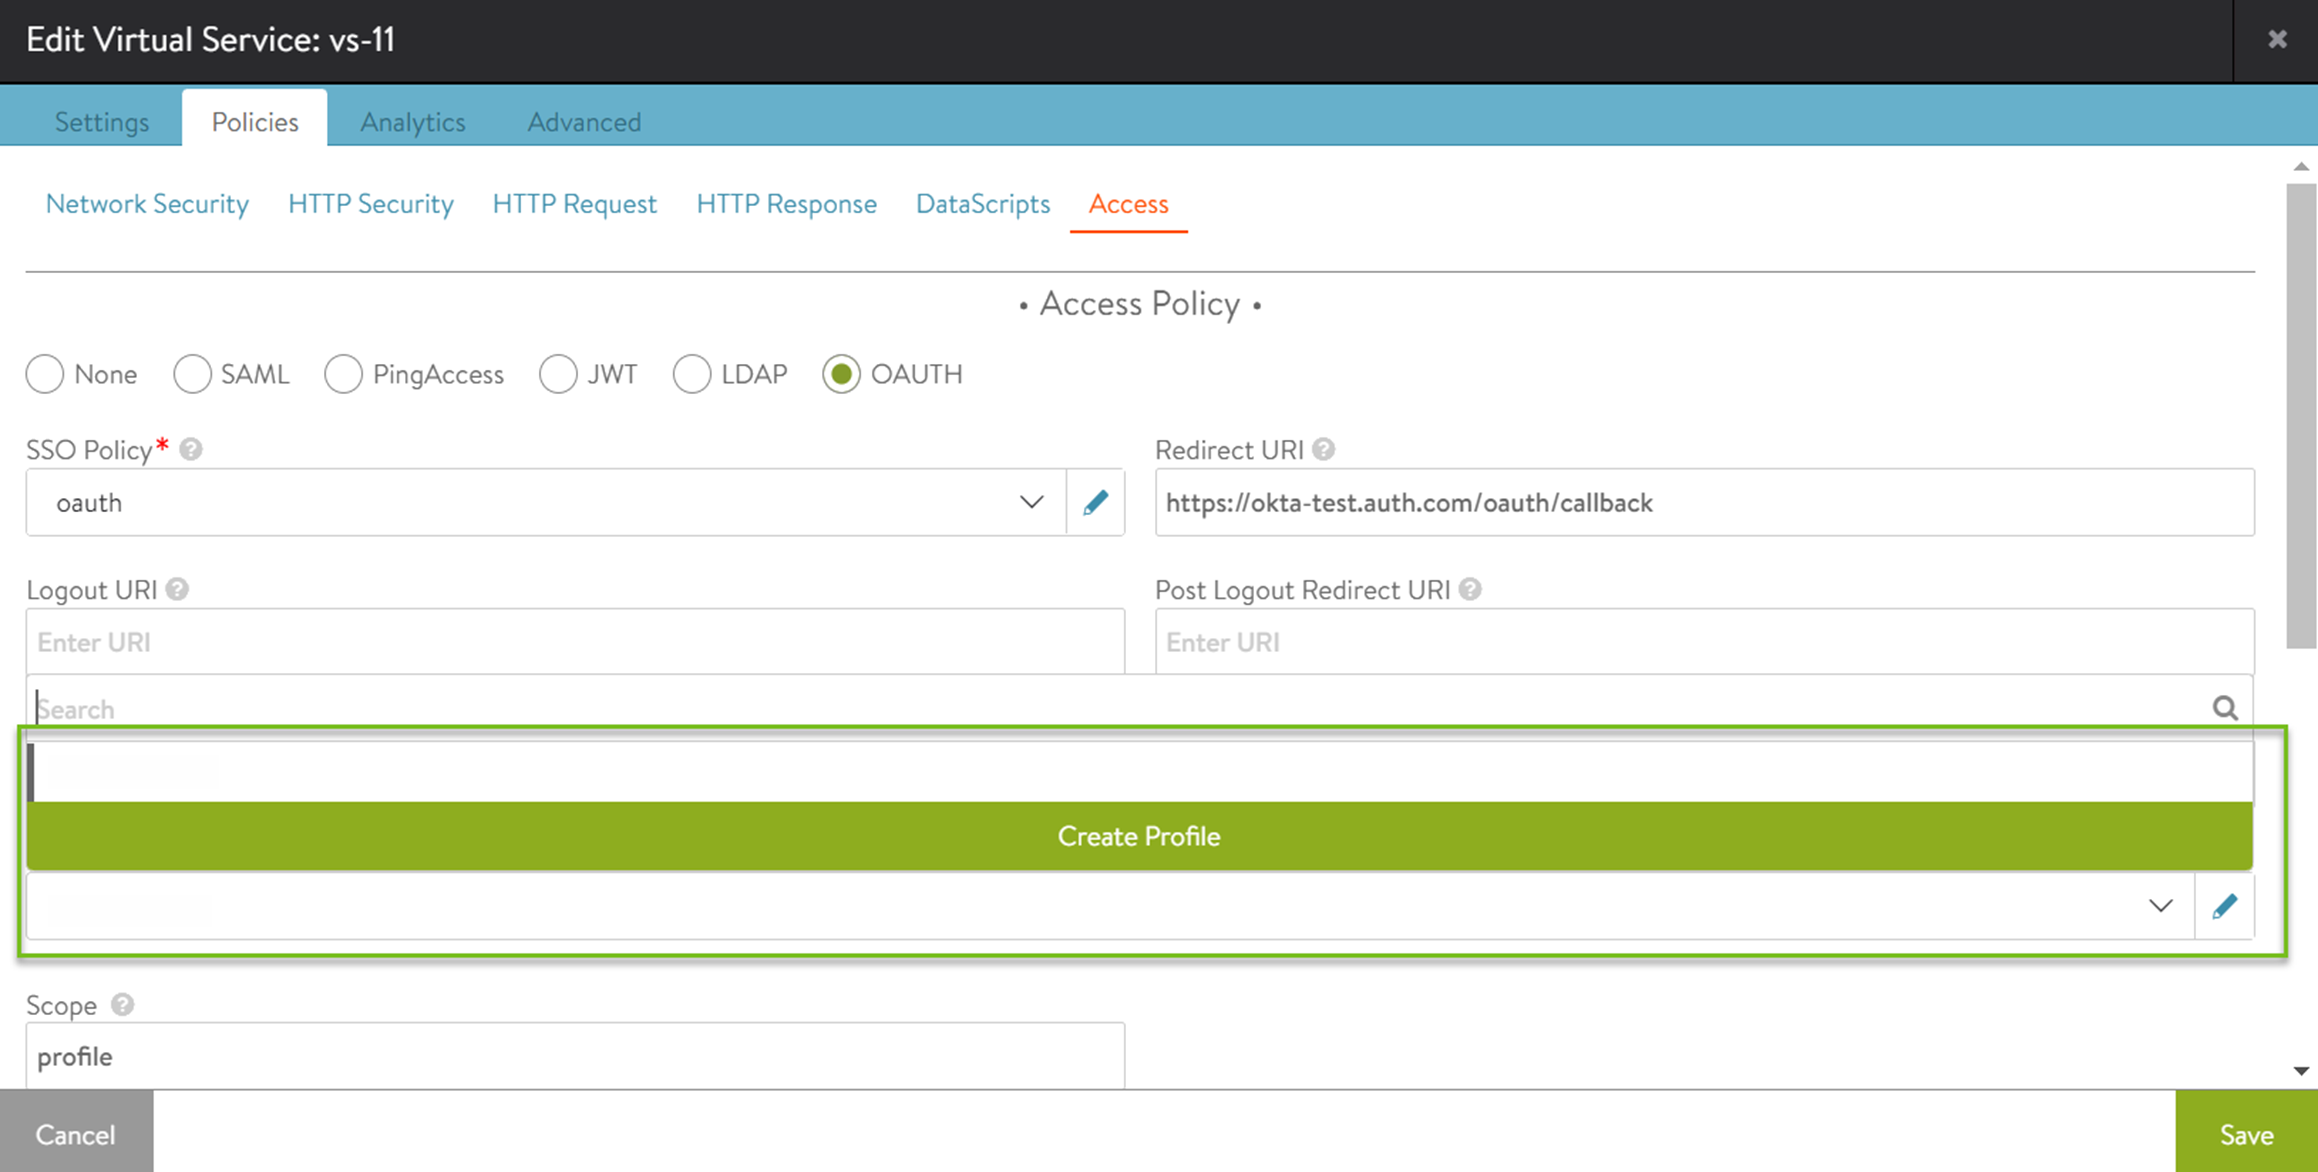
In the CREATE AUTH PROFILE screen, enter the desired Name and Type as OAuth/OIDC.
Perform one of the following steps to configure the endpoints:
To configure and retrieve the endpoints automatically:
Enter the URL in the Import Endpoints.
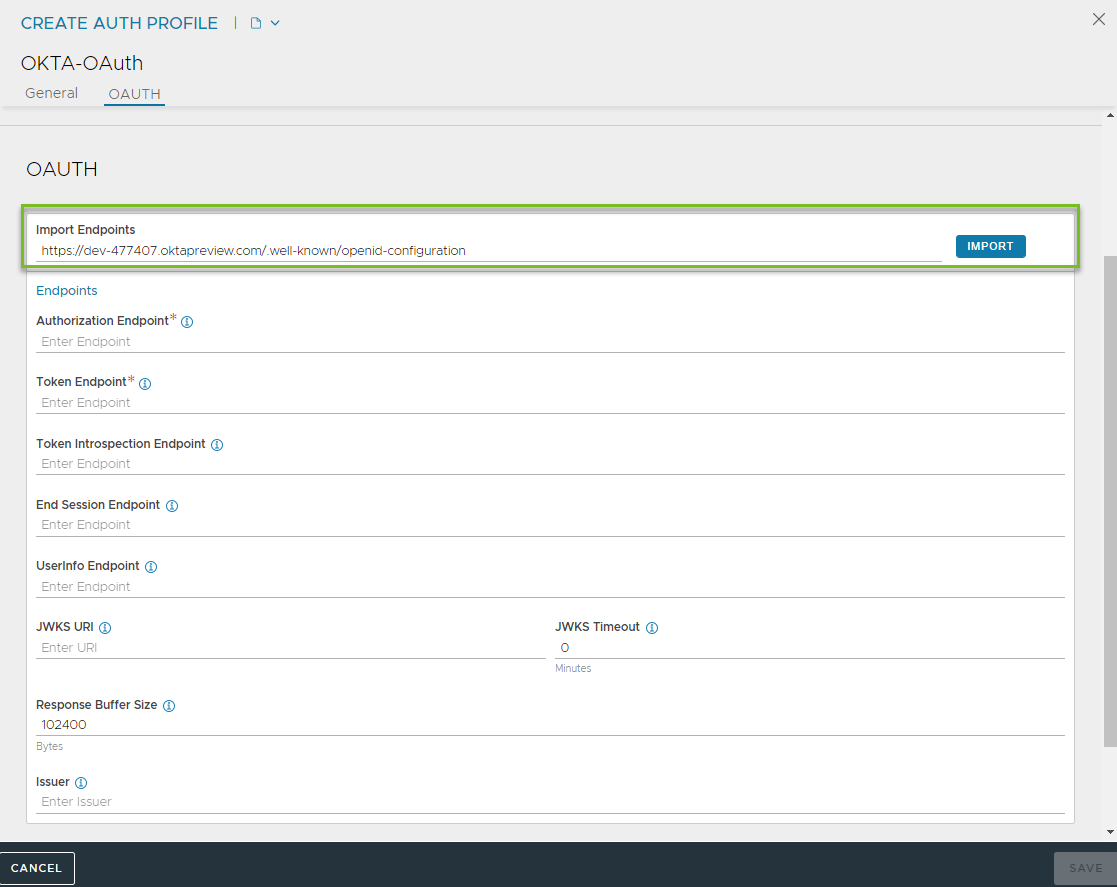
Click IMPORT.
To configure the endpoints manually, enter the required details.
Select Pool from the Pool.
Click
Save.
Configuring SSO Policy
The following are the steps to configure SSO policy:
Navigate to .
Click Create or edit the existing Virtual Services.
Navigate to .
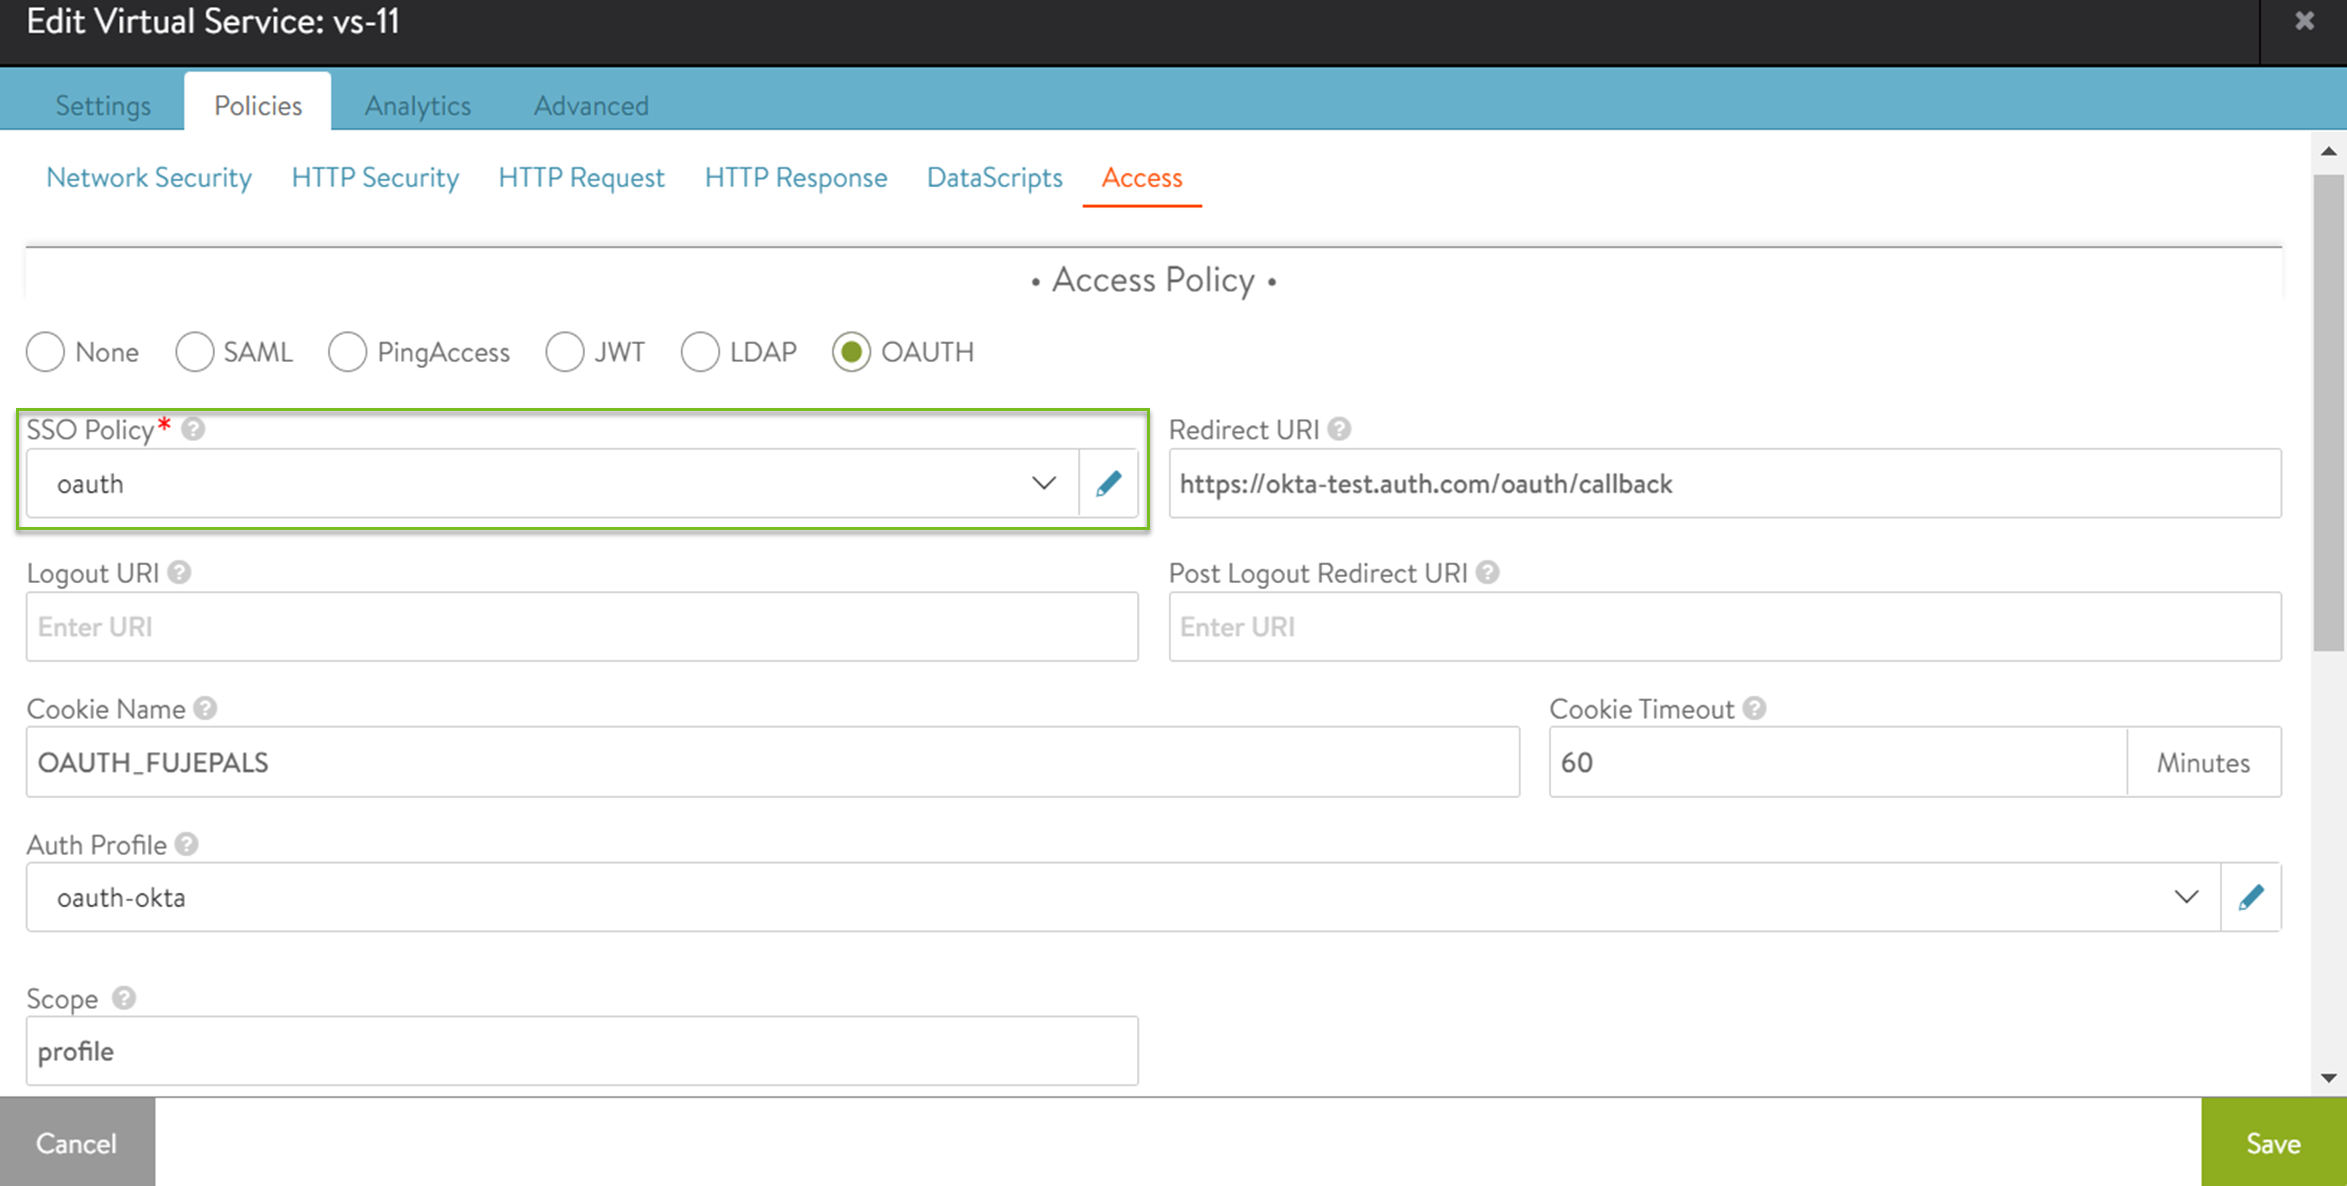
Under Access Policy, select OAUTH.
Select Create SSO Policy from the SSO Policy drop-down menu or edit the existing SSO Policy.
In the EDIT SSO POLICY screen, enter the required details.
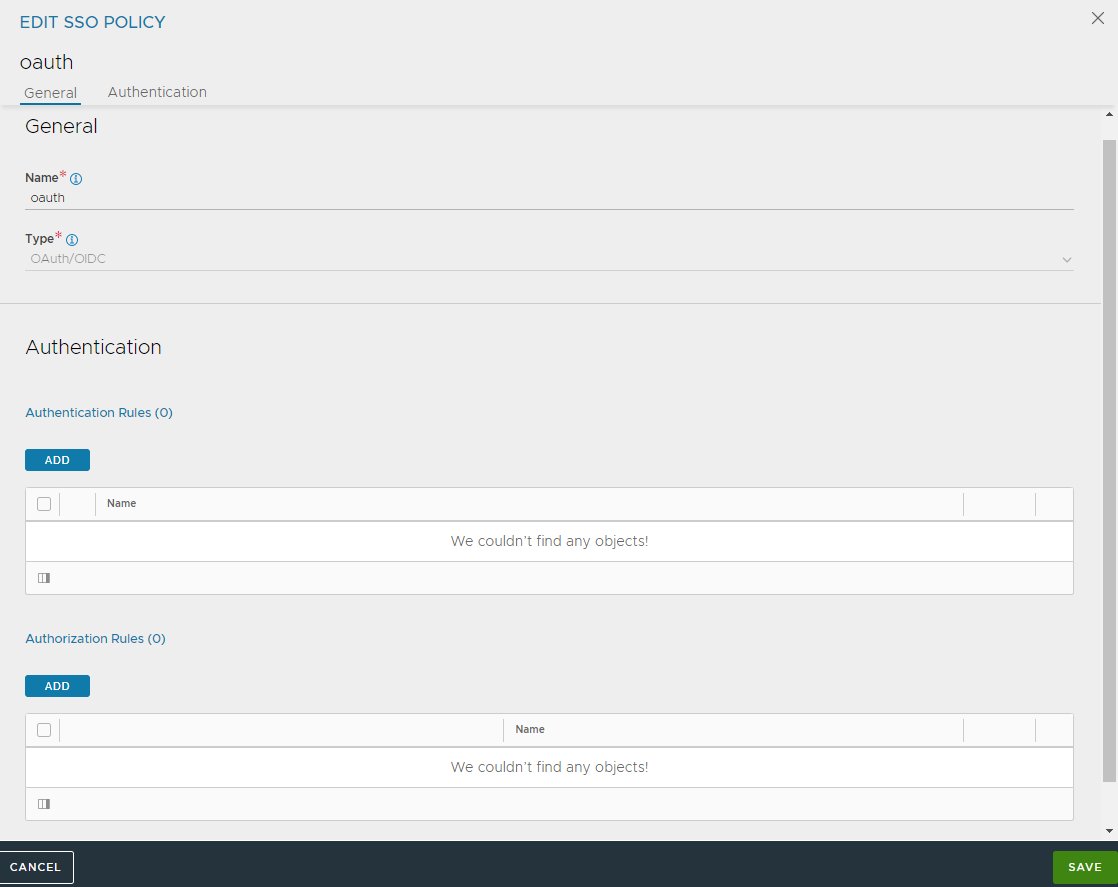
Click Save.
Configuring OAuth settings on the Virtual Service
It is assumed that virtual service is already configured. Enable OAuth/OIDC specific configuration in the virtual service.
Navigate to .
Click Create or edit the existing Virtual Services.
Navigate to .
Under Access Policy, select OAUTH.
Select Create SSO Policy from the SSO Policy drop-down menu or edit the existing SSO Policy.
Enter the required details.
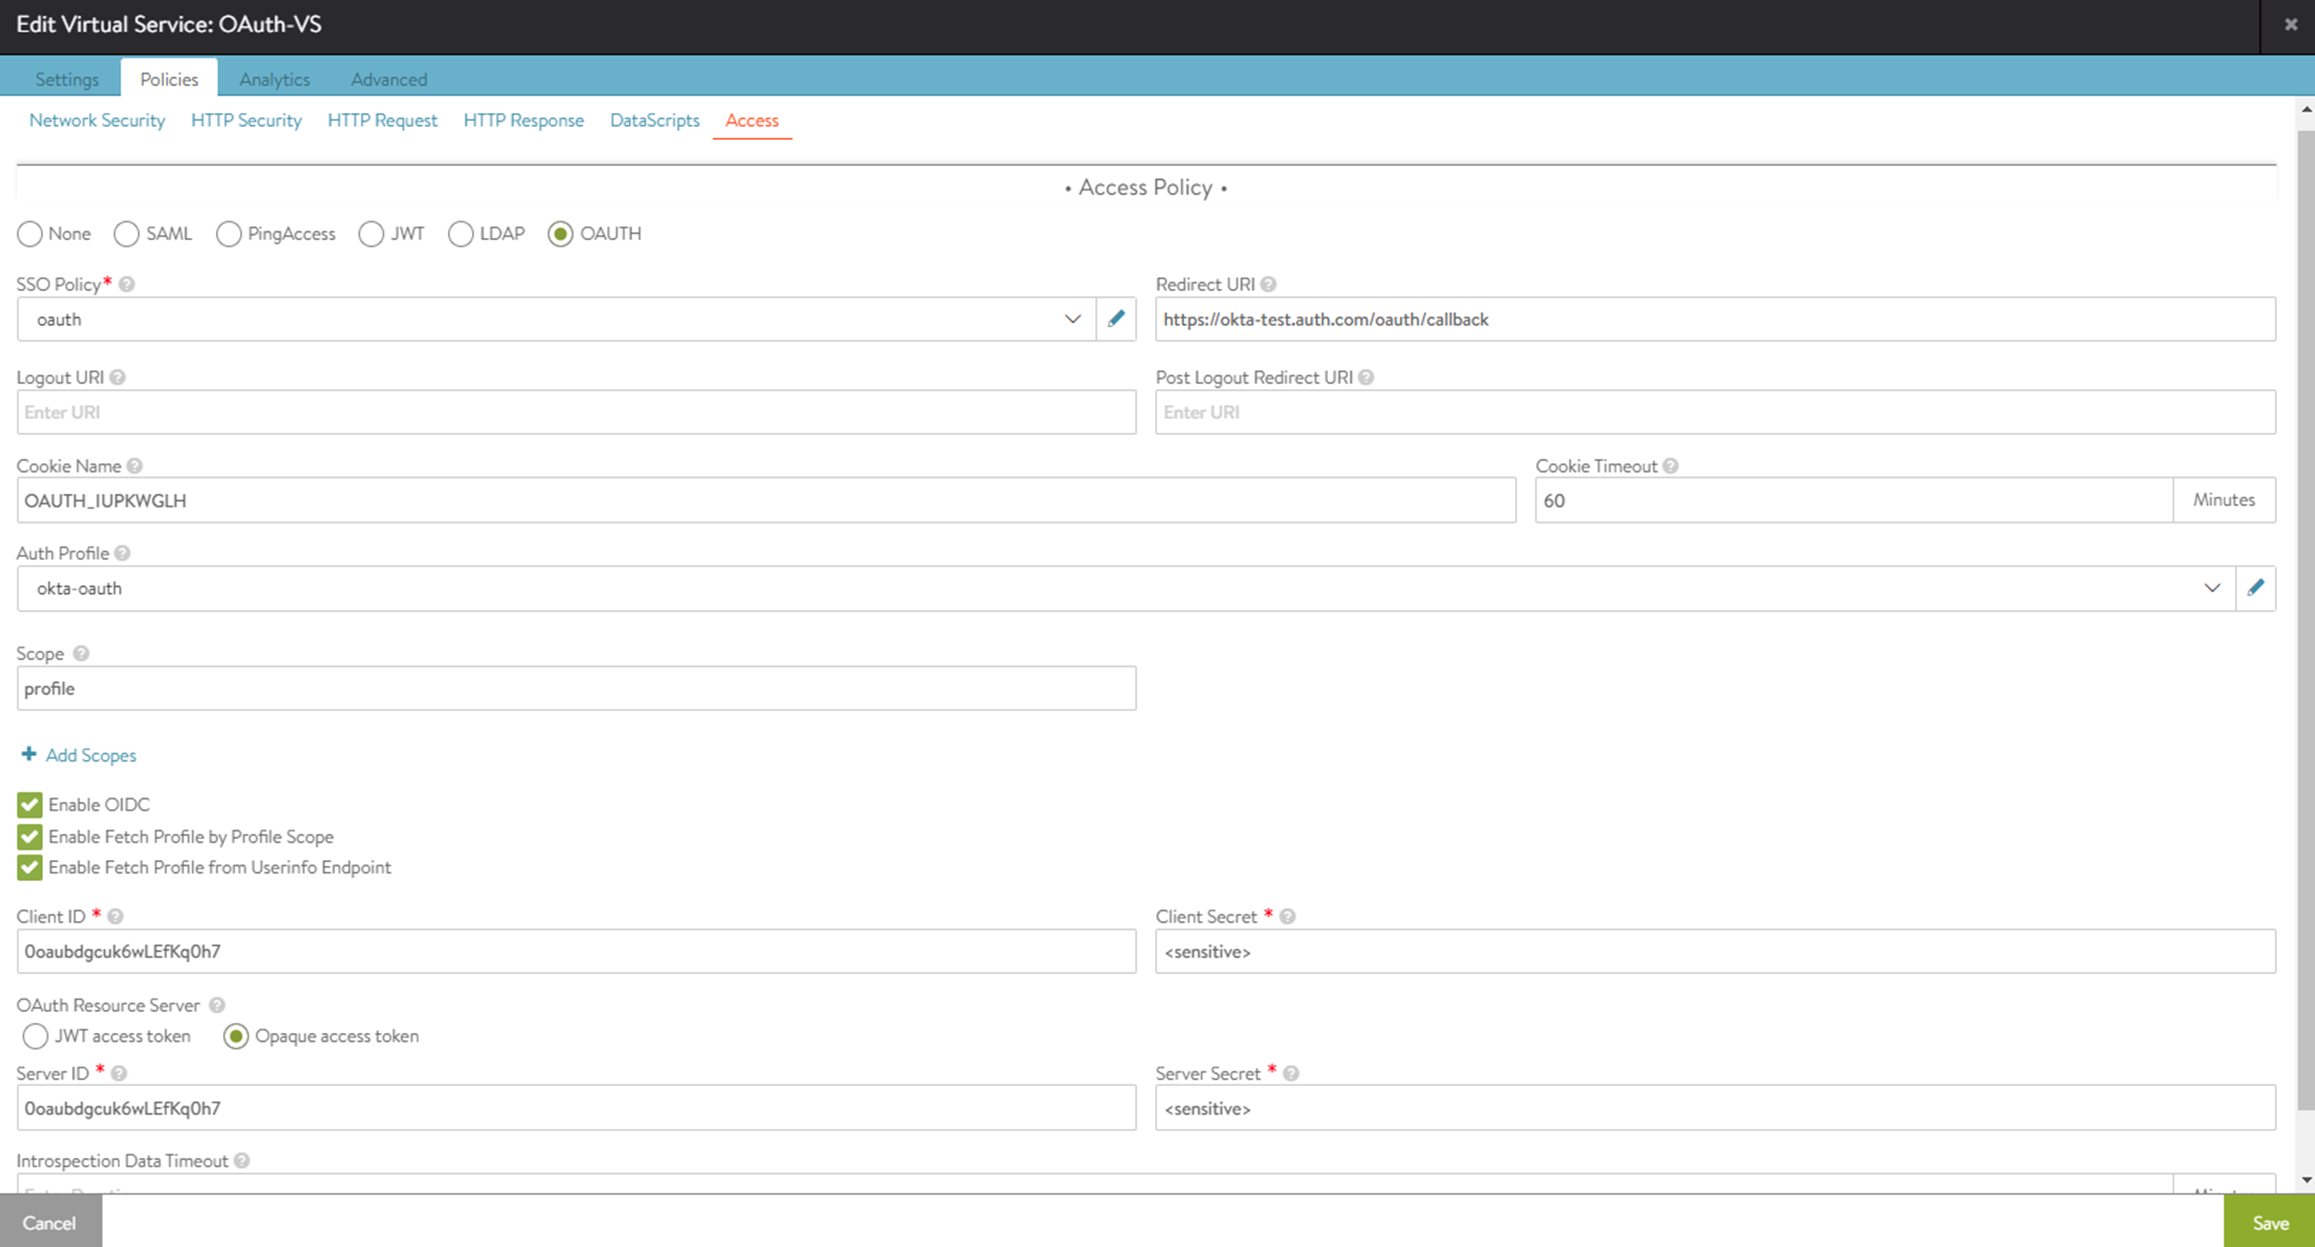
Note:When configuring OAuth virtual services using the UI, at least one scope needs to be configured. If no scopes are required for the deployment, then configure a placeholder scope in the UI and remove it later using the CLI.
Click Save.
Configuring Pool using CLI
Configure the pool using the CLI as shown below:
[admin: ctrl]: > configure pool okta-pool
[admin: ctrl]: pool> default_server_port 443
[admin: ctrl]: pool> ssl_profile_ref System-Standard
[admin: ctrl]: pool> servers
[admin: ctrl]: pool:servers> hostname dev-477407.oktapreview.com
[admin:ctrl]: pool:servers> resolve_server_by_dns
[admin:ctrl]: pool:servers> resolve_server_by_dns
[admin:ctrl]: pool:servers> save
[admin:ctrl]: pool> save
+-------------------------------------------+------------------------------------------------+
| Field                                     | Value                                          |
+-------------------------------------------+------------------------------------------------+
| uuid                                      | pool-ae3e31cb-eaf9-4014-b3f0-2a7391b9f767      |
| name                                      | okta-pool                                      |
| default_server_port                       | 443                                            |
| graceful_disable_timeout                  | 1 min                                          |
| connection_ramp_duration                  | 10 min                                         |
| max_concurrent_connections_per_server     | 0                                              |
| servers[1]                                |                                                |
|   ip                                      | 34.236.241.37                                  |
|   hostname                                | dev-477407.oktapreview.com                     |
|   enabled                                 | True                                           |
|   ratio                                   | 1                                              |
|   verify_network                          | False                                          |
|   resolve_server_by_dns                   | True                                           |
|   static                                  | False                                          |
|   rewrite_host_header                     | False                                          |
| servers[2]                                |                                                |
|   ip                                      | 34.236.241.36                                  |
|   hostname                                | dev-477407.oktapreview.com                     |
|   enabled                                 | True                                           |
|   ratio                                   | 1                                              |
|   verify_network                          | False                                          |
|   resolve_server_by_dns                   | True                                           |
|   static                                  | False                                          |
|   rewrite_host_header                     | False                                          |
| servers[3]                                |                                                |
|   ip                                      | 34.236.241.38                                  |
|   hostname                                | dev-477407.oktapreview.com                     |
|   enabled                                 | True                                           |
|   ratio                                   | 1                                              |
|   verify_network                          | False                                          |
|   resolve_server_by_dns                   | True                                           |
|   static                                  | False                                          |
|   rewrite_host_header                     | False                                          |
| lb_algorithm                              | LB_ALGORITHM_LEAST_CONNECTIONS                 |
| lb_algorithm_hash                         | LB_ALGORITHM_CONSISTENT_HASH_SOURCE_IP_ADDRESS |
| ssl_profile_ref                           | System-Standard                                |
| inline_health_monitor                     | True                                           |
| use_service_port                          | False                                          |
| capacity_estimation                       | False                                          |
| capacity_estimation_ttfb_thresh           | 0 milliseconds                                 |
| vrf_ref                                   | global                                         |
| fewest_tasks_feedback_delay               | 10 sec                                         |
| enabled                                   | True                                           |
| request_queue_enabled                     | False                                          |
| request_queue_depth                       | 128                                            |
| host_check_enabled                        | False                                          |
| sni_enabled                               | True                                           |
| rewrite_host_header_to_sni                | False                                          |
| rewrite_host_header_to_server_name        | False                                          |
| lb_algorithm_core_nonaffinity             | 2                                              |
| lookup_server_by_name                     | False                                          |
| analytics_profile_ref                     | System-Analytics-Profile                       |
| tenant_ref                                | admin                                          |
| cloud_ref                                 | Default-Cloud                                  |
| server_timeout                            | 0 milliseconds                                 |
| delete_server_on_dns_refresh              | True                                           |
| enable_http2                              | False                                          |
| ignore_server_port                        | False                                          |
| routing_pool                              | False                                          |
| append_port                               | NON_DEFAULT_80_443                             |
| http2_properties                          |                                                |
|   max_http2_control_frames_per_connection | 0                                              |
|   max_http2_header_field_size             | 4096 bytes                                     |
| server_disable_type                       | DISALLOW_NEW_CONNECTION                        |
| use_service_ssl_mode                      | False                                          |
+-------------------------------------------+------------------------------------------------+
Configuring Authentication Profile using CLI
Configure the authentication profile using CLI as shown below:
[admin:ctrl]: > configure authprofile Okta-OAuth
[admin:ctrl]: authprofile> type auth_profile_oauth
[admin:ctrl]: authprofile> oauth_profile
[admin:ctrl]: authprofile:oauth_profile>
authorization_endpoint   URL of authorization server.
cancel                   Exit the current submode without saving
do                       Execute a show command
introspection_endpoint   URL of token introspection server.
issuer                   Uniquely identifiable name of the Token Issuer.
jwks_timeout             Lifetime of the cached JWKS keys.
jwks_uri                 JWKS URL of the endpoint that hosts the public keys that can be used to verify any JWT issued by...
no                       Remove field
oauth_resp_buffer_sz     Buffering size for the responses from the OAUTH enpoints.
pool_ref                 Pool object to interface with Authorization Server endpoints.
save                     Save and exit the current submode
show_schema              show object schema
token_endpoint           URL of token exchange server.
userinfo_endpoint        URL of the Userinfo Endpoint.
watch                    Watch a given show command
where                    Display the in-progress object
[admin:ctrl]: authprofile:oauth_profile> authorization_endpoint https://dev-477407.oktapreview.com/oauth2/v1/authorize
[admin:ctrl]: authprofile:oauth_profile> token_endpoint https://dev-477407.oktapreview.com/oauth2/v1/token
[admin:ctrl]: authprofile:oauth_profile> introspection_endpoint https://dev-477407.oktapreview.com/oauth2/v1/introspect
[admin:ctrl]: authprofile:oauth_profile> jwks_uri https://dev-477407.oktapreview.com/oauth2/v1/keys
[admin:ctrl]: authprofile:oauth_profile> issuer https://dev-477407.oktapreview.com
[admin:ctrl]: authprofile:oauth_profile> userinfo_endpoint https://dev-477407.oktapreview.com/oauth2/v1/userinfo
[admin:ctrl]: authprofile:oauth_profile> pool_ref okta-pool
[admin:ctrl]: authprofile:oauth_profile> save
[admin:ctrl]: authprofile> save

+--------------------------+---------------------------------------------------------+
| Field                    | Value                                                   |
+--------------------------+---------------------------------------------------------+
| uuid                     | authprofile-4b335ccf-8385-48bd-a438-51e72726cc14        |
| name                     | okta                                                    |
| type                     | AUTH_PROFILE_OAUTH                                      |
| oauth_profile            |                                                         |
|   authorization_endpoint | https://dev-477407.oktapreview.com/oauth2/v1/authorize  |
|   token_endpoint         | https://dev-477407.oktapreview.com/oauth2/v1/token      |
|   introspection_endpoint | https://dev-477407.oktapreview.com/oauth2/v1/introspect |
|   jwks_uri               | https://dev-477407.oktapreview.com/oauth2/v1/keys       |
|   issuer                 | https://dev-477407.oktapreview.com                      |
|   pool_ref               | OKTA                                                    |
|   oauth_resp_buffer_sz   | 102400                                                  |
|   userinfo_endpoint      | https://dev-477407.oktapreview.com/oauth2/v1/userinfo   |
| tenant_ref               | admin                                                   |
+--------------------------+---------------------------------------------------------+
Configuring SSO Policy using CLI
Configure the SSO policy using CLI as shown below:
[admin:ctrl]: > configure ssopolicy oauth
[admin:ctrl]: ssopolicy> type sso_type_oauth
[admin:ctrl]: ssopolicy> save
+------------+------------------------------------------------+
| Field      | Value                                          |
+------------+------------------------------------------------+
| uuid       | ssopolicy-8a4cb441-c819-4153-a247-d78f3a2585b3 |
| name       | oauth                                          |
| type       | SSO_TYPE_OAUTH                                 |
| tenant_ref | admin                                          |
+------------+------------------------------------------------+
Configuring OAuth Settings on the Virtual Service
Configure the sso_policy_ref as shown below:
[admin:ctrl]: > configure virtualservice OAuth-VS
[admin:ctrl]: > virtualservice> sso_policy_ref oauth
Configure the oauth_vs_config as shown below:
[admin:ctrl]: virtualservice> oauth_vs_config
 [admin:ctrl]: virtualservice:oauth_vs_config> redirect_uri   https://100.64.94.61/oauth/callback
 [admin:ctrl]: virtualservice:oauth_vs_config> oauth_settings
 New object being created
 [admin:ctrl]: virtualservice:oauth_vs_config:oauth_settings> auth_profile_ref okta
 [admin:ctrl]: virtualservice:oauth_vs_config:oauth_settings> app_settings
 [admin:ctrl]: virtualservice:oauth_vs_config:oauth_settings:app_settings> oidc_config
 [admin:ctrl]: virtualservice:oauth_vs_config:oauth_settings:app_settings:oidc_config> oidc_enable
 [admin:ctrl]: virtualservice:oauth_vs_config:oauth_settings:app_settings:oidc_config> save
 [admin:ctrl]: virtualservice:oauth_vs_config:oauth_settings:app_settings> client_id xxxxxxxxxxxxxxx
 [admin:ctrl]: virtualservice:oauth_vs_config:oauth_settings:app_settings> client_secret xxxxxxxxxxxxxxx
Add the actual client_id and client_secret that your authorization server has provided.
[admin:ctrl]: virtualservice:oauth_vs_config:oauth_settings:app_settings> save
 [admin:ctrl]: virtualservice:oauth_vs_config:oauth_settings:resource_server>
 [admin:ctrl]: virtualservice:oauth_vs_config:oauth_settings:resource_server> access_type access_token_type_opaque
For this example, an opaque token is used with OKTA. JWT token can be chosen instead of an opaque token, if required.
[admin:ctrl]: virtualservice:oauth_vs_config:oauth_settings:resource_server> opaque_token_params
 [admin:ctrl]: virtualservice:oauth_vs_config:oauth_settings:resource_server:opaque_token_params>
 [admin:ctrl]: virtualservice:oauth_vs_config:oauth_settings:resource_server:opaque_token_params> server_id xxxxxxxxxxxxxxx
 [admin:ctrl]: virtualservice:oauth_vs_config:oauth_settings:resource_server:opaque_token_params> server_secret xxxxxxxxxxxxxxx
In most of the cases, server_id and server_secret are the same as client_id and client_secret respectively.
[admin:ctrl]: virtualservice:oauth_vs_config:oauth_settings:resource_server:opaque_token_params> save
 [admin:ctrl]: virtualservice:oauth_vs_config:oauth_settings:resource_server> save
 [admin:ctrl]: virtualservice:oauth_vs_config:oauth_settings> save
 [admin:ctrl]: virtualservice:oauth_vs_config> save
 [admin:ctrl]: virtualservice> save
The OAuth configuration is as shown below:
| sso_policy_ref                     | oauth                                               |
 | oauth_vs_config                    |                                                     |
 |   redirect_uri                     | https://okta-test.auth.com/oauth/callback           |
 |   cookie_name                      | OAUTH_IUPKWGLH                                      |
 |   cookie_timeout                   | 1 min                                               |
 |   oauth_settings[1]                |                                                     |
 |     auth_profile_ref               | okta-oauth                                          |
 |     app_settings                   |                                                     |
 |       oidc_config                  |                                                     |
 |         oidc_enable                | True                                                |
 |         profile                    | True                                                |
 |         userinfo                   | True                                                |
 |       client_id                    | xxxxxxxxxxxxxxx                                     |
 |       client_secret                | <sensitive>                                   |
 |     resource_server                |                                                     |
 |       access_type                  | ACCESS_TOKEN_TYPE_OPAQUE                            |
 |       opaque_token_params          |                                                     |
 |         server_id                  | xxxxxxxxxxxxxxx                                     |
 |         server_secret              | <sensitive>                                   |
 |   key[1]                           |                                                     |
 |     name                           | dc7dde0a-8a64-45b4-8ded-f65adb03c2a4                |
 |     aes_key                        | b'sdZFYlVECVu9aW7XK4IhVaC8TfakvNSvp6m861tyVNc='     |
 +------------------------------------+-----------------------------------------------------+