


In NSX Advanced Load Balancer, bi-directional virtual service layer-2 traffic between an SE group and its back-end pool can be replicated (cloned) to a cloned-traffic server (or set of servers) or a given subnet. Conceptually, this feature mimics the behavior of a SPAN port. Traffic cloning is typically applied to intrusion detection systems (IDS), intrusion protection systems (IPS), and monitoring tools.
The traffic cloning feature must not be confused with the sideband profile feature of NSX Advanced Load Balancer. Both features replicate traffic to an ancillary server or set of servers, but differ in many important ways. For more information on these features, see Virtual Service Sideband Profile and Traffic Replication Options with NSX Advanced Load Balancer.
How Traffic Cloning Works
The following figure depicts the regular traffic flow for a load-balanced application running on a pool of servers. Virtual service VS-1 is placed on the SE. When traffic cloning is enabled for VS-1, SE-1 replicates all SE-server-pool traffic (background colored yellow), sending that traffic (background colored light purple) to the configured IP. This traffic is completely stateless and so the SE does not perform any TCP handshake and does not expect any responses to the traffic sent to the configured cloned-traffic server pool. You can optionally configure the traffic clone profile on the SE to preserve the original client’s IP address.

If a set of cloned-traffic servers is configured, the SEs distribute traffic to them in round-robin fashion. This distribution is independent of the algorithm that chooses servers within the back-end application-server pools of the virtual service. You can configure the NSX Advanced Load Balancer to preserve the client IP and send decrypted traffic to the cloned-traffic servers.
Scope and Usage Guidelines
The cloned-traffic server or subnet must be directly-connected to members of the SE group. Ensure SE interfaces are attached to the correct networks.
Traffic cloning is currently supported only for Linux server clouds, Cisco CSP 2100, AWS, OpenStack, vCenter write access and no-orchestrator clouds.
The following are the main points for traffic cloning to work in the AWS Cloud.
The clone server instance must be in a directly-connected network.
From AWS console, deactivate source and destination check for traffic clone servers. For more information, check for the SourceDestCheck section in the AWS CloudFormation User Guide.
Update clone servers SG to allow inbound traffic for application (pool servers) ports from all IP addresses.
TCP port 80 from 0.0.0.0/0
Ensure that VIPs and traffic clone profile are configured for the same tenant for multi-tenant deployments.
Cross-tenant profiles or configuration is not supported, as each tenant operates in a separate network name space.
No special configuration is needed for multi-AZ support. You can add clone the server IP address and network information like you do for single AZ.
For traffic cloning to work in OpenStack, create a traffic clone profile in the same network that the backend server is in.
Note:For packets to be captured, ingress and egress security group rules need to be in place.
Cloning Traffic Using the UI
To clone traffic,
Creating the Traffic Clone Profile through UI
To create the traffic clone profile using the NSX Advanced Load Balancer UI, follow these steps.
Navigate to .
Click Create and enter the Name of the traffic clone.
Click Set Cloud.
Select the cloud from the Cloud drop-down menu in the Set Cloud screen.
Note:If only one cloud is available, by default the cloud will be selected and the Set Cloud field is not available.
Click Set.
Select the Preserve Client IP check box if the client IP has to be preserved in the clone destination.
Click Add to open the Clone Server sub-screen.
Select the network in which the traffic has to be cloned to.
Enter the Subnet of the network in which the traffic has to be cloned to.
Note:In the Clone Server sub-screen, the Subnet drop-down is available only if the selected network has any configured subnets. If no subnets are configured for the selected network, then the Subnet field is not visible.
Enter the server IP Address.
Enter the MAC Address of the clone server.
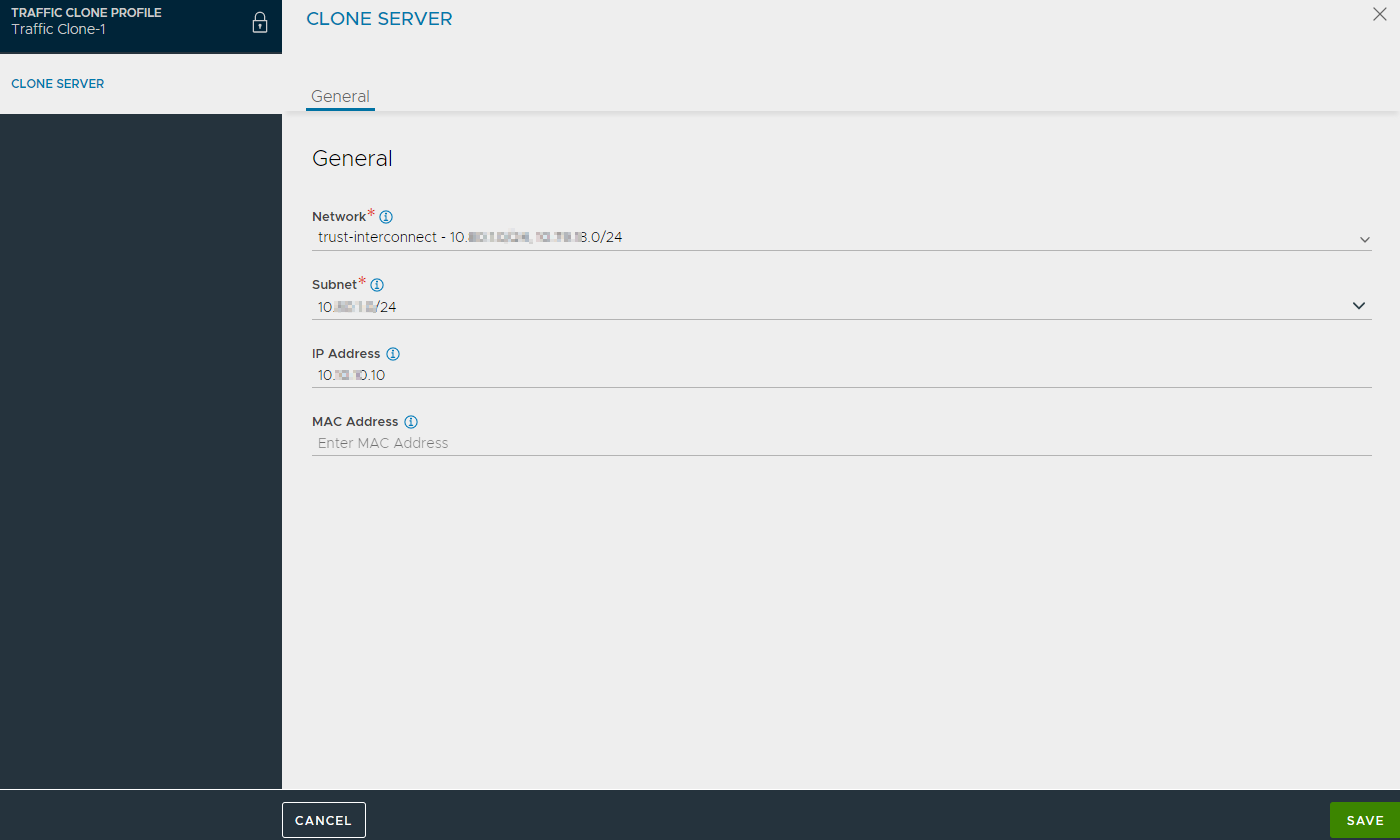
Click Save to complete creating the cloned server.

Click Save to complete the traffic clone creation.
Assigning the Traffic Clone Profile using the CLI
To enable cloning of a virtual service traffic, associate the traffic clone profile to the required virtual service.
Open the virtual service for which the traffic will be cloned in edit mode.
Navigate to the Advanced tab.
Under Other Settings, select the Traffic Clone Profile.
Save the virtual service.
Cloning Traffic Using the CLI
To clone traffic, create a traffic clone profile and assign it to the required virtual service.
Creating a Traffic Clone Profile
Assigning the Traffic Clone Profile
Creating a Traffic Clone Profile through CLI
Configure the clone server details as shown below.
[admin:controller-]: > configure trafficcloneprofile clone_profile_name
[admin:controller-1]: trafficcloneprofile> clone_servers
New object being created
[controller]: trafficcloneprofile:clone_servers> ip_address 10.10.10.10
[admin:controller]: trafficcloneprofile:clone_servers> subnet 10.10.10.0/24
[admin:controller]: trafficcloneprofile:clone_servers> save
[admin:controller]: trafficcloneprofile> save
[admin:controller]:>
To optionally configure the profile to preserve client IP addresses, overwrite the previously entered value for preserve_client_ip.
[admin: controller]: trafficcloneprofile> preserve_client_ip
To view the traffic clone profile, run the following command.
[admin:controller]:>show trafficcloneprofile clone_profile_name
Assigning the Traffic Clone Profile through CLI
To associate a clone profile with a virtual service, run the following CLI commands.
[admin:controller]: > configure virtualservice vs_name [admin:controller]: virtualservice> traffic_clone_profile_ref clone_profile_name [admin:controller]: virtualservice> save [admin:controller]:>
To print the cloning statistics for any given virtual service, run the following command.
[admin:controller]: > show virtualservice vs_name traffic_clone_stats
+-------------------------+------------------------------+
| Field               	  | Value                        |
+-------------------------+------------------------------+
| se_uuid             	  | 10-10-22-224:se-005056b0bad2 |
| proc_id                 | PROC_Aggregate               |
| clone_srvr_stats[1]     |                              |
|   ip                	  | 10.10.10.10                  |
|   num_total_pkts_cloned | 10                        	 |
|   num_mbuf_alloc_failed | 0                        	 |
|   num_driver_failures   | 0                        	 |
|   num_succeeded     	  | 10                        	 |
+-------------------------+------------------------------+
[admin:controller]: >
Configuration changes for a clone profile associated with any given virtual service will reset its stats.
Special Conditions
No Destination IP
Some use cases might have some type of network sniffer listening to all network traffic on the receiving end of the cloned traffic. In this case, a destination IP address, MAC or both that could be configured in the profile might not be available. For this use case, the profile must be configured with any dummy IP address and/or MAC address for the cloned-traffic server. However, the subnet needs to be valid, with the SE having an interface connected to the network. This is required for the SE to ascertain the interface to send the cloned traffic from. Since the SE does not maintain any connection state and does not expect a response from the cloned-traffic server, the destination IP/MAC address need not be valid.
SSL on the Back End
Though some use cases can require end-to-end SSL encryption, traffic sent to cloned-traffic servers always needs to be unencrypted. Recall that the servers lack the credentials necessary to dialog directly with the client community over SSL. For this, the user must configure two virtual services in tandem as shown in the following figure, so that VS1-A is added as pool server for VS1.
The client traffic SSL is terminated by VS1 on SE-1 and re-encrypted by VS1-A on SE-2, before being load-balanced to the back-end servers. The unencrypted traffic from VS-1 to VS1-A and the return traffic can then be cloned. The virtual services must be created on separate service engine groups so that both the virtual services are not placed on same SE.
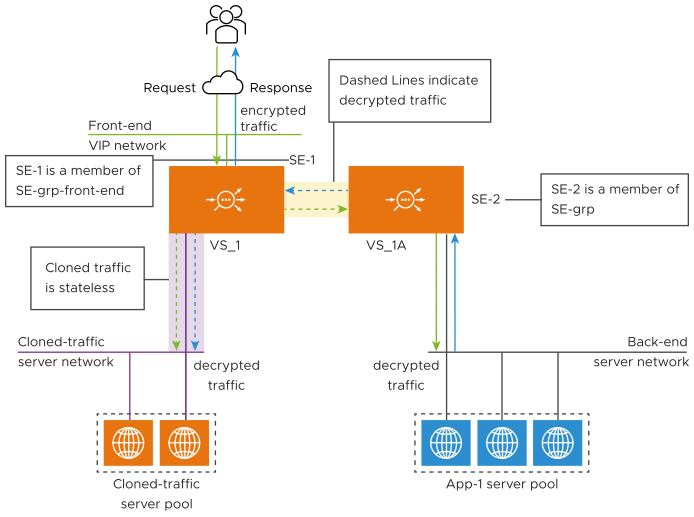
The figure illustrates a back-to-back virtual service traffic cloning configuration. Encrypted client traffic (color-coded green) enters VS-1 through the front-end VIP network. Decrypted packet-level traffic (dashed green arrows) flows outward from SE-1, to the cloned-traffic servers and also to SE-2.
Responses from the back-end pool (depicted in solid blue) are received by SE-2, decrypted, processed, and forwarded to SE-1, which replicates them to the cloned-traffic servers. SE-1 is responsible to encrypt responses sent to the clients.
