


This section explains configuring NSX Advanced Load Balancer virtual service to load balance passive FTP.
In passive FTP, the client sends a PASV command to the server on port 21. The server responds with the server IP address data port that is greater than 1023 to connect to. On using a virtual IP on the load balancer for passive FTP, the server IP has to be changed to the virtual IP on the load balancer so that the client connects to the load balancer instead of connecting to the server directly. A DataScript is used for changing the server IP to a virtual IP configured in the FTP payload in the server response.
Configuring NSX Advanced Load Balancer
To configure NSX Advanced Load Balancer for load balancing passive FTP, follow the steps below:
Configuring health monitor for FTP
Configuring pool with the required FTP servers
Configuring Layer 4 response DataScript for FTP
Configuring Layer 4 virtual service with port configuration for the data channel
Configuring Health Monitor
To configure an external health monitor for FTP, on NSX Advanced Load Balancer UI navigate to and click Create.
Enter a name for the health monitor.
Click the dropdown for Type and select External.
Enter a relevant value in the Send Interval field.
Under External Settings,
Enter port number 21 in the Health Monitor Port field.
Paste the below bash script for the FTP health monitor in the Script Code section.
#!/bin/bash
    curl -s ftp://$IP/$path --ftp-pasv -u $user:$pass
Enter the Username, Password, and the Filepath in the Script Variables section.
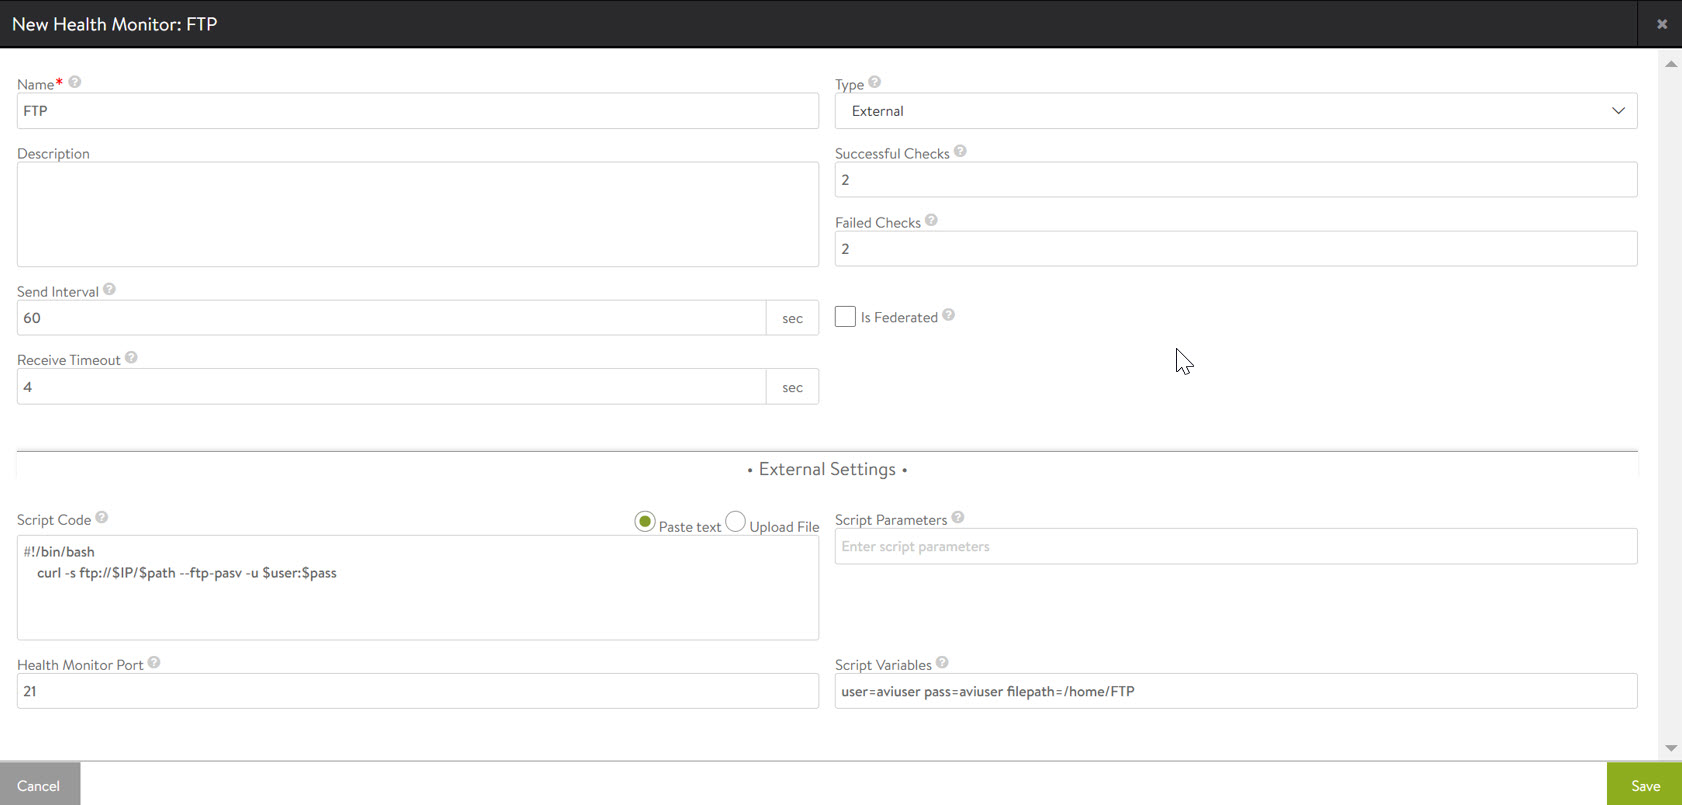
The file path is the absolute path of the file to be checked in the health monitor. The curl opens up an FTP connection using the user name and password provided to the servers in the pool and requests for a directory listing in the path provided. The curl runs in silent mode (as specified by the option -s) and returns a directory listing output only if a file exists in the file path and the health monitor will pass. If no file exists in the file path, the health monitor will fail. The path is optional, and if not specified, the curl will retrieve the root directory listing.
Configuring Pool
To configure the pool with required FTP servers, on NSX Advanced Load Balancer UI navigate to and click Create Pool.
Enter a name for the pool.
Enter port number 21 in the Default Server Port field.
Under Load Balance, select .
Consistent Hash with Source IP Address is chosen as the load balancing algorithm to avoid a different server being selected by each SE if a virtual server is scaled out to multiple Service Engines.
Click +Add Active Monitor and from the drop-down menu select the health monitor configured in the previous step - FTP.
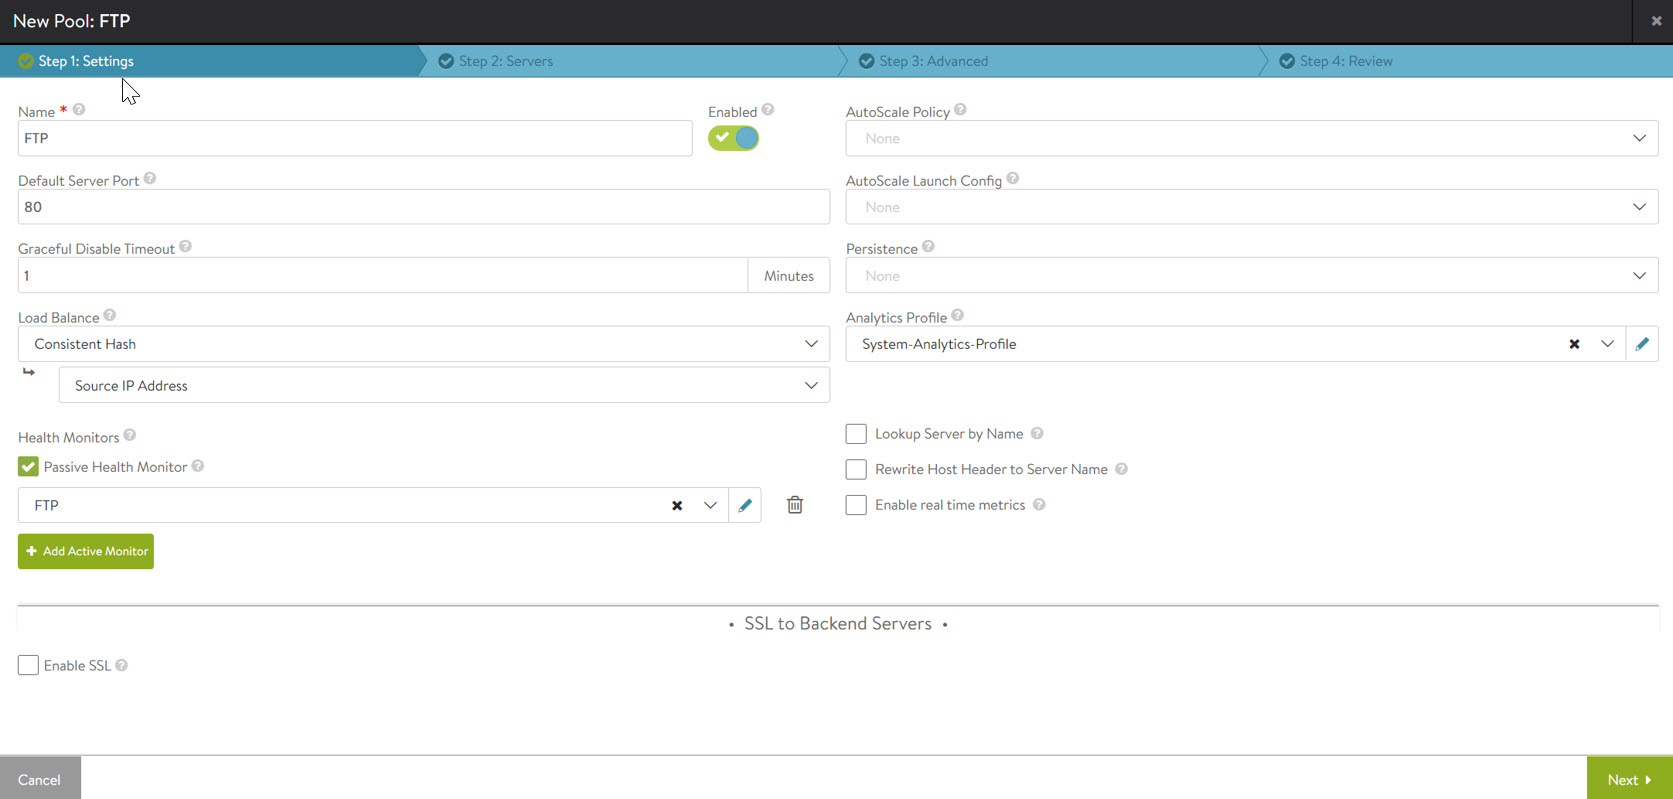
Navigate to the Servers tab and add the relevant servers.
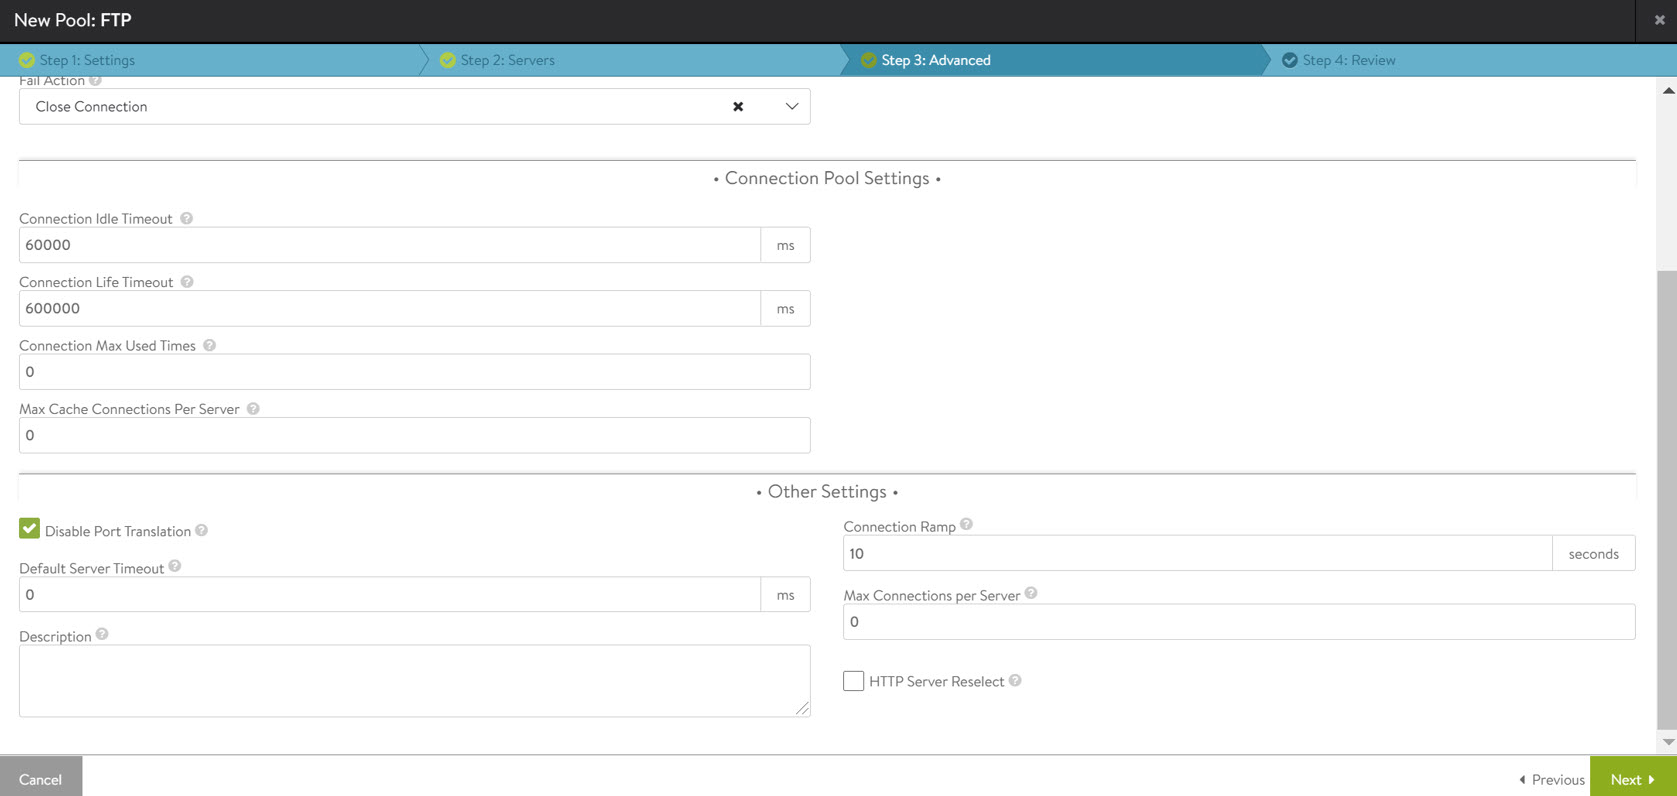
Navigate to the Advanced tab.
Under Other Settings, click the check box for Disable Port Translation to enable the option.
Configuring DataScript
To configure the Layer 4 response DataScript, on NSX Advanced Load Balancer UI navigate to and click Create.
Add the below DataScript to the VS Datascript Evt L4 Response Event Script section and click Save.
-- Handle passive FTP 227 response rewrite (server IP to VIP)
function string.tohex(str)
	return (str:gsub('.', function (c)
    	return string.format('%02X', string.byte(c))
	end))
end
-- Do not run DS for data ports
if avi.vs.port() ~= '21' then
	avi.l4.ds_done()
end
-- Read entire payload (assumption that entire response we are looking for is a single packet)
local payload = avi.l4.read()
local p1, p2 = string.match(payload, '227 Entering Passive Mode %(%d+,%d+,%d+,%d+,(%d+),(%d+)%)%.\r\n')
if p1 ~= nil then
	local vip_ip = string.gsub(avi.vs.ip(), '%.', ',')
	local rewrite = '227 Entering Passive Mode (' .. vip_ip .. ',' .. p1 .. ',' .. p2 ..').\r\n'
	avi.l4.modify(string.tohex(rewrite))
	rewrite_len = rewrite:len()
	payload_len = payload:len()
	if rewrite_len < payload_len then
    	avi.l4.discard(payload_len-rewrite_len, rewrite_len)
	end
end
Configure Virtual Service
To configure a Layer 4 virtual service for FTP on NSX Advanced Load Balancer UI:
Navigate to , click Create Virtual Service, and select Advanced Setup.
Under Profiles,
For Application Profile, click the dropdown and select System-L4-Application.
For TCP/UDP Profile, click the dropdown and select System-TCP-Proxy.
Under Service Port, click Switch to Advanced.
Under Services, enter the port range as 1024-65534.
Note:From a security perspective, it is recommended to identify the specific passive port range configured on the FTP servers and to configure this port range under the Virtual Service rather than the full range of high ports.
Under Pool, click the dropdown and select the pool configured - FTP.
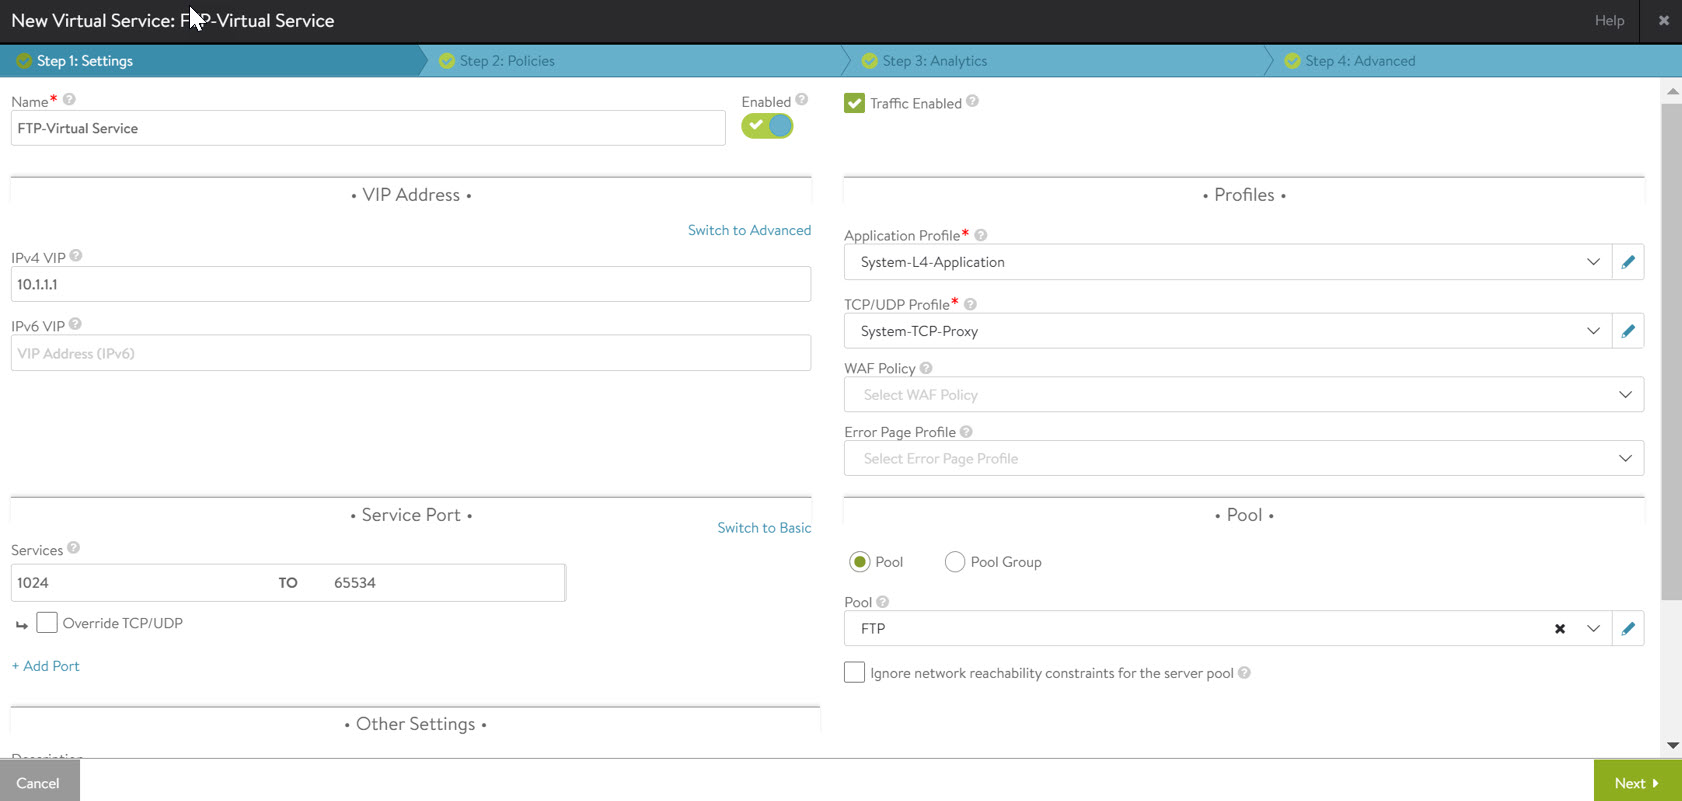
Click Next.
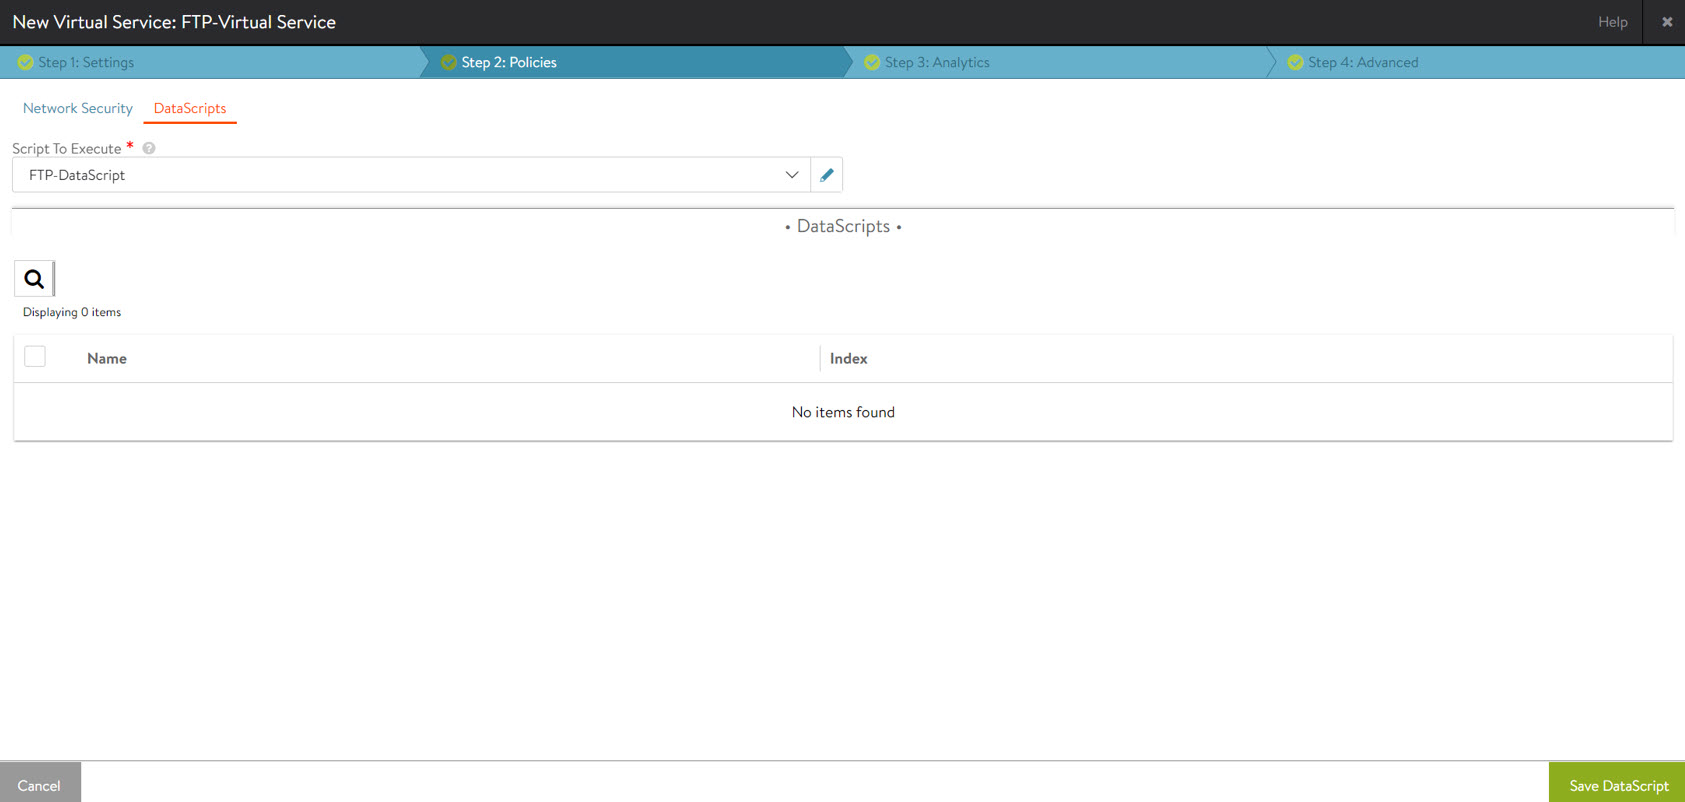
In the Policies tab, under DataScripts, click + Add DataScript. From the dropdown, select the DataScript configured in the previous section - FTP-DataScript.
Click Save DataScript.
Click Next to navigate to the next two tabs and Save the configuration.
Additional Configuration
The FTP servers could enforce that the control and data connections are sourced from the same IP. Hence, the Service Engines that load balances the control and data traffic must be the same. This can be achieved by deploying the Service Engines in an active/standby high availability mode.
For deployment in active/active mode with native Layer 2 scaleout, to ensure the same Service Engine load balances the traffic to the FTP servers, configure the following on the virtual service using the CLI:
[admin:10-10-10-1]: > configure virtualservice virtual-service-name
[admin:10-10-10-1]: virtualservice> flow_dist consistent_hash_source_ip_address
[admin:10-10-10-1]: virtualservice> save
On using BGP / ECMP scaleout, as in the deployment for FTP load balancing in Azure or GCP, the flow would reach the Service Engines based on the routing hash done on the upstream device. Therefore the above CLI configuration is not applicable for BGP / ECMP scaleout.
The virtual service is now ready for load balancing FTP. The FTP server IP for clients would be the VIP configured on the FTP virtual service.
