


When creating the virtual service, Step 4: Advanced provides advanced and optional configuration for the virtual service.
Procedure
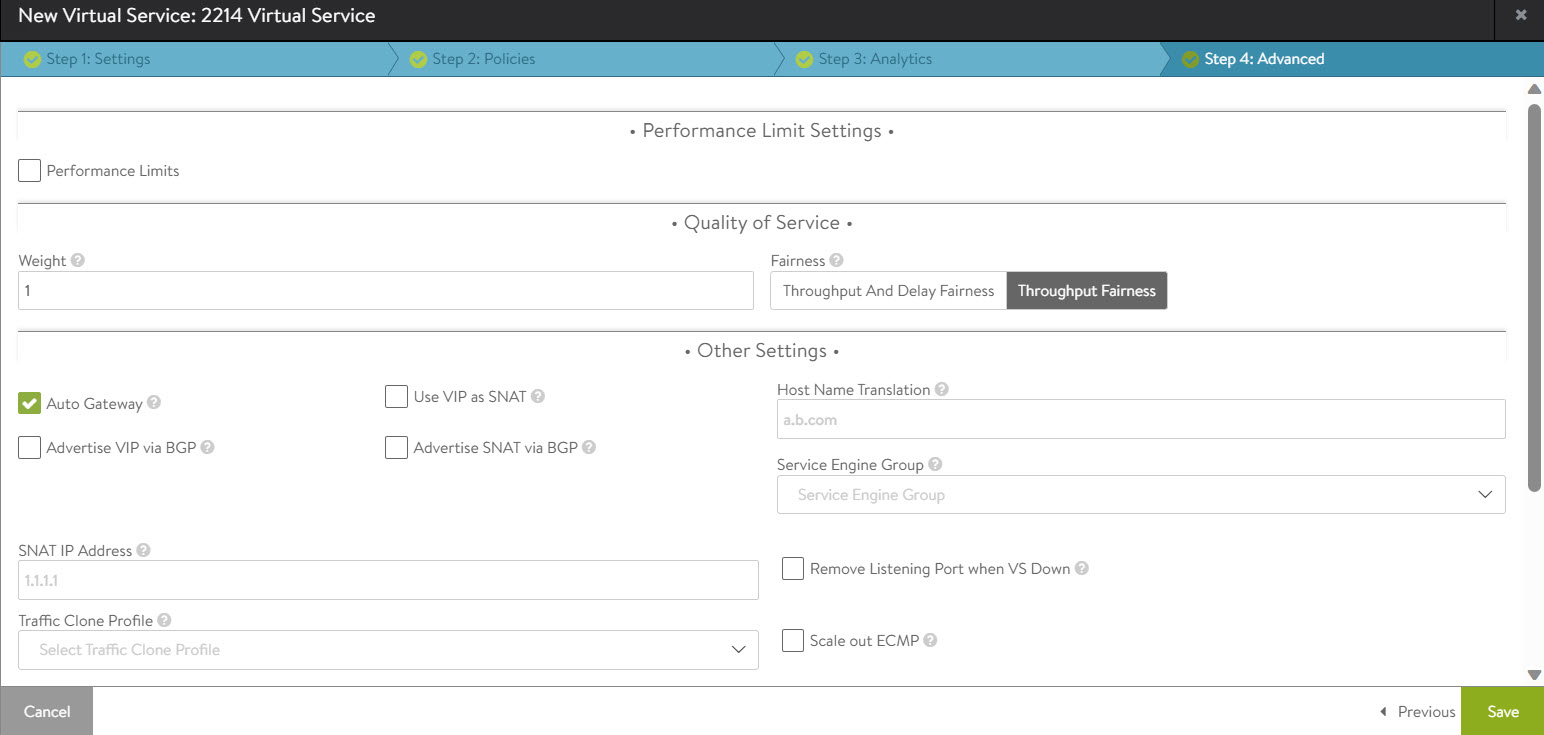
- Under Performance Limit Settings, click Performance Limits and define the performance limits for a virtual service. The limits applied are for this virtual service only, and are based on an aggregate of all clients. See Rate Shaping and Throttling Options in VMware NSX Advanced Load Balancer Monitoring and Operability Guide.
Configure limits per client using the application profile’s DDoS tab. Use policies or DataScripts for more per-client limits.
- To limit the incoming connections to this virtual service use Rate Limit Number of New TCP Connections and Rate Limit Number of New HTTP Requests. Configure the following fields
Option Description Threshold
Set the maximum threshold of new connections, requests or packets permitted (within the range 1-1000000000) from all clients created for this virtual service over the configured time period.
Time Period
Enter the time (within the range 1-1000000000), in seconds, within which the threshold is valid. Enter to 0 to keep the threshold perpetually valid.
Action
Select the Action. NSX Advanced Load Balancer performs this action upon rate limiting.
- Enter the maximum amount of bandwidth for the virtual service in Mbps for each SE using Max Throughput.
- Specify the maximum number of concurrent open connections using Max Concurrent Connections. Connection attempts that exceed this number will be reset (TCP) or dropped (UDP) until the total number of concurrent connections falls below the threshold.
- Under the section Quality of Service, configure the following
Option Description Weight
Bandwidth is the packets per second through the SE’s hypervisor, saturation of the physical interface of the host server, or similar network constrictions. NSX Advanced Load Balancer provides bandwidth allocation to the traffic that this virtual service transmits, depending on the weight you assign.
A higher weight prioritizes traffic in comparison to other virtual services sharing the same Service Engines.
This setting is only applicable if there is network congestion, and only for packets sent from the Service Engine.
Fairness
Fairness determines the algorithm that the NSX Advanced Load Balancer uses to ensure that each virtual service can send traffic when the Service Engine experiences network congestion.
The Throughput Fairness algorithm considers the weight defined for the virtual service into account to achieve this.
Throughput and Delay Fairness is a more thorough algorithm to accomplish the same task. It consumes greater CPU on the Service Engine when there are larger numbers of virtual services.
This option is only recommended for latency-sensitive protocols.
- Under Other Settings configure the following:
- Enable Auto Gateway to send response traffic to clients back to the source MAC address of the connection, rather than statically sent to the default gateway of the NSX Advanced Load Balancer. If the NSX Advanced Load Balancer has the wrong default gateway, no configured gateway, or multiple gateways, client-initiated return traffic will still flow correctly. The NSX Advanced Load Balancerdefault gateway will still be used for management and outbound-initiated traffic.
To register MAC address of the auto gateway on the Secondary Service Engine, NSX Advanced Load Balancer retains the source MAC address of the client during TCP handshake, later it starts using MAC address of the primary Service Engine.
- Enable Use VIP as SNAT for health monitoring and sending traffic to the back-end servers instead of the SE interface IP. On enabling this option the virtual service cannot be configured in an active-active HA mode. For example, in environments in which firewalls separate clients from services (for example, AWS), the feature provides a consistent source IP for traffic to the origin server. During packet capture, you can filter on the VIP and capture traffic on both sides of the NSX Advanced Load Balancer, thus eliminating extraneous traffic.
- Select Advertise VIP via BGP to enable Route Health Injection using the BGP configuration in the vrf context.
- Select Advertise SNAT via BGP to enable Route Health Injection for Source network address translated (NAT) floating IP Address using the BGP configuration in the vrf context.
- Enter the network address translated (NAT) floating source IP Address(es) for upstream connection to servers as the SNAT IP Address.
- Enter the Server network or list of servers for cloning traffic in the Traffic Clone Profile.
- If the host header name in a client HTTP request is not the same as this field, or if it is an IP address,NSX Advanced Load Balancer translates the host header to this name prior to sending the request to a server. If a server issues a redirect with the translated name, or with its own IP address, the redirect’s location header will be replaced with the client’s original requested host name. Host Name Translation does not rewrite cookie domains or absolute links that might be embedded within the HTML page. This option is applicable to HTTP virtual services only. This capability can be manually created using HTTP request and response policies.
- Select the required Service Engine Group. Placing a virtual service in a specific Service Engine group is used to guarantee resource reservation and data plane isolation, such as separating production from test environments. This field may be hidden based on configured roles or tenant options.
- Enable Remove Listening Port when VS Down for the Service Engine to respond to requests to the VIP and service port with a RST (TCP) or ICMP port unreachable (UDP), when the virtual service is down. See Remove Listening Port when VS down.
- Select Scale out ECMP if the network itself performs flow hashing with ECMP in environments such as GCP. Deactivate the redistribution of flows across Service Engines for a virtual service.
- Enable Auto Gateway to send response traffic to clients back to the source MAC address of the connection, rather than statically sent to the default gateway of the NSX Advanced Load Balancer. If the NSX Advanced Load Balancer has the wrong default gateway, no configured gateway, or multiple gateways, client-initiated return traffic will still flow correctly. The NSX Advanced Load Balancerdefault gateway will still be used for management and outbound-initiated traffic.
- Configure Role-Based Access Control (RBAC)for the virtual service using markers. See Granular Role Based Access Controls in VMware NSX Advanced Load Balancer Administration Guide.
- Click Add.
- Enter the Key and the corressponding Value.
- Click Save to complete the virtual service configuration.
