


NSX Advanced Load Balancer Controllers continually exchange information securely with NSX Advanced Load Balancer SEs. Likewise, in cluster deployments, multiple NSX Advanced Load Balancer Controllers also continually exchange information with one other securely.
SEs perform data plane operations such as load balancing and report the related information to the NSX Advanced Load Balancer Controllers. This information includes server health, client connection information, and request logs. In cluster deployments, the multiple Controllers share the workload for log processing and analytics.
NSX Advanced Load Balancer Controllers also might sometimes send commands down to the SEs, for example, to make configuration changes. During normal operation, this management traffic might average a few Kb/s per SE. Spikes in communication can occur if the Controller requests full client logs, which can potentially be several GB in size.
SE to Controller Session Setup
NSX Advanced Load Balancer Controllers and SEs communicate using HTTP/2 port 8443 over their management IP addresses. When a new SE is deployed and is connected to the network, it contacts the Controller to set up a secure management session. (The management IP addresses of the SE and Controller are included in the meta-information of the SE.)
The secure TLS session is established between Envoy as the proxy on both SE and Controller. Once the connection is fully established, the Controller pushes down the relevant configuration to the SE. The Controllers never initiate these connections. They are always initiated by the SEs.
In addition to communication over port 8443, there is an encrypted tunnel based on SSH reverse port forwarding between SE and the Controller which is used for debugging purposes only.
Trust Establishment
The trust model here is based on a certificate hierarchy, where the Controller generates the following set of self-signed certificates:
Root CA
Controller certificate (signed by the root CA)
While the default is a self-signed certificate, you can also update the certificates on port
8443with something that is issued by your organization PKI.Do not replace or edit the
System-Default-Secure-Channel-Certwith a custom certificate. Create a new certificate and update the System configuration to point to it. Replacing the existing certificate will break the secure channel certificate verification and the system will have to be restored.Ensure that there are no Service Engines in the system.
Ensure that only no access clouds.
1 - Prepare SE Image
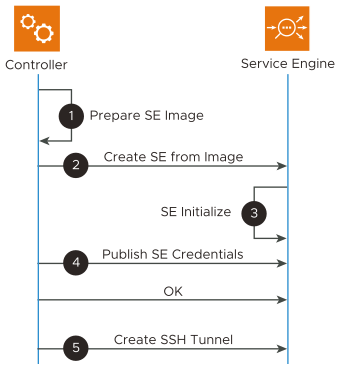
Generate the set of self-signed certificates for the Controller cluster. This will act as the trust anchor for the NSX Advanced Load Balancer Controller and SEs.
Same certificate is presented by each NSX Advanced Load Balancer Controller node in the cluster for SE to verify its authenticity.
Generate a one-time token valid for a duration of 60 minutes.
Controller packages the root CA certificate in the SE image. One-time token is included in the meta-information of the SE.
2 - Create SE from Image
NSX Advanced Load Balancer Controller creates the SE using the appropriate Cloud infrastructure APIs.
3 - SE Initialize
Upon bootup, SE will generate a unique key pair for itself
The key pair is used for JWT based gRPC authentication as well as creating the SSH reverse tunnel for debugging features only.
4 - Publish SE Credentials
SE invokes a secure key exchange gRPC to controller on port
8443.When invoking this API, the authentication involves:
SE verifies certificate presented by the Controller using the prepackaged root CA certificate.
The Controller verifies usage of the one-time token that was generated.
Subsequent authentication involves controller verifying an API signature using the SSH keys exchanged.
SE's public key of the key pair gets persisted on the controller for subsequent JWT based gRPC authentication.
Additionally, the SSH tunnel between SE and the Controller(for debugging only) uses host-key based authentication on the client-side, and a key based auth for internal aviseuser on the server-side. Necessary key pairs are exchanged as part the API as well.
From this point onward, SE can establish the secure HTTPS session through Envoy as the proxy as well as the additional SSH reverse tunnel for debugging. The one-time token will no longer be permitted for any requests from this SE.
5 - Create SSH Tunnel between SE and the Controller

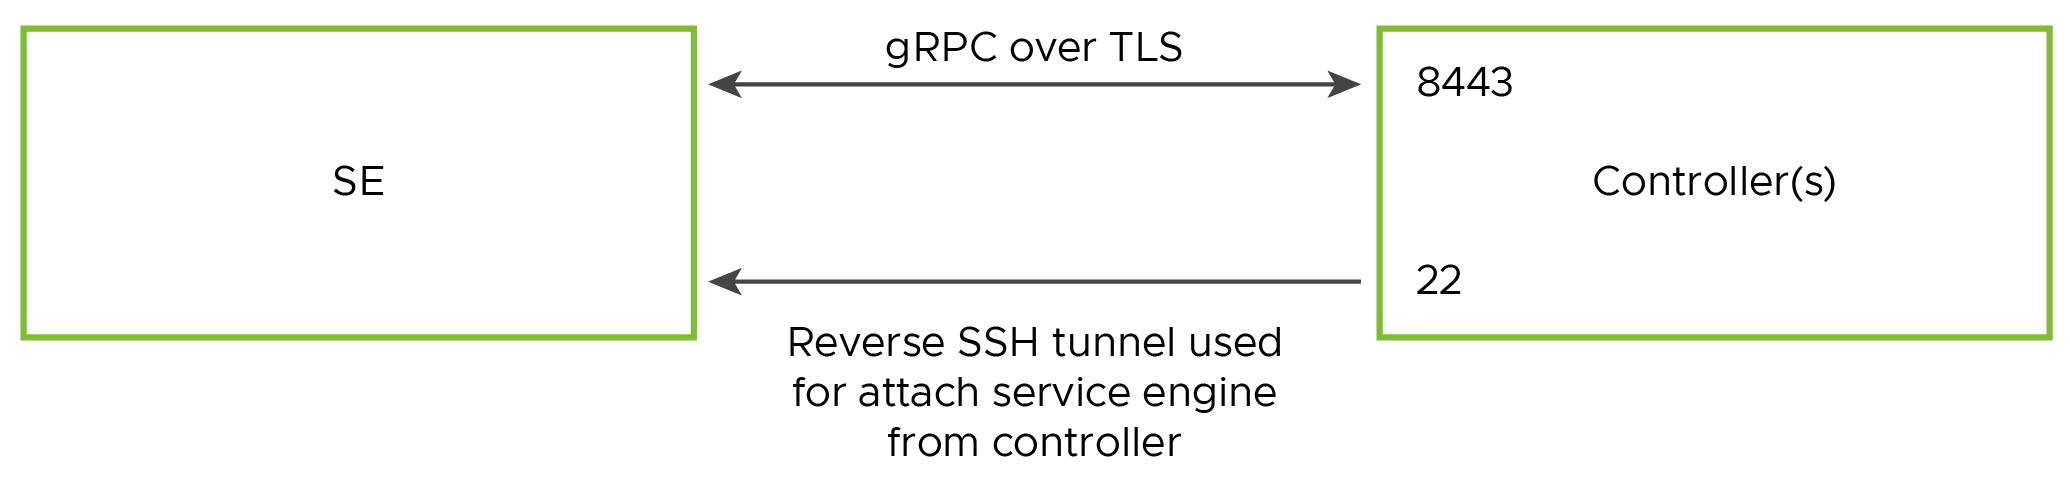
There are two underlying infra between SE and the Controller for secure communication:
- For debugging:
-
SSH tunnel based on SSH reverse port forwarding
- For application:
-
Secure HTTPS connection between Envoy proxies on both the Controller and SE
For debugging: SSH tunnel based on SSH reverse port forwarding
For application: Secure HTTPS connection between Envoy proxies on both controller and SE
Authentication involved in the Envoy based HTTPS connection used for gRPC:
TLS origination on SE Envoy and TLS termination on the Controller Envoy.
Certificate validation on client (SE Envoy) to authenticate the server (Controller).
gRPC authentication with signed JWT token with expiry for each API on server (Controller) to authenticate the client (SE).
JWT token is issued with signature validation based on the exchanged SSH key pairs.
Creating a Custom Secure Channel Certificate
The NSX Advanced Load Balancer supports differet types of SSL/TLS certificates to establish a secure connection.
To create a root certificate,
1. Navigate to .
2. Click Create.
3. Select Root/Intermediate CA Certificate from the dropdown list.
4. In the NEW CERTIFICATE screen, either click IMPORT File to import the .pem file or paste the contents of the certificate in the text box provided.
5. Click Validate.
If the certificate is valid, the fields Common Name, Organization, Alogirthm, and others are auto-filled.
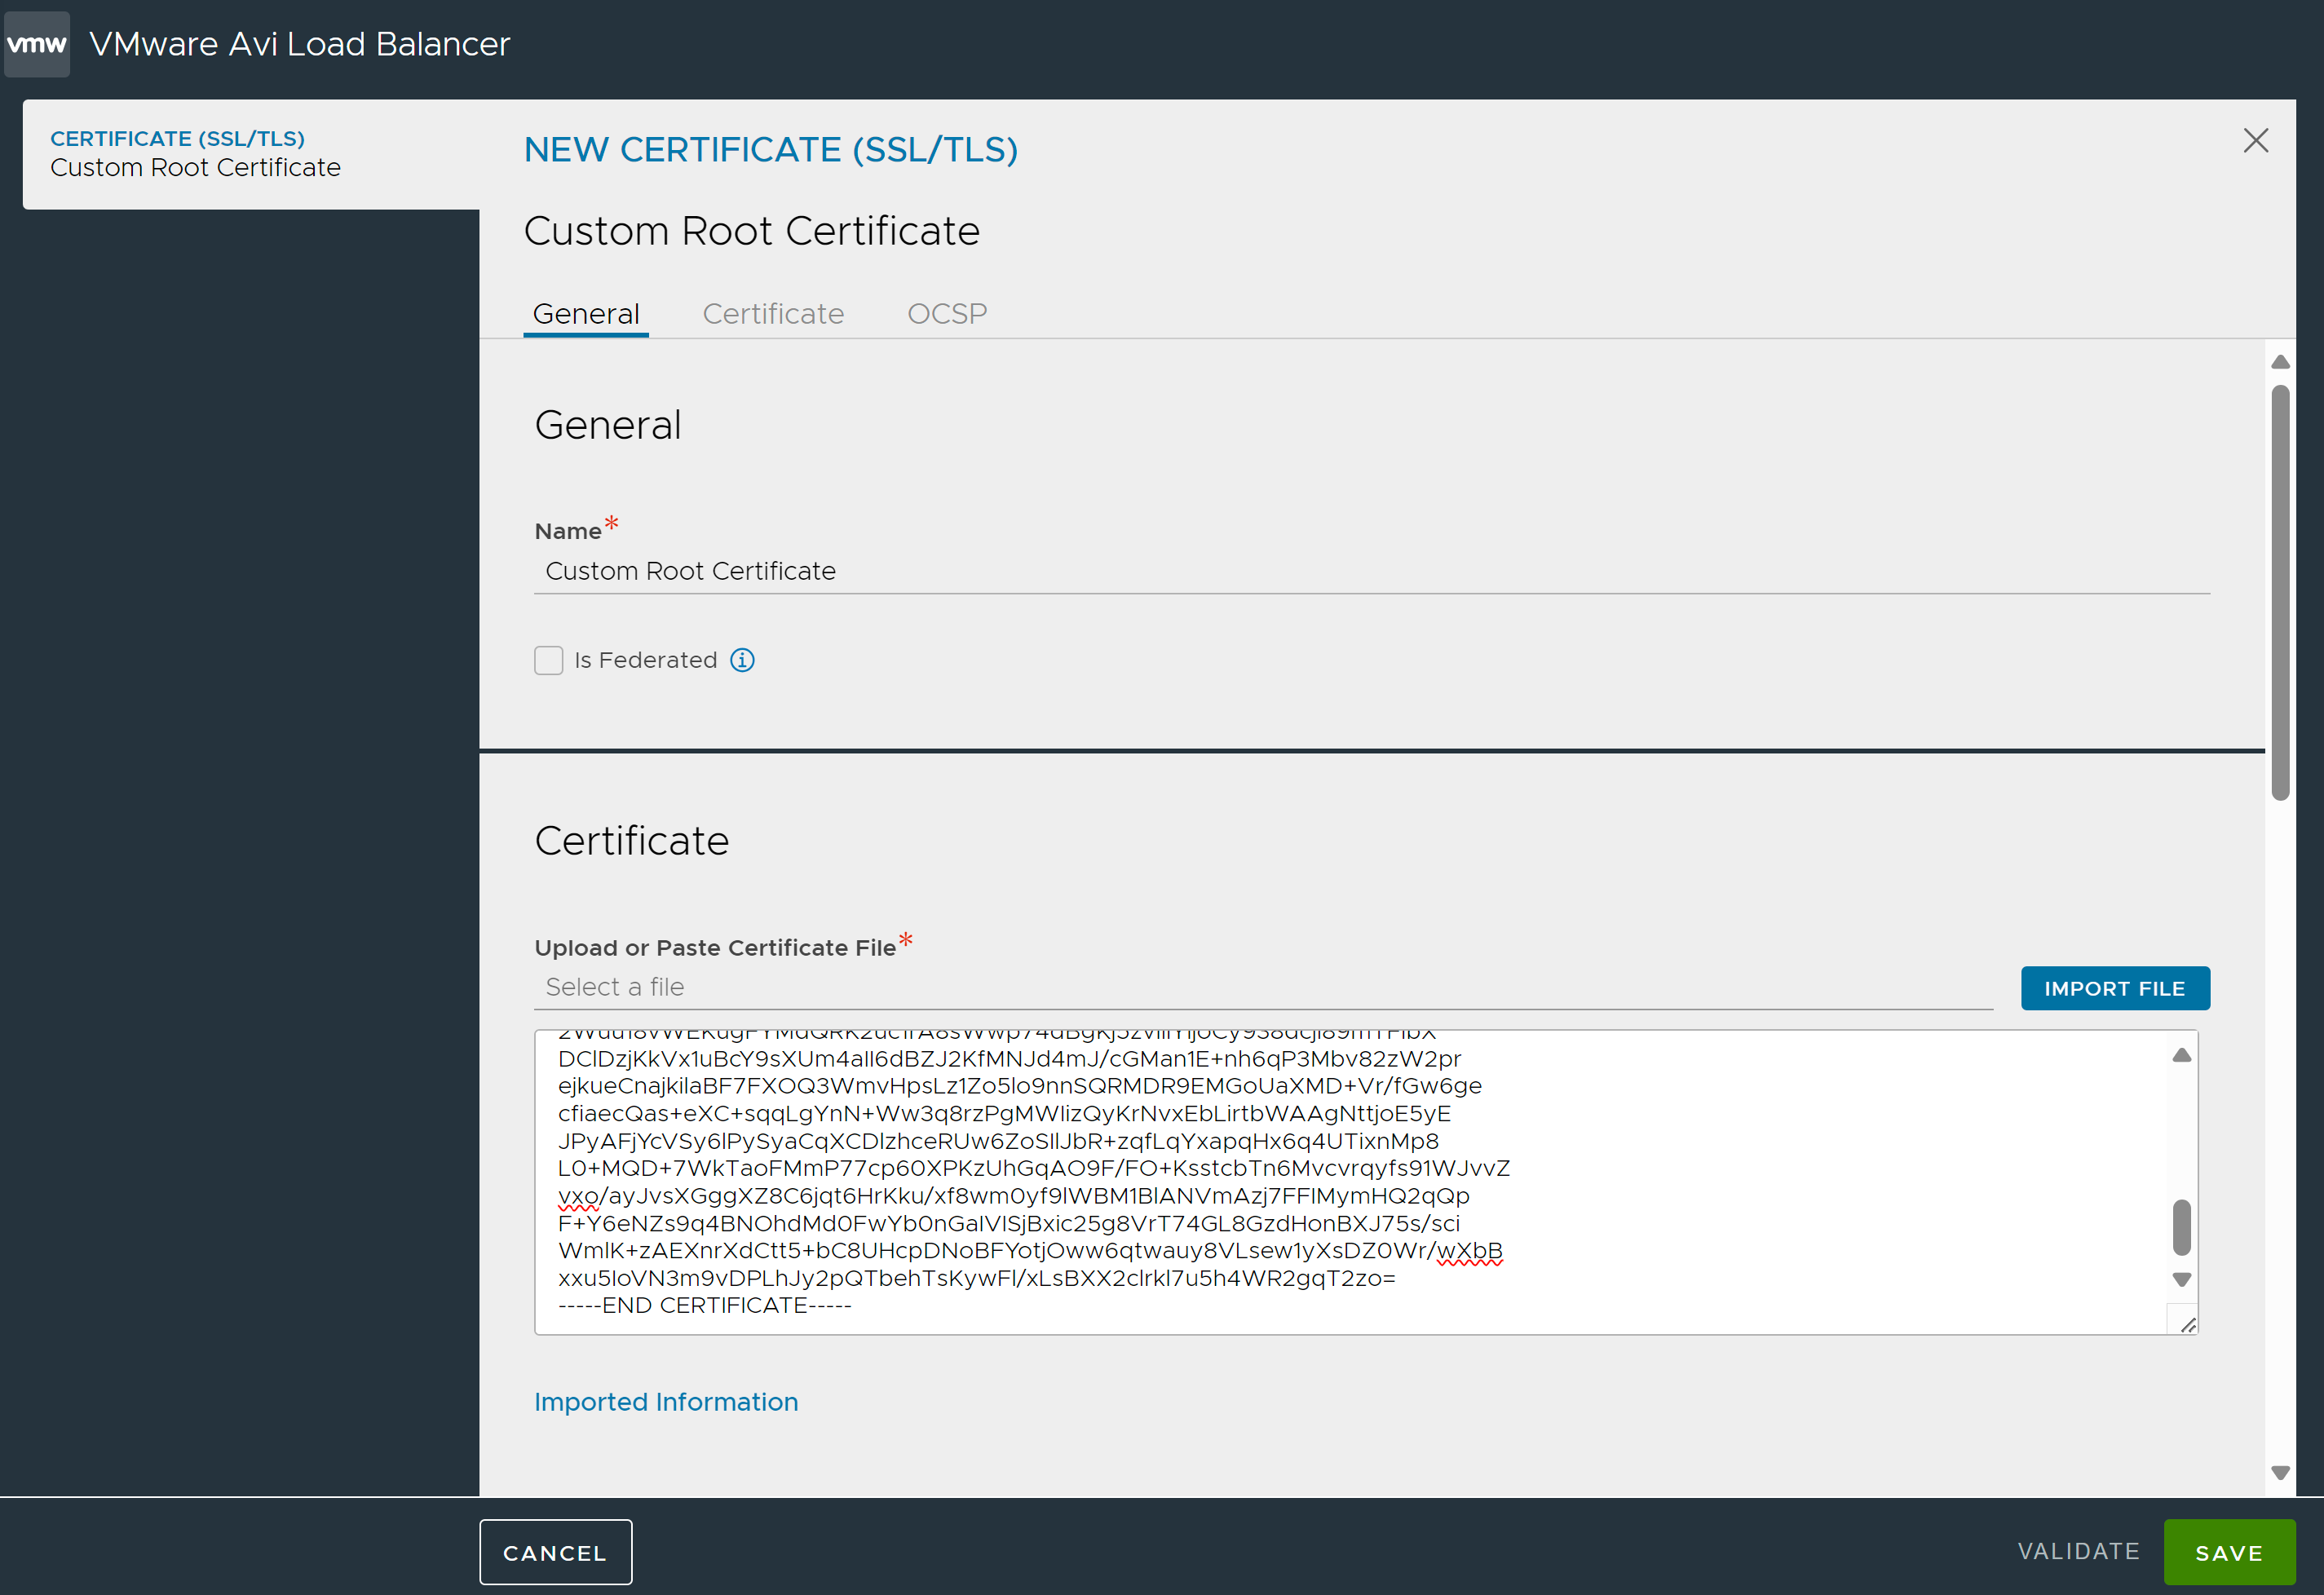
6. Click Save.
Similarly, using the same steps an intermediate certificate can be uploaded.
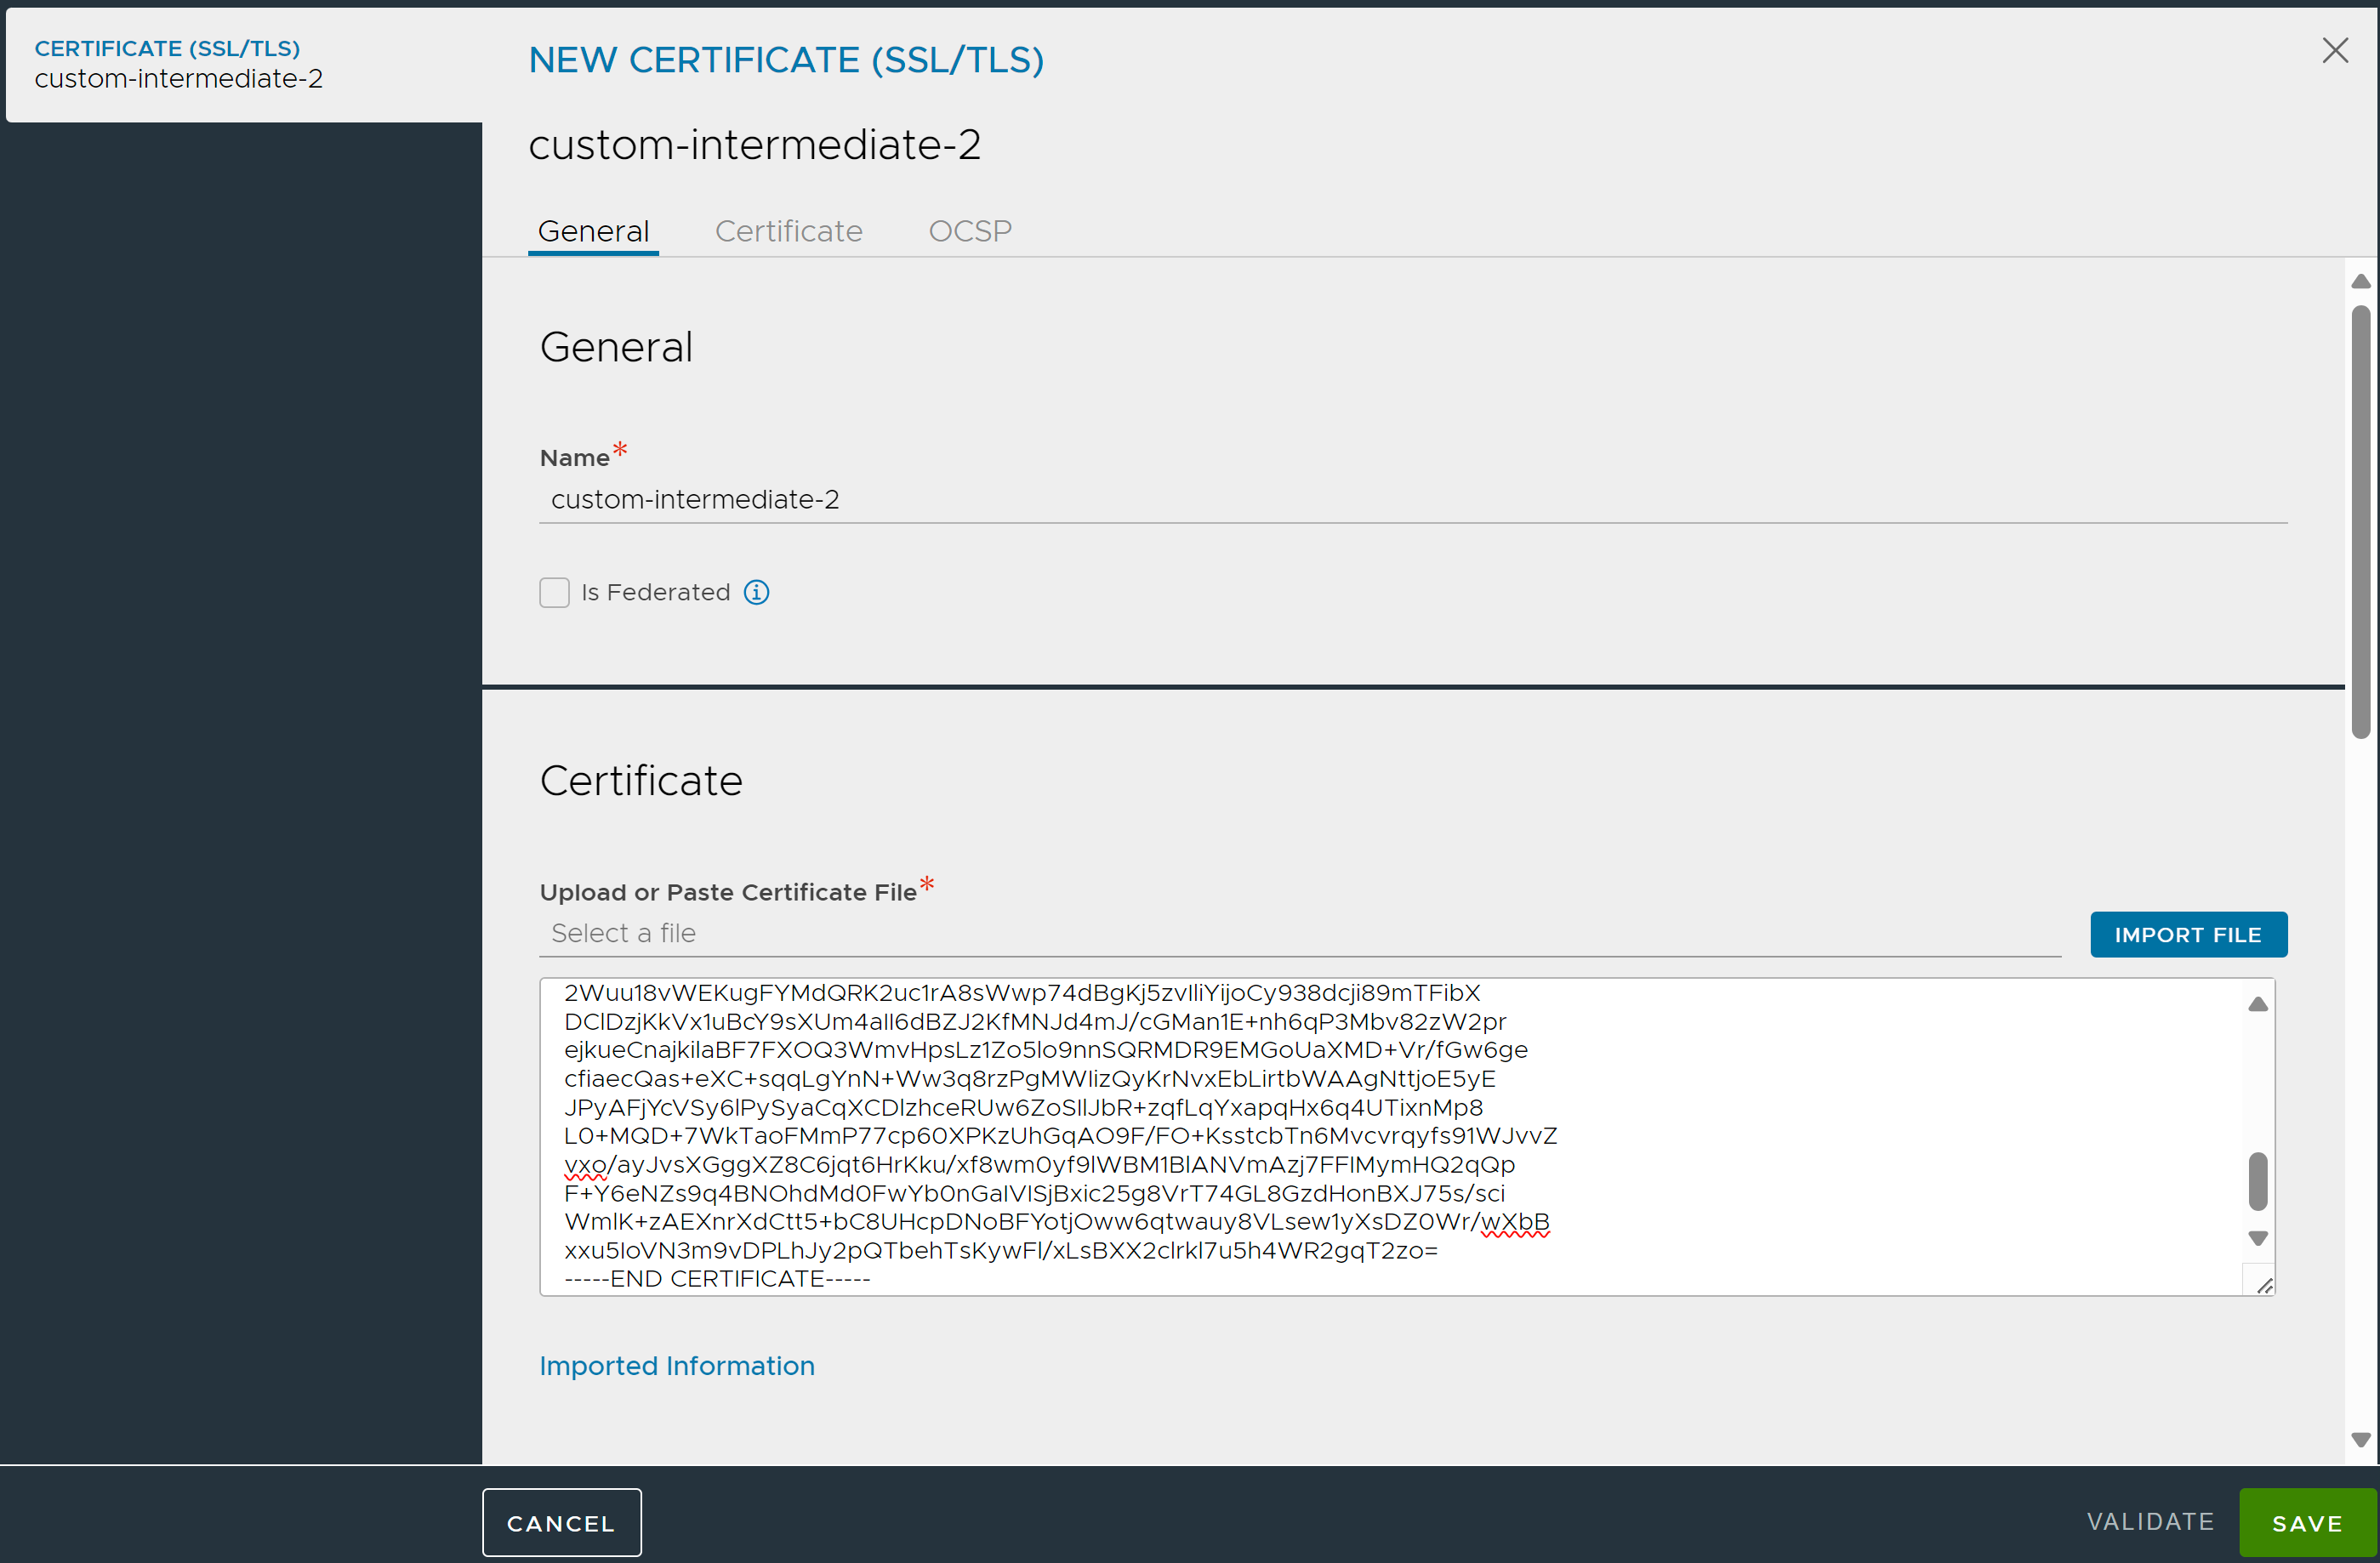
After the upload of the intermediate certificate, you can see the intermediate and the root certificates are automatically linked. The issuer of the intermediate certificate is the root certificate we uploaded earlier.

To upload an Application Certificate,
1. Navigate to .
2. Click Create.
3. Select Application Certificate from the dropdown list.
4. Under Type select Import to upload an existing certificate. The certificate or private key can be imported by copying-pasting or uploading a file.
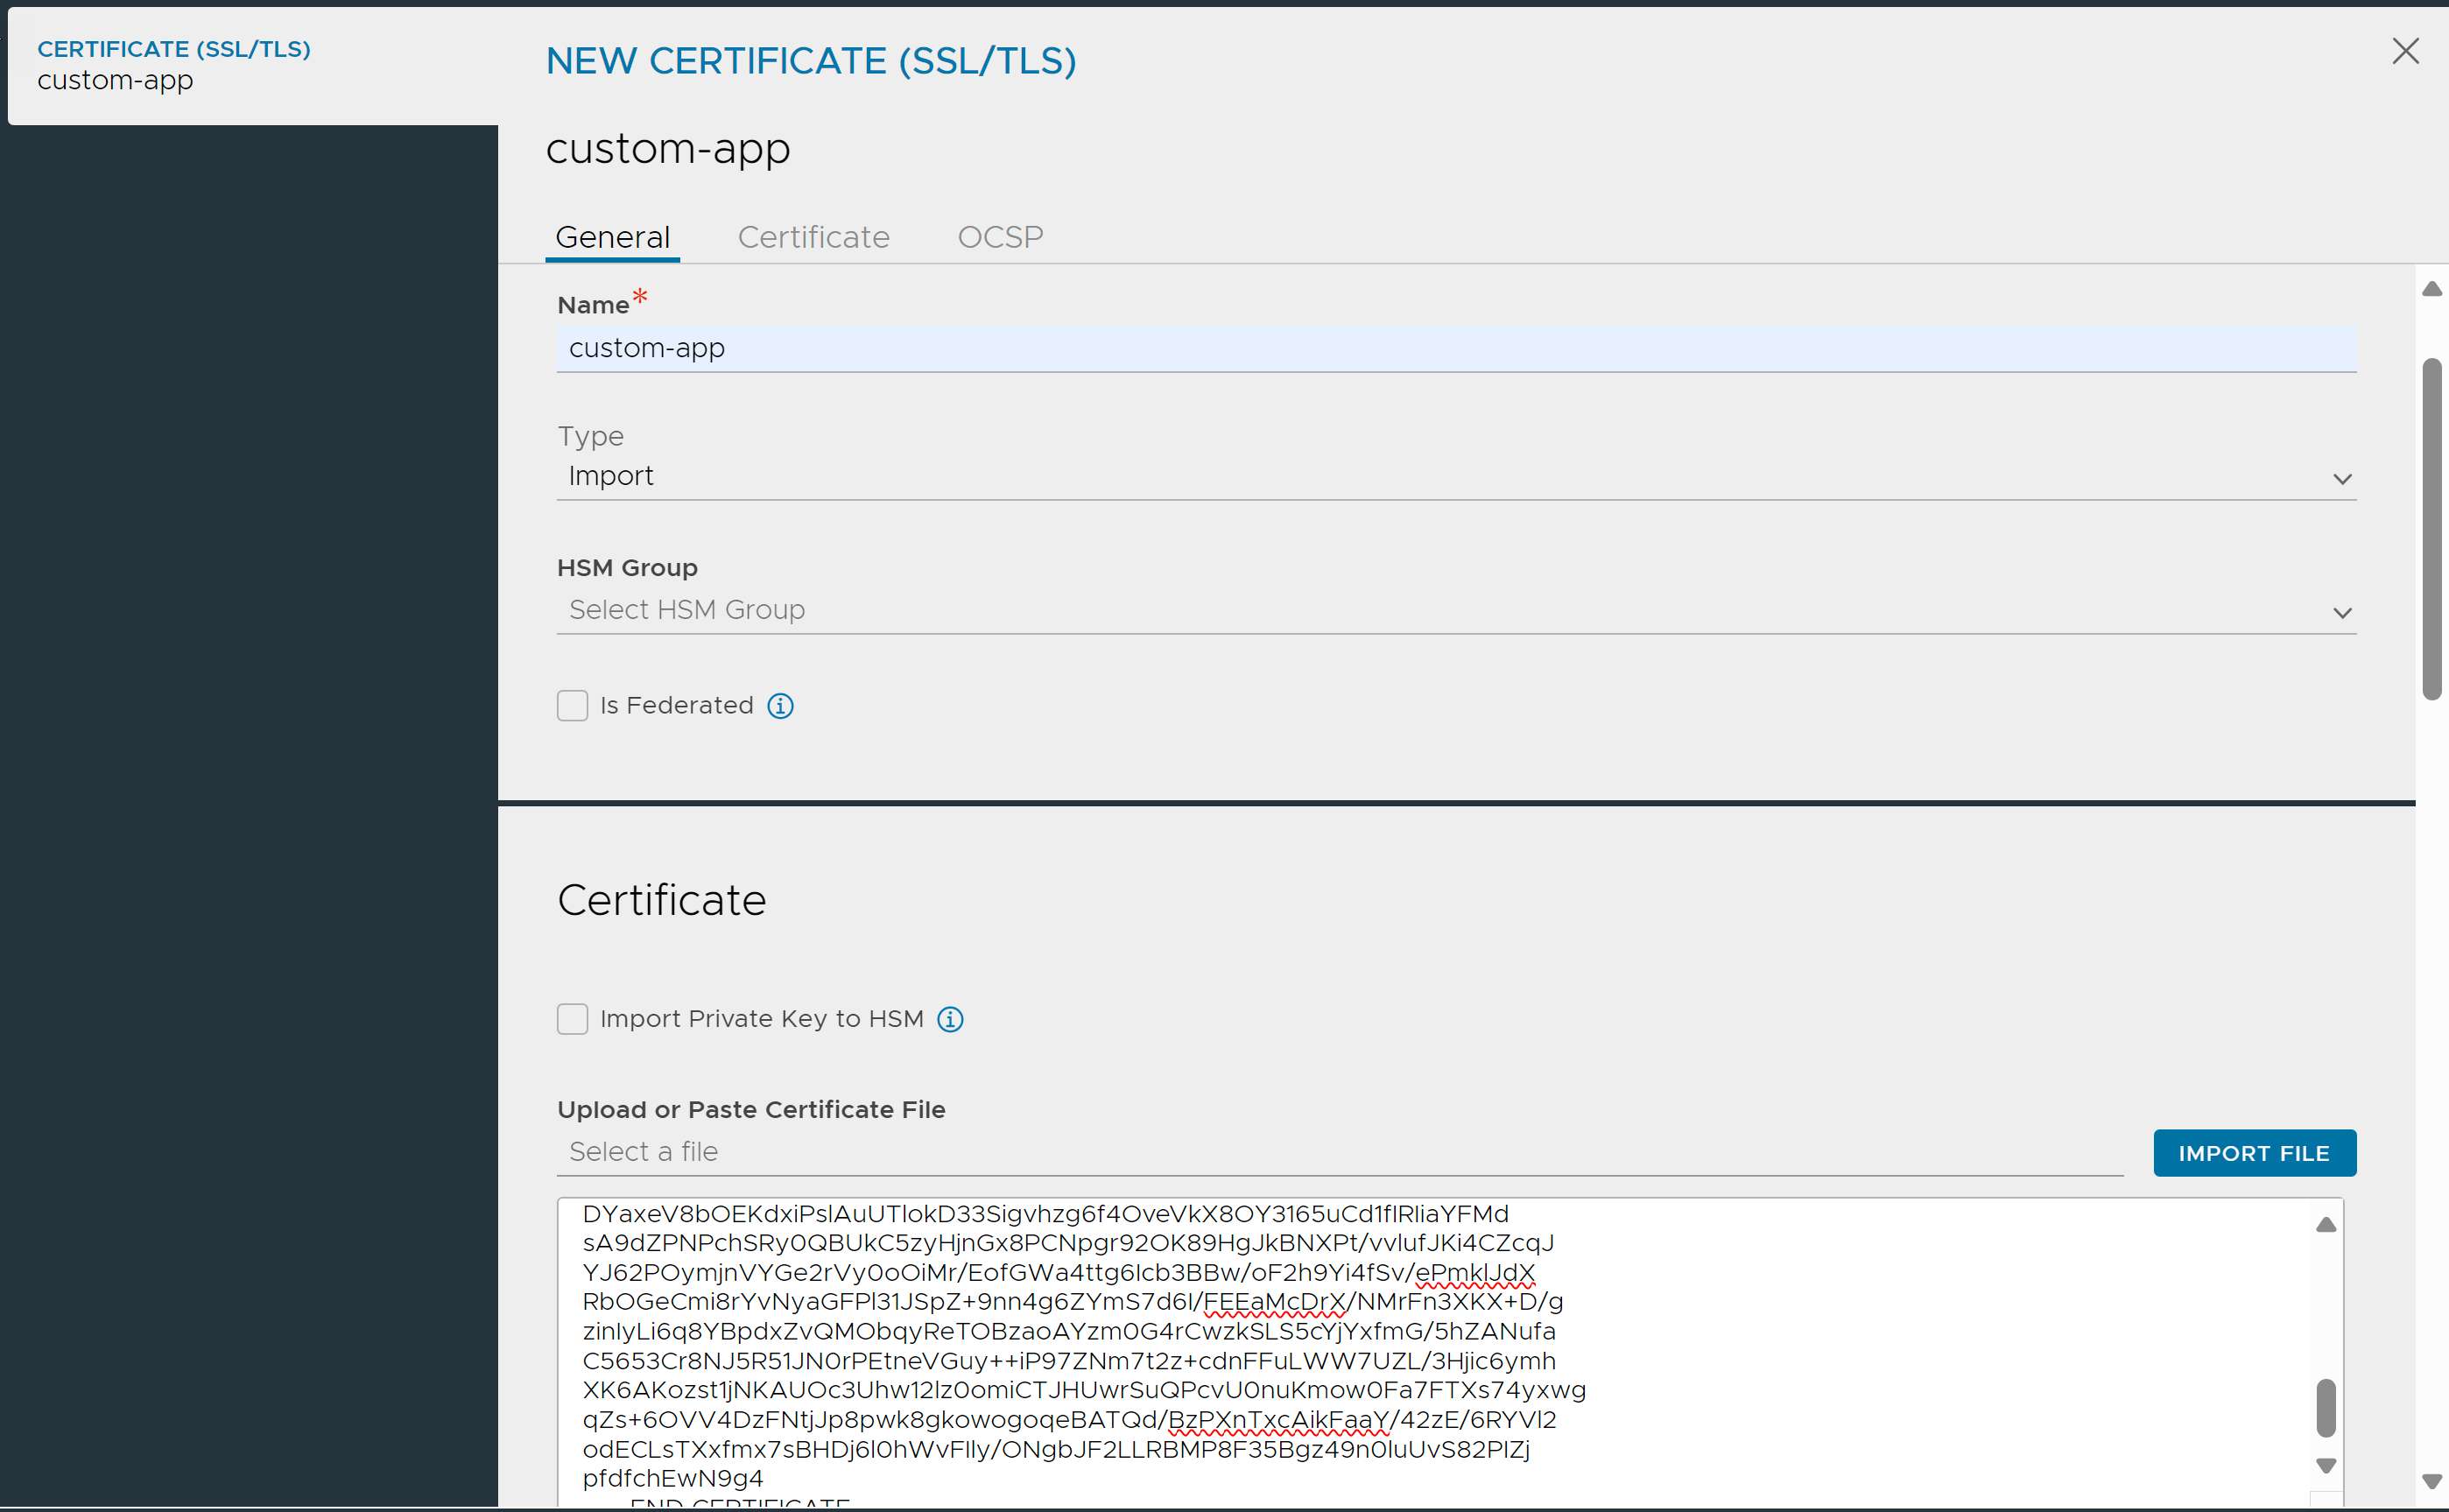
5. Click Validate.
6. Save the certificate.
Selecting the Secure Channel Certificates
To use the custom certificates created, configure the system settings.
1. Navigate to .
2. Click Edit.
3. Under the Access tab, In the Secure Channel SSL/TLS Certificate field, select the custom certificates required, from the drop down.
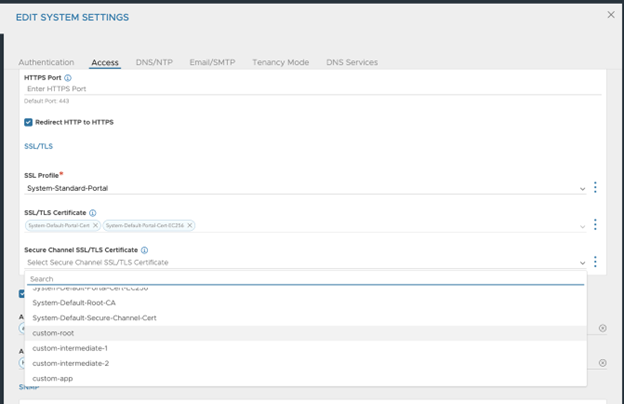
4. Click Save.
Restrictions
If you want to change the root certificate, then:
Ensure that there are no Service Engines in the system.
Ensure that only no access clouds and single node cluster are in the system. You can only change the root certificate when this requirement is met.
If you want to change the controller cert after cloud configuration:
The root of secure channel certificate remains the same.
The common name of secure channel certificate remains the same.
The whole certificate chain of the secure channel certificate must be uploaded to the Controller.
In a scenario where the root certificate has to be changed but the requirements mentioned cannot be met, contact Broadcom Support.
