This section describes the details of integrating NSX Advanced Load Balancer with the VMware Cloud (VMC) on AWS. NSX Advanced Load Balancer is deployed as a customer-managed solution in VMC.
NSX Advanced Load Balancer is installed in No Orchestrator mode on the VMware Cloud on AWS.
The deployment of SEs on VMC is manual. Once SE is integrated with NSX Advanced Load Balancer Controller, virtual service placement and scaling can be handled centrally from the NSX Advanced Load Balancer Controller.
The following diagram depicts a typical NSX Advanced Load Balancer deployment with VMC.
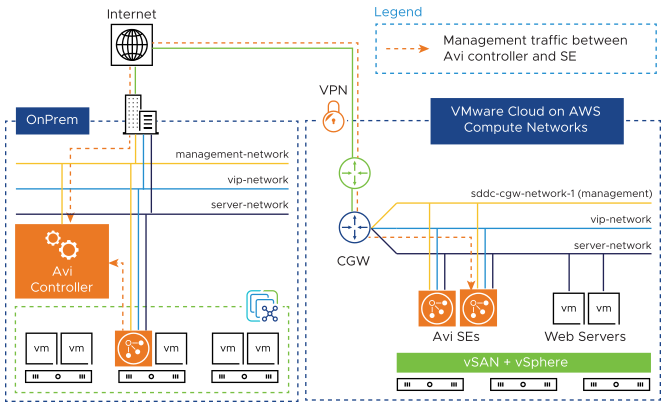
The following are the observations from the above diagram:
For NSX Advanced Load Balancer SEs,
NSX Advanced Load Balancer SEs are deployed as VMs on VMC.
SEs are connected to logical networks. The following are the two types of logical networks:
Routed network – over IPsec VPN
Extended network – over L2 VPN
The SEs connect to the Controller over the management network, which is the logical network connection to the vNIC0 of the SE VM.
For NSX Advanced Load Balancer Controller,
The NSX Advanced Load Balancer Controller cluster is dedicated to the VMC environment or is used for load balancing local vCenters.
Considering the monetary cost of resources on VMC and its ephemeral nature, it is recommended to deploy the NSX Advanced Load Balancer Controller cluster outside of the VMC environment. However, this is not a restriction.
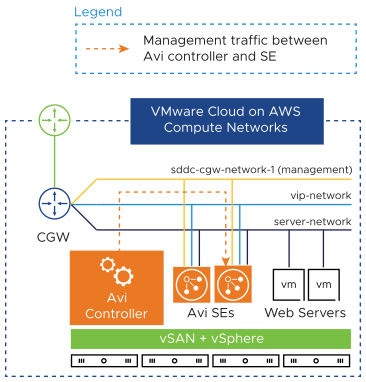
The following diagram depicts the deployment of the NSX Advanced Load Balancer Controller cluster and SEs on the VMC infrastructure.
High Availability
The following are the options currently supported for high availability (in the order of recommendation):
N+M with SE’s in DFW exclusion list (For more information on distributed firewall exclusion list, see Manage the Distributed Firewall Exclusion List).
Active or Active with SE’s in DFW exclusion list (For more information on distributed firewall exclusion list, see Manage the Distributed Firewall Exclusion List).
Active or standby with MAC masquerade disabled. A two-armed configuration to support Preserve Client IP is supported (For more information, see Deploying NSX Advanced Load Balancer with Inline Topology on VMC on AWS).
Configuration
SE VMs require manual creation. The lack of automation on VMC is because the [email protected] user does not have all required permissions to read or write to vCenter API, and there is no access to the ESX management plane. The access to the ESX management plane is required for NSX Advanced Load Balancer automated deployment in on-prem vCenter.
This section covers the following:
Downloading SE image
Uploading SE image to Content Library
Deploying SE VM
Downloading SE Image
Log in to UI as the admin user.
Navigate to . Download the SE OVA image using the download icon on the cloud. Use the Default-Cloud or create a new No Orchestrator cloud.
Uploading SE Image to Content Library
The downloaded .OVA file is used directly to create an SE VM, but this requires uploading the image to vCenter every time a new VM needs to be created. For faster deployment, the SE image is uploaded to the content library on VMC and can be used multiple times.
Follow the steps to upload the SE image to the content library:
Log in to vCenter and select the option to create a new content library. Provide the name and select the desired vCenter server.
Select a storage location for the library contents.
Click the Actions drop-down menu and select the Import Item option available on the vSphere client and upload the .ovf and .vmdk files as shown.

Deploying SE VM
- Prerequisites
-
The following data are required for deploying SE VM:
NSX Advanced Load Balancer Controller IP address
Authentication token and cloud UUID (Navigate to , select the required cloud, and click the key icon to the generate cloud UUID and the authentication token).
Management IP address, subnet, and subnet mask. This is required only if DHCP is disabled on management logical network.
- VM Creation
-
Log in to the vSphere client, select the Templates option, and click the New VM from this template to create a new VM as shown.
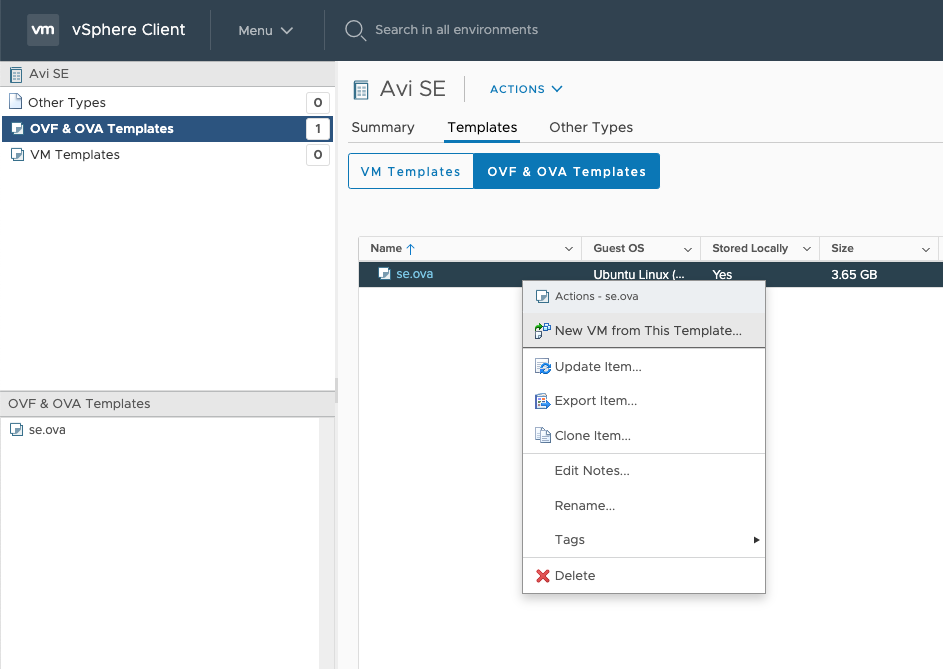
Select a VM location as shown below.
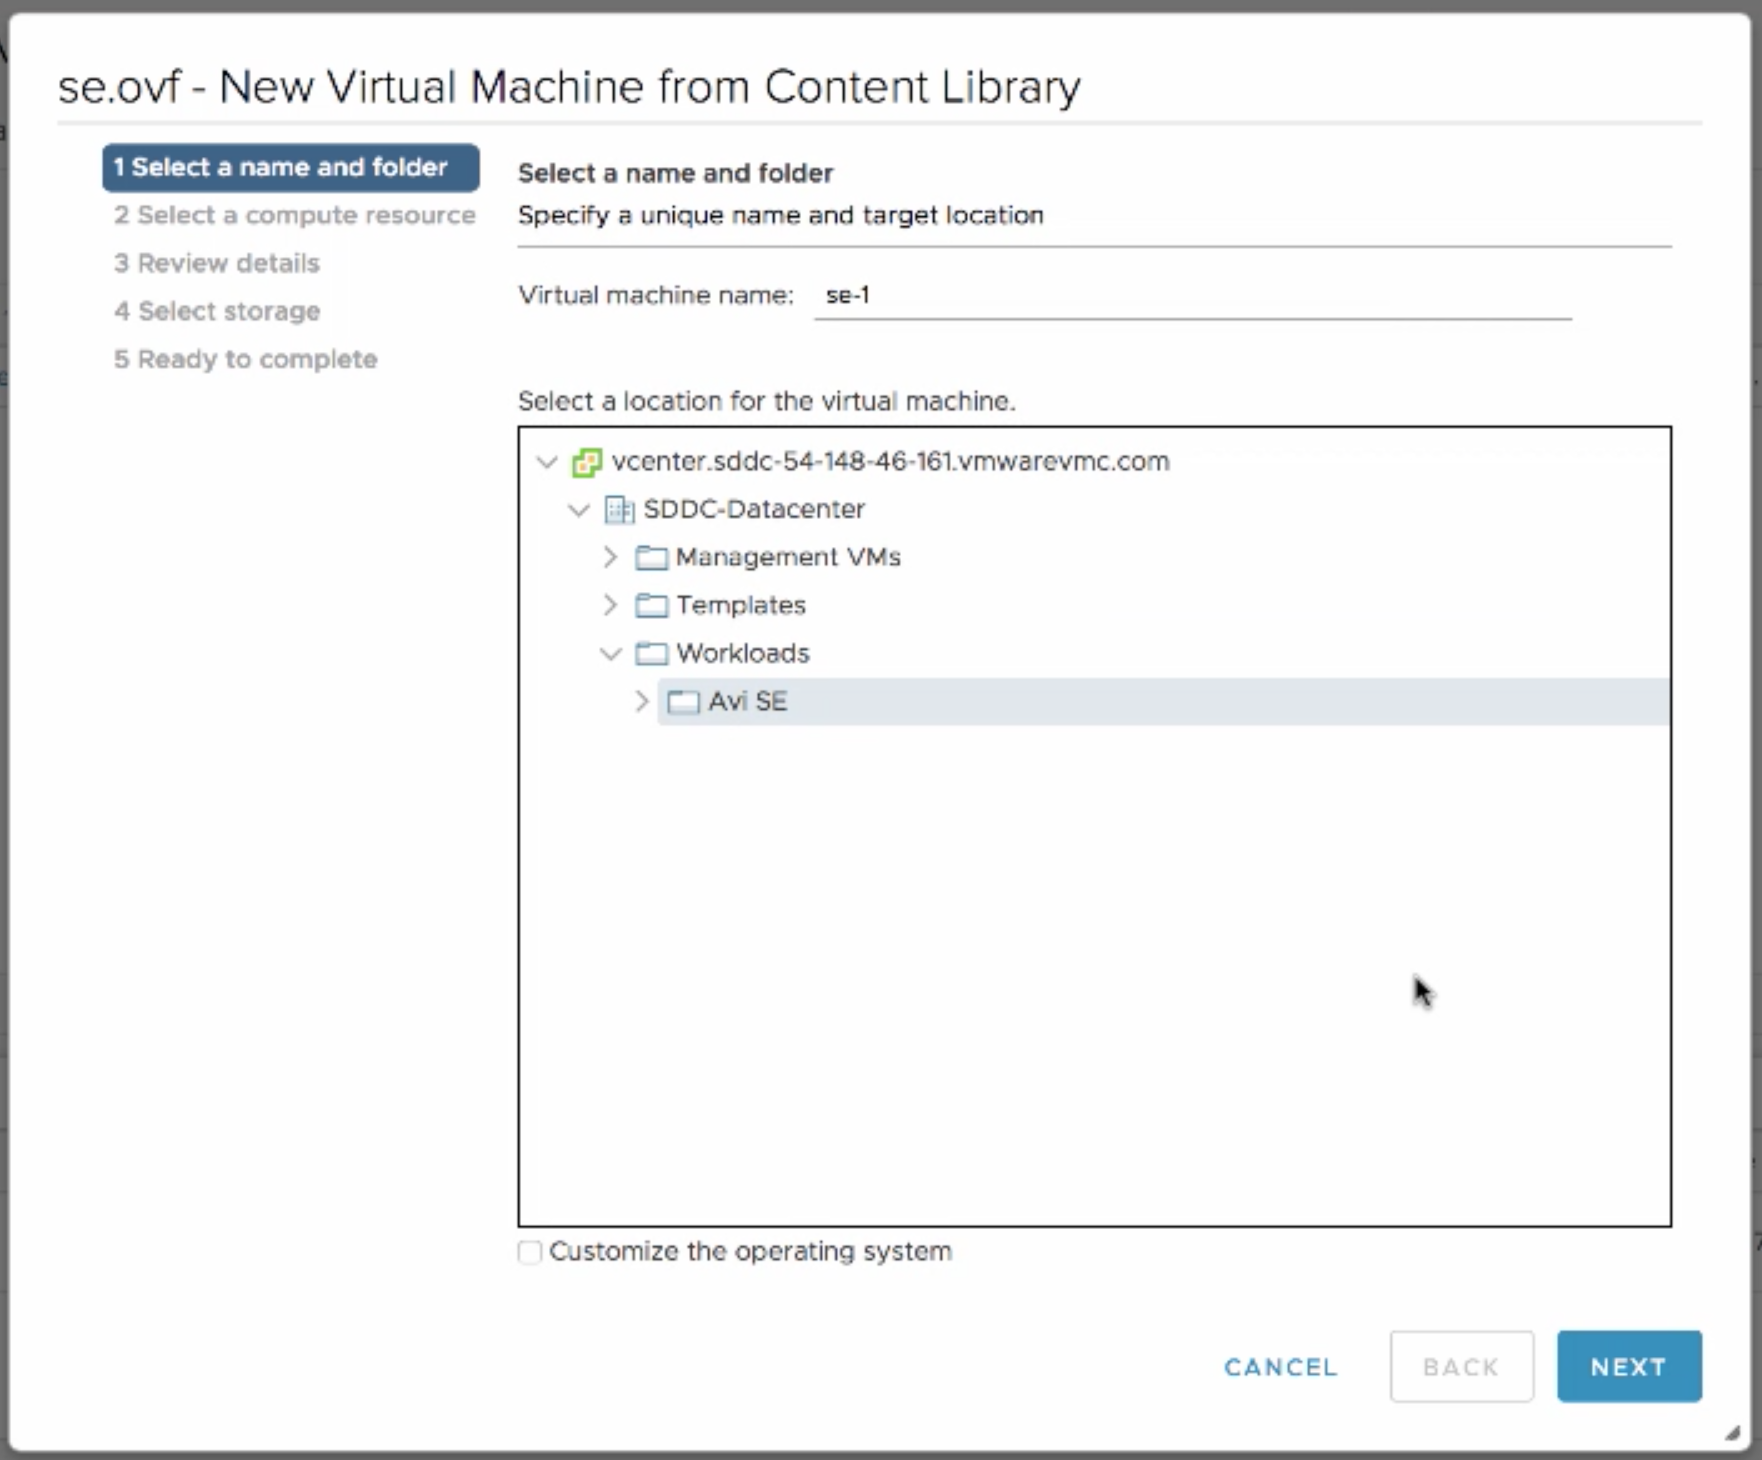
Optional step: Create a new folder under Workloads to place all the SEs.
Click Select a compute resource option to select the resource pool for the deployment.
Click the Select storage option to select the required data store.
Click the Select network option to configure the required networks.
The Management network label (vNIC0) is mapped to the management logical network. The remaining network labels (Data Network 1 – 9) is connected to any of the front end network of the virtual service or back end logical network of the server as required. It is left disconnected if not required.
Select the Customize template option to create vApp properties. Provide NSX Advanced Load Balancer Controller IP address details, the Cluster UUID, and the authentication token described in the Prerequisites section.
Review and click Finish.
Power-on the deployed VM.
Additional Information
To check the newly deployed SE, navigate to tab on the UI.
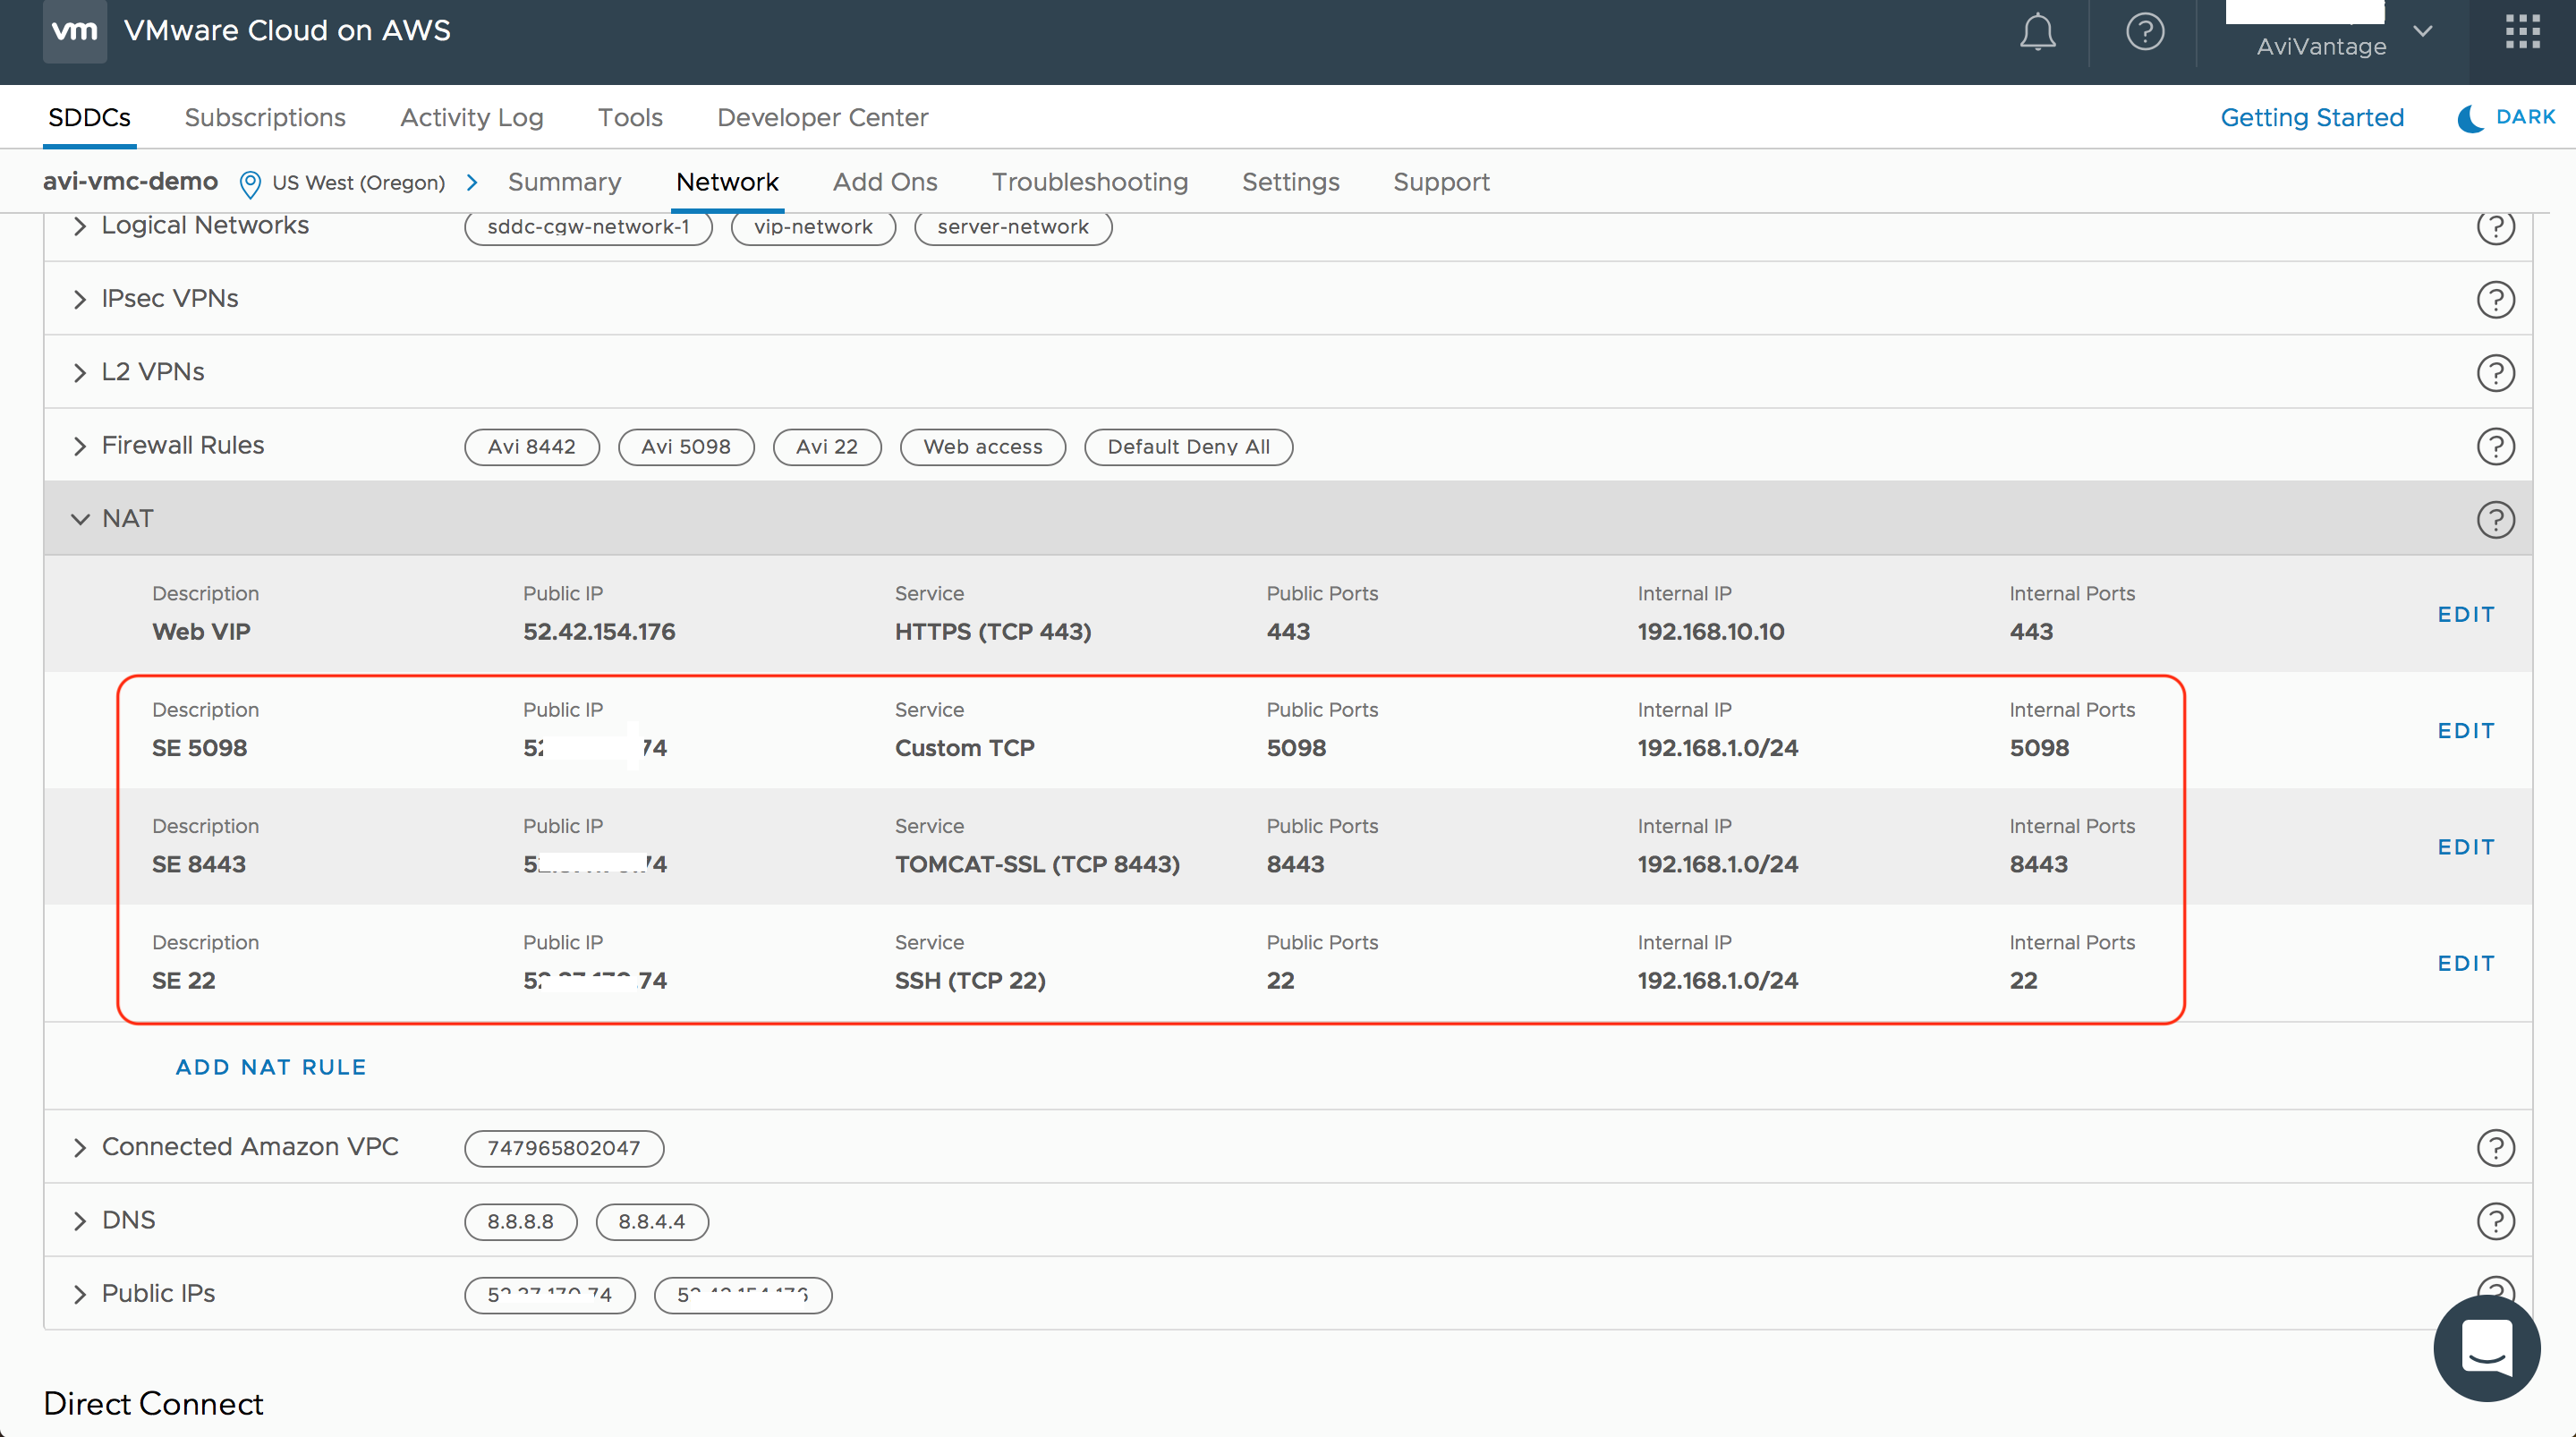
If the SE VMs are switched on but not connected to the NSX Advanced Load Balancer Controller, check firewall ports configured on the Compute Gateway option in the VMC console. This option is used to allow management traffic from the SE to the NSX Advanced Load Balancer Controller.
For more information on the required ports and protocols, see Protocol Ports Used by NSX Advanced Load Balancer for Management Communication.
The SEs open TCP connections to the NSX Advanced Load Balancer Controller, so the firewall rules should allow outgoing traffic. Since the firewall is stateful, reverse traffic is automatically allowed.
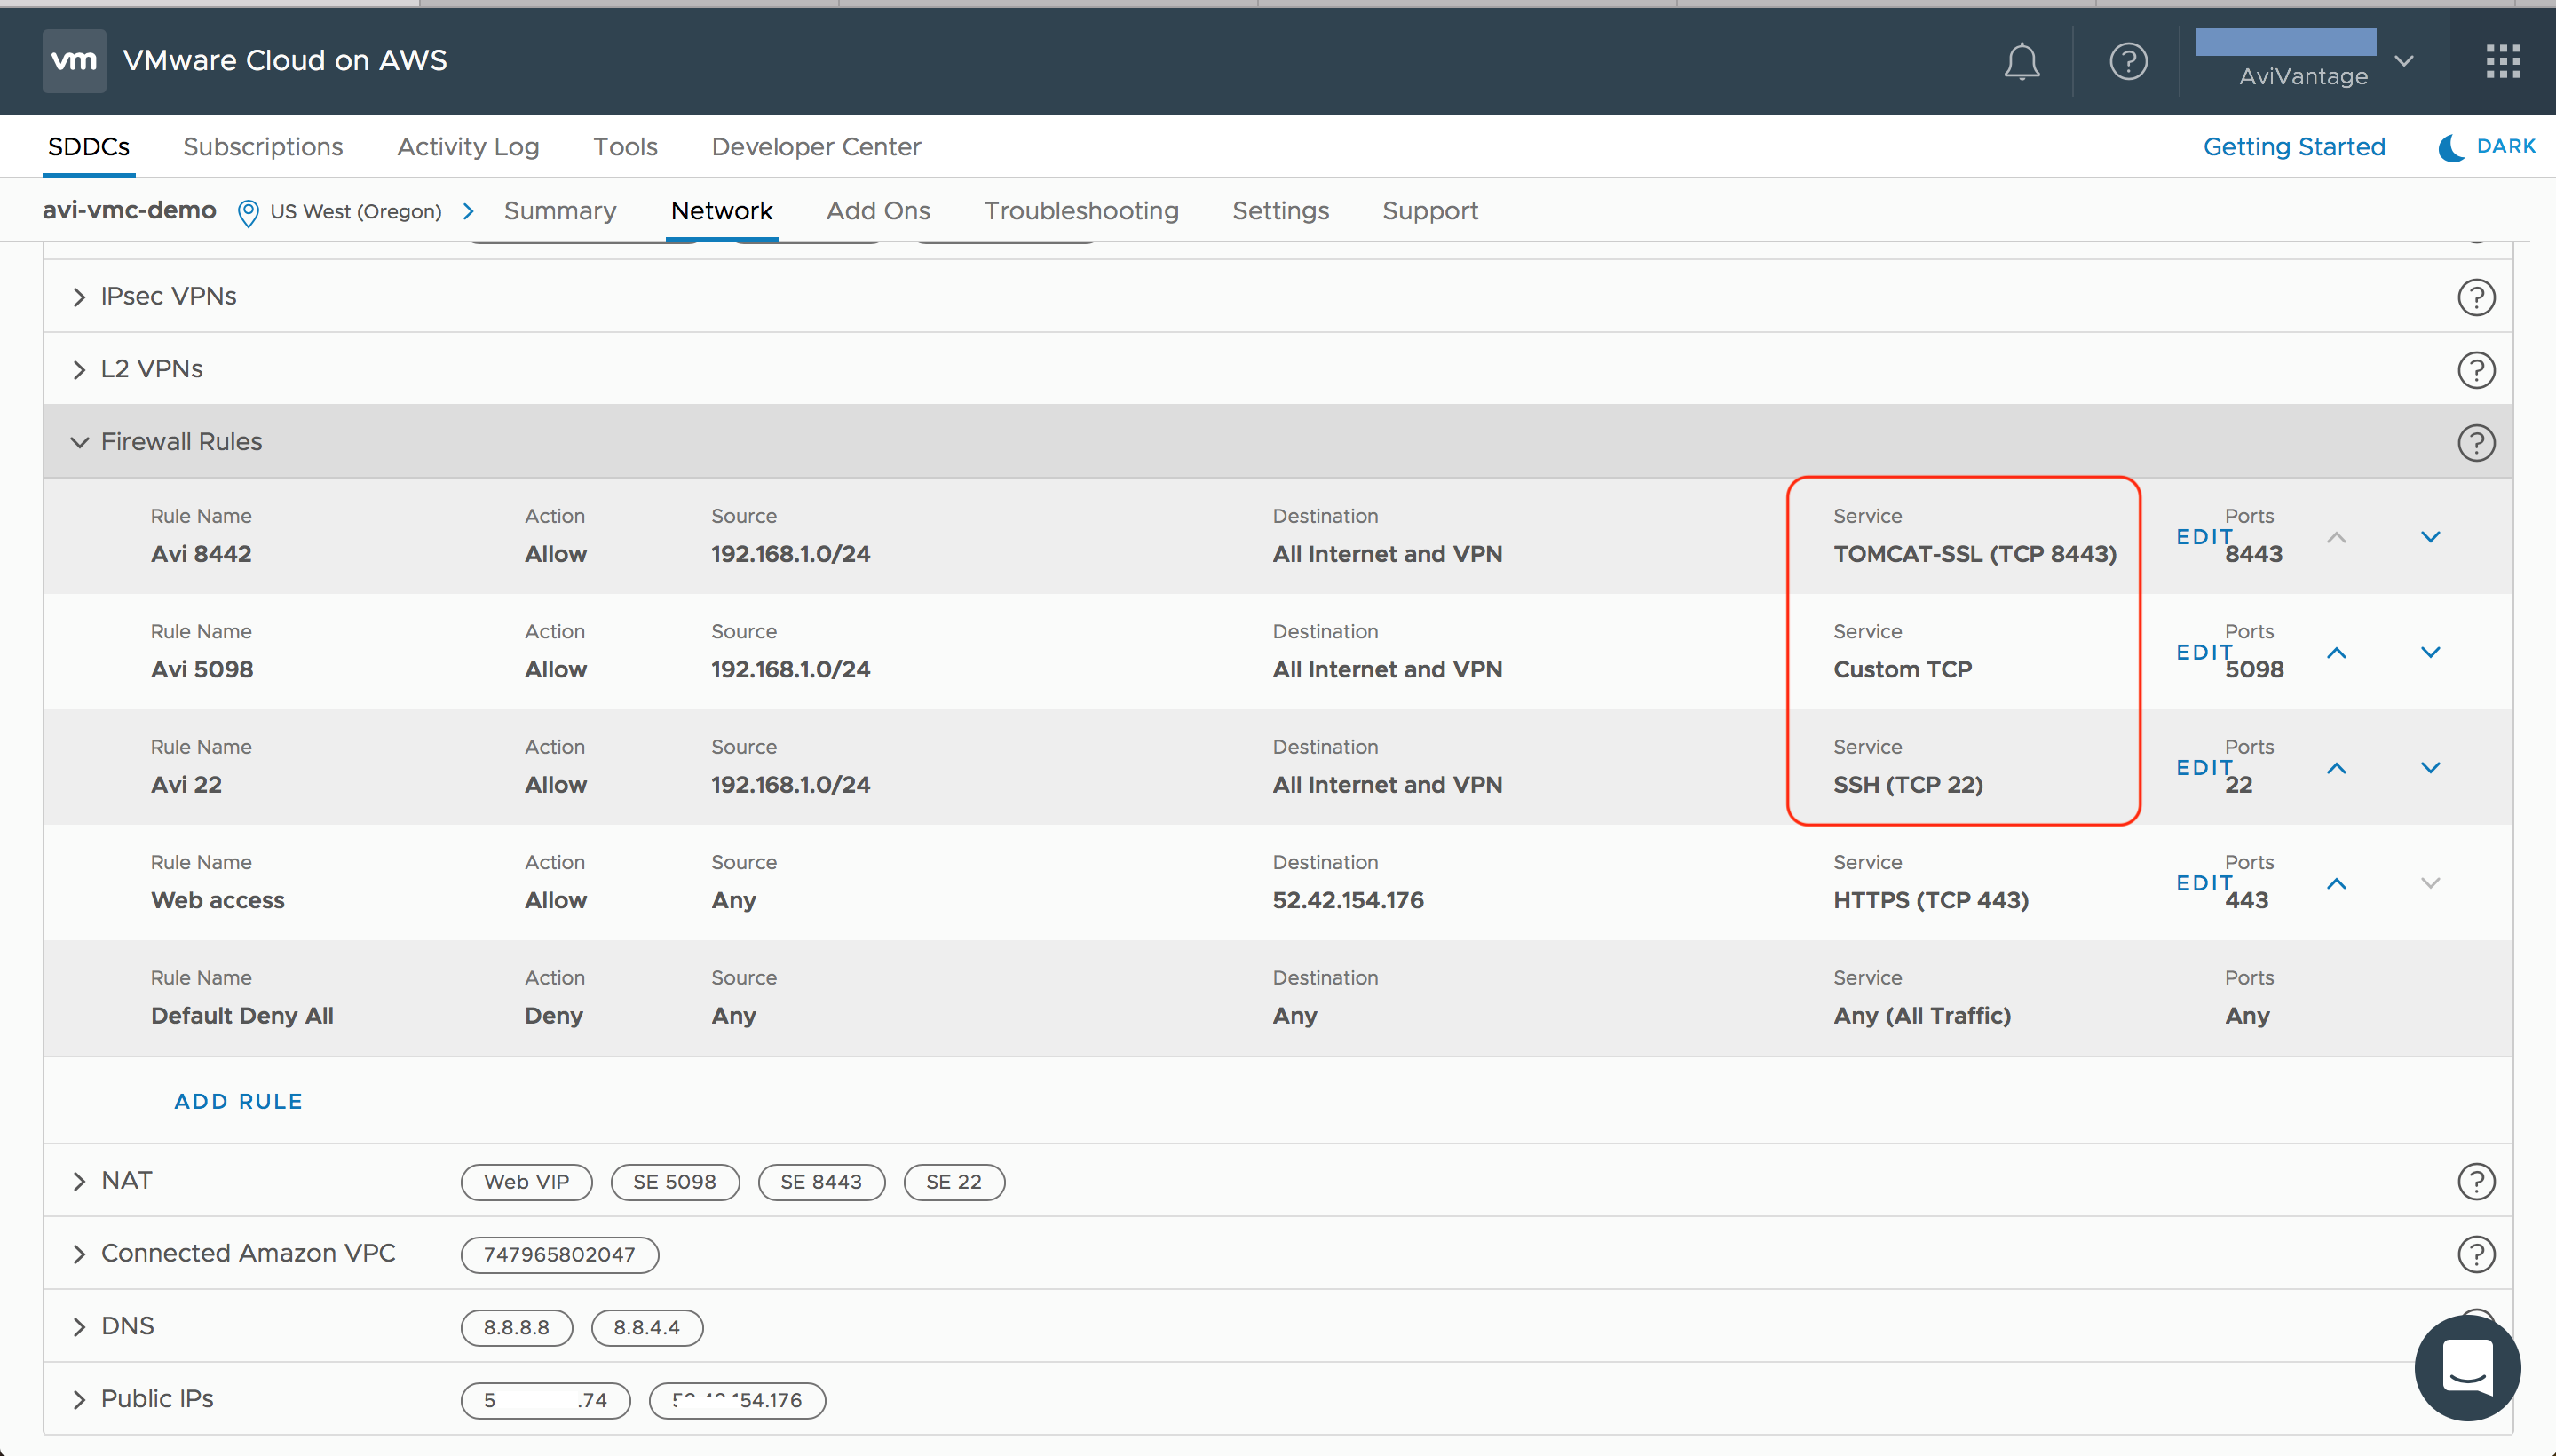
If the NSX Advanced Load Balancer Controller is accessed using public IP address (for example, when it is deployed on another VPC on AWS or if NSX Advanced Load Balancer SaaS offering is being used), add NAT rules to allow SE traffic over the internet.
Enabling VMC Deployment in Cloud Configuration
Starting with NSX Advanced Load Balancer version 20.1.5, in the cloud configuration, a new knob vmc_deployment is provided to indicate that the cloud is configured in the VMC based deployment. This knob must be set when the deployment is VMC based.
Starting with NSX Advanced Load Balancer version 20.1.5, if vmc_deployment is set, you do not have to configure the TCP Network profile.
[admin:Avi-Controller]: > configure cloud Default-Cloud
[admin:Avi-Controller]: cloud> vmc_deployment
[admin:Avi-Controller]: cloud> save
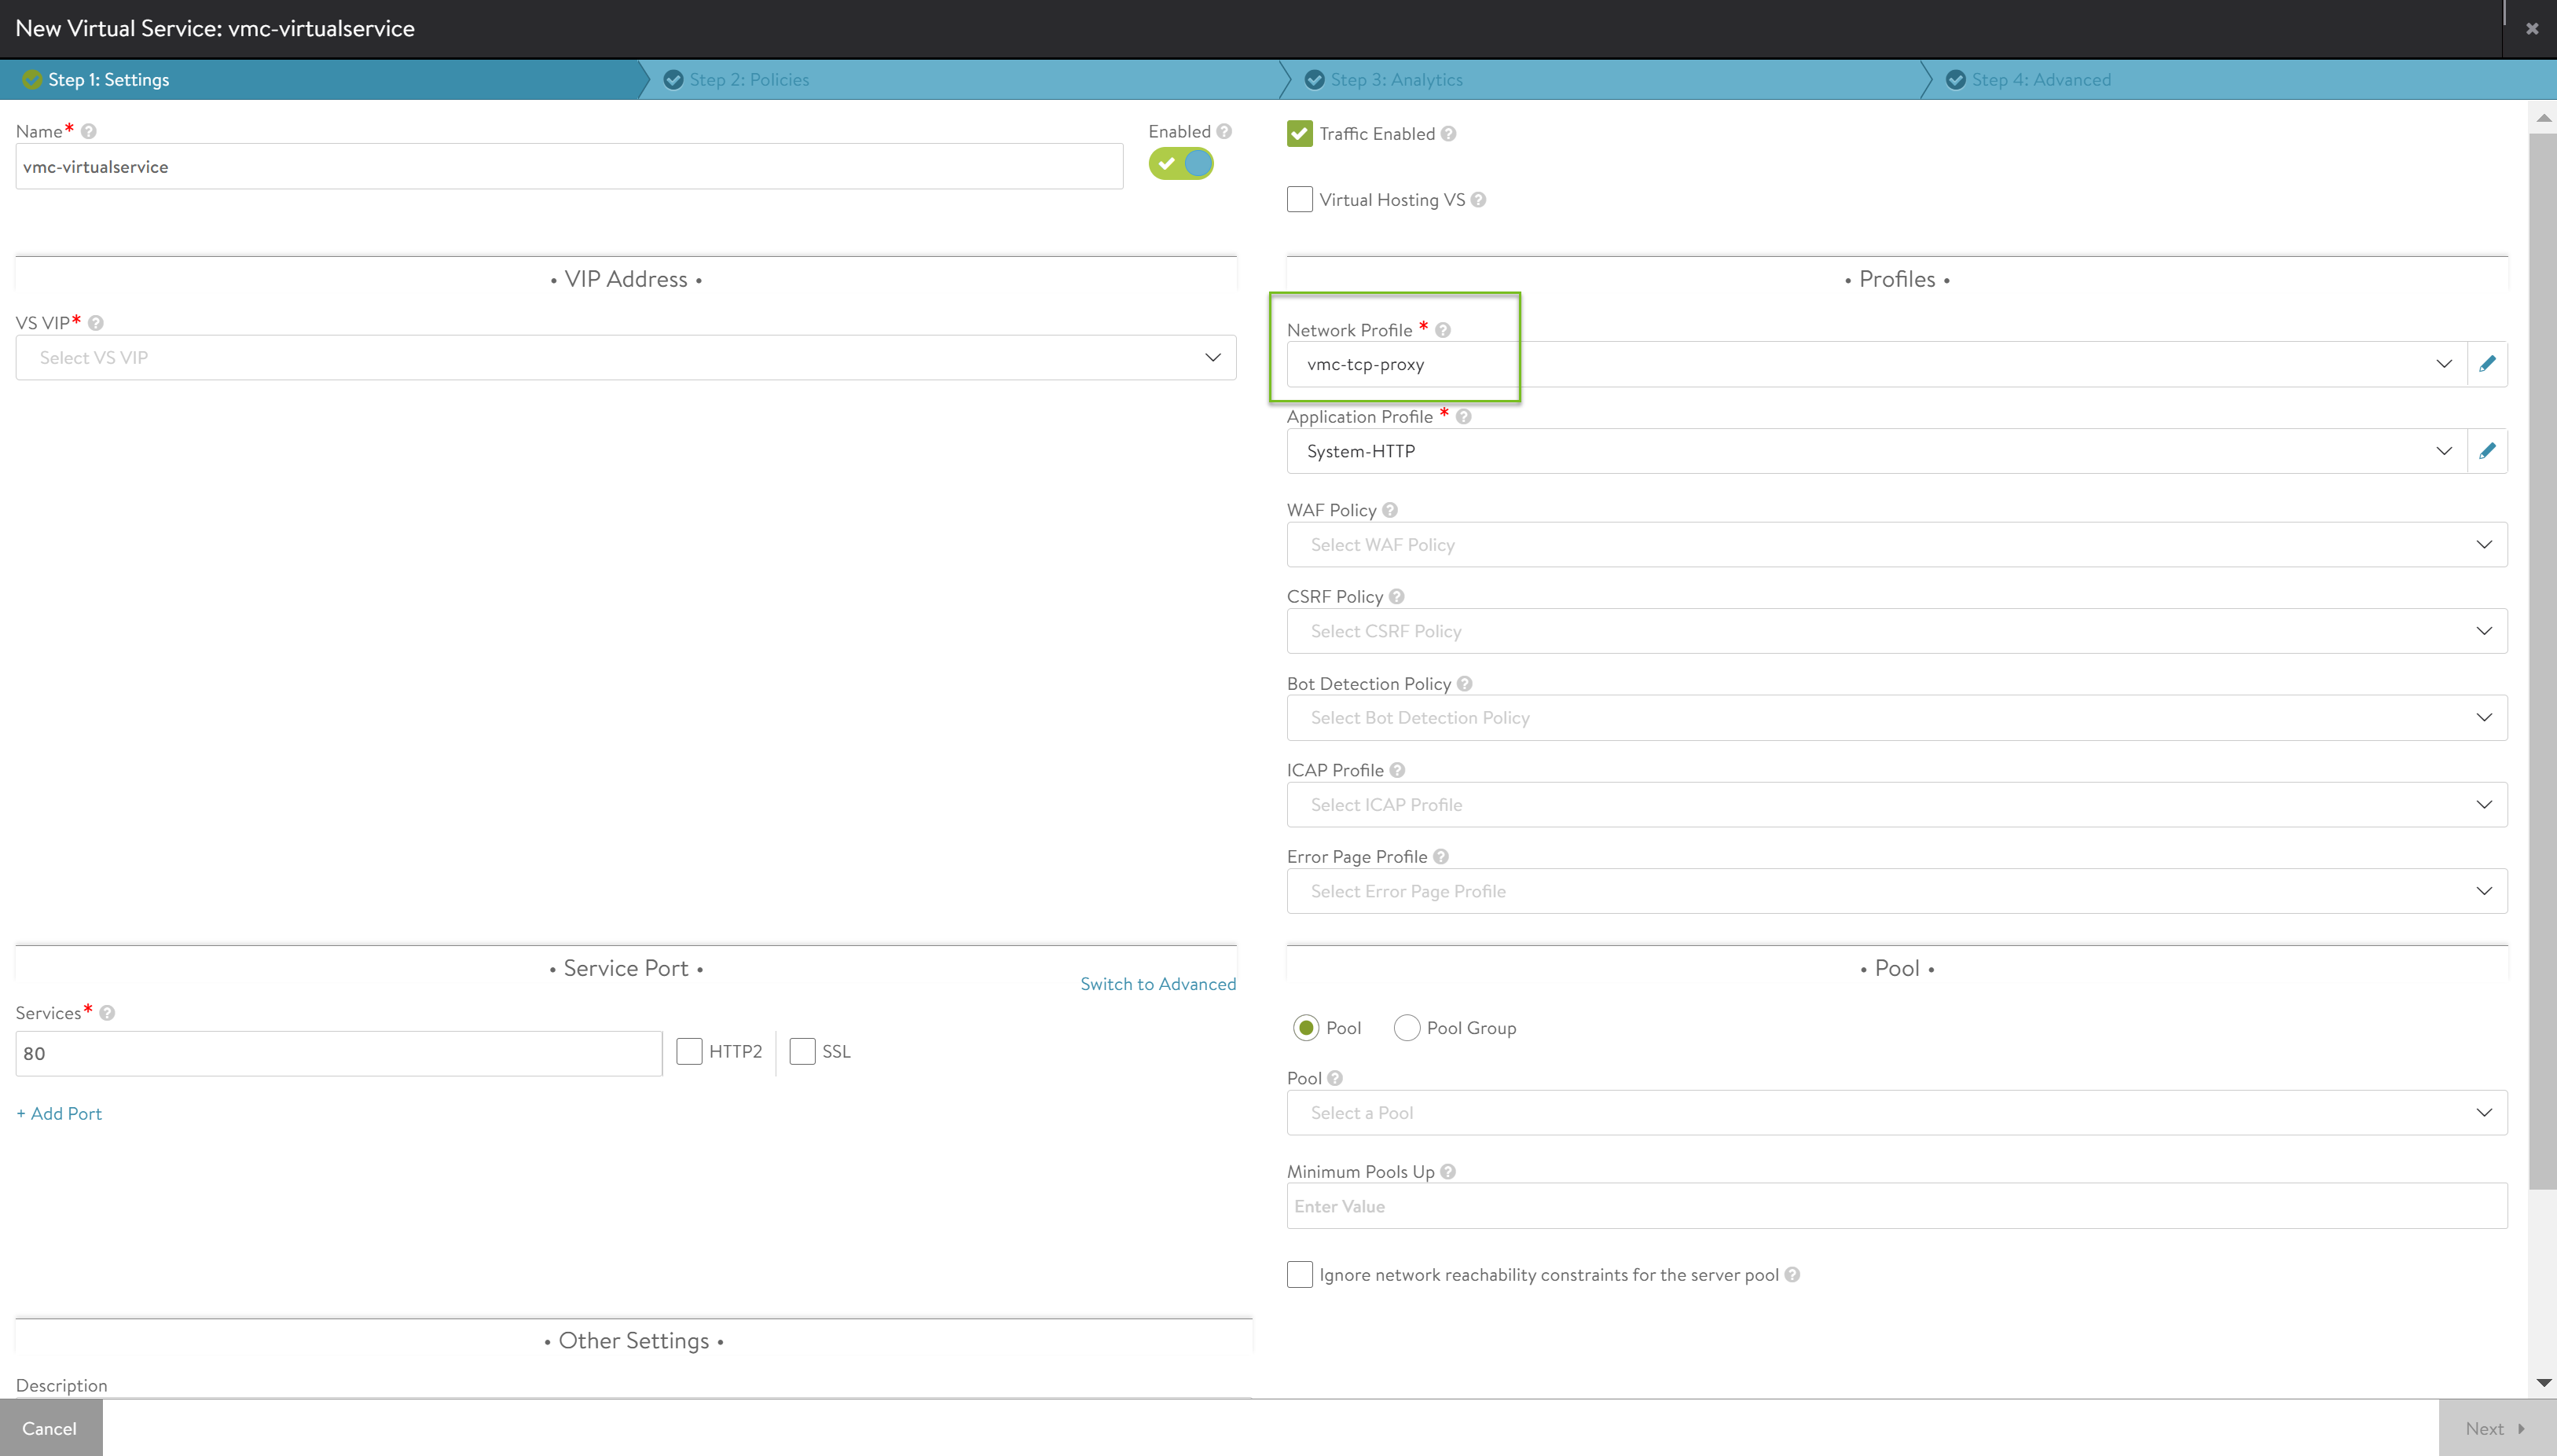
TCP Network Profile
Before NSX Advanced Load Balancer version 20.1.5, you need to configure TCP Network Profile.
As a result of a high number of out-of-order packets within the AWS infrastructure, it is recommended to modify the TCP profile that will be applied to virtual services with a reorder_threshold value set to 8. This modified profile will help with the out-of-order packets potentially improving application performance.
The example below shows creating a brand new TCP profile that will be used by the virtual services.
[admin:avicontroller]: > configure networkprofile vmc-tcp-proxy
[admin:avicontroller]: networkprofile> profile tcp_proxy_profile
[admin:avicontroller]: networkprofile:profile:tcp_proxy_profile> no automatic
[admin:avicontroller]: networkprofile:profile:tcp_proxy_profile> reorder_threshold 8

[admin:avicontroller]: networkprofile:profile:tcp_proxy_profile> save
[admin:avicontroller]: networkprofile> save
+----------------------------------------+-----------------------------------------------------+
| Field                                  | Value                                               |
+----------------------------------------+-----------------------------------------------------+
| uuid                                   | networkprofile-07ad8f8c-9960-4535-a14c-9065062a58bb |
| name                                   | vmc-tcp-proxy                                       |
| profile                                |                                                     |
|   type                                 | PROTOCOL_TYPE_TCP_PROXY                             |
|   tcp_proxy_profile                    |                                                     |
|     automatic                          | False                                               |
|     ignore_time_wait                   | False                                               |
|     time_wait_delay                    | 2000 milliseconds                                   |
|     max_retransmissions                | 8                                                   |
|     max_syn_retransmissions            | 8                                                   |
|     receive_window                     | 64 kb                                               |
|     nagles_algorithm                   | False                                               |
|     ip_dscp                            | 0                                                   |
|     idle_connection_type               | KEEP_ALIVE                                          |
|     idle_connection_timeout            | 600 sec                                             |
|     use_interface_mtu                  | True                                                |
|     cc_algo                            | CC_ALGO_NEW_RENO                                    |
|     aggressive_congestion_avoidance    | False                                               |
|     reorder_threshold                  | 8                                                   |
|     slow_start_scaling_factor          | 1                                                   |
|     congestion_recovery_scaling_factor | 2                                                   |
|     reassembly_queue_size              | 0                                                   |
|     keepalive_in_halfclose_state       | True                                                |
|     auto_window_growth                 | True                                                |
| connection_mirror                      | False                                               |
| tenant_ref                             | admin                                               |
+----------------------------------------+-----------------------------------------------------+
[admin:avicontroller]: >