This section explains the AWS multi availablity zone support for custom DNS.
Infoblox DNS Profile supports adding multiple records for virtual services defined across AWS AZs and also requires State-Based Registration to maintain HA. This can be achieved by:
Custom DNS - Multi-VIP and Multi-FQDN support
Control Script – Operational state-based DNS registration
Custom IPAM/ DNS Profile
NSX Advanced Load Balancer can utilize Custom IPAM/ DNS scripts through the Custom IPAM/ DNS profile feature to integrate with any API-driven third-party IPAM/ DNS providers. Custom IPAM/ DNS offers increased flexibility by being entirely driven by user-customizable scripts.
The creation of a new virtual service will use the Custom IPAM/ DNS profile and script to automatically create IPAM/ DNS records with the IPAM/ DNS provider.
For more information, see Custom DNS Profile on NSX Advanced Load Balancer.
Custom DNS Script
Custom DNS script for Infoblox DNS provider supports the following functionality:
Multi-VIP functionality
Multi-FQDN functionality
All virtual service types, such as V4, V6, and V4_V6 types
Custom DNS profile scripts written before this version, are still supported. However, you must use the latest version of the script to leverage the newly added features.
The script must have all the required functions and exception classes defined; else, the system will display the following error message during DNS profile creation:
“Custom DNS profile script is missing required functions/exception classes {function_or_exception_names}.”
The following are the required functions for the newer version of the script:
CreateOrUpdateDnsRecords
DeleteDnsRecords
The following are the required exception classes for the newer version of the script:
CustomDnsAuthenticationErrorExceptionCustomDnsRecordNotFoundException
CustomDnsRecordAlreadyExistsExceptionCustomDnsGeneralException
It is recommended to use logger_name (of auth_params) for script logging. Tenant-specific debug log files are created to save the log statements from the script.
For admin tenant — /var/lib/avi/log/custom_dns_script.log
For non admin tenant — /var/lib/avi/log/custom_dns_script_<tenant_name>.log
NSX Advanced Load Balancer logs for the Custom DNS profile can be found in this location: /opt/avi/log/portal-webapp.log.
Custom DNS Workflow
The following is the custom DNS workflow:
Create a script object.
Navigate to , click Create and upload a python script which provides functions for CRUD to the DNS provider.
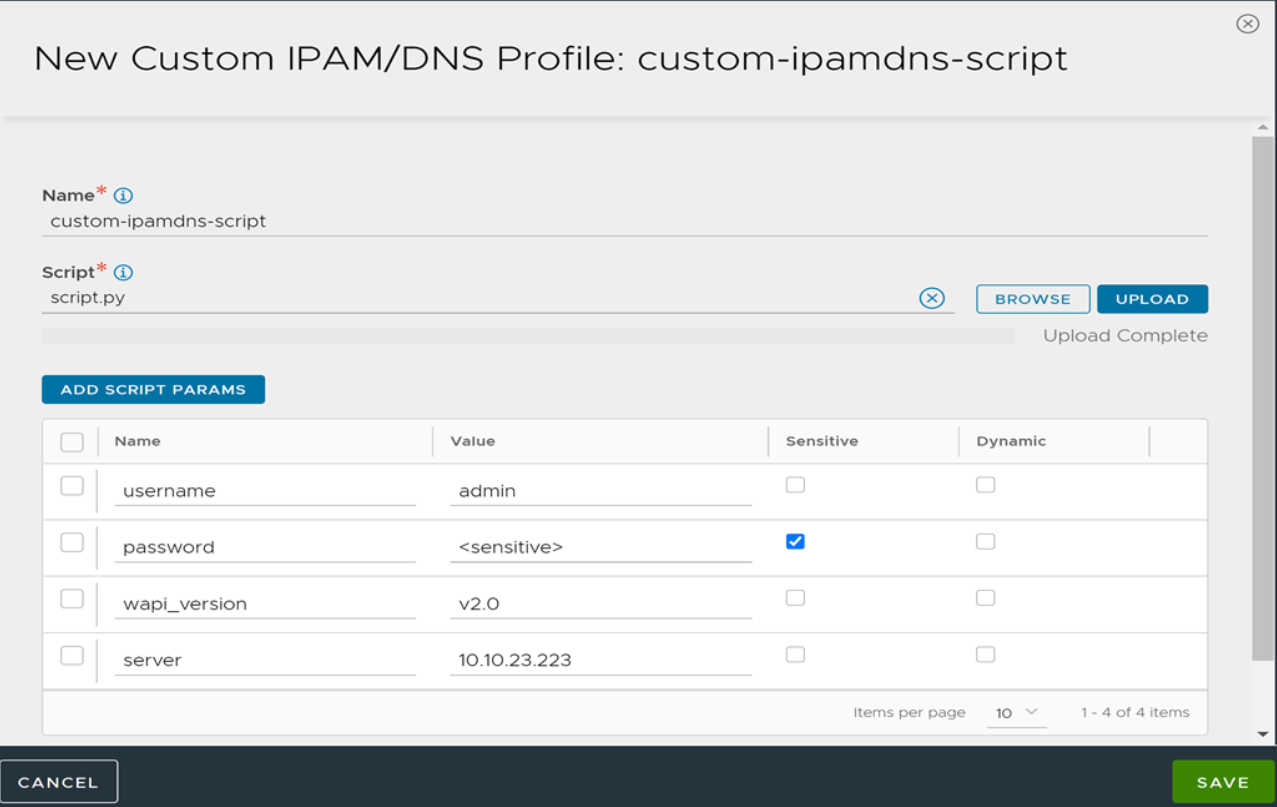
Add the required Script Params. For instance, username, password, API version, provider server address.
Create DNS profile.
Navigate to , click Create.
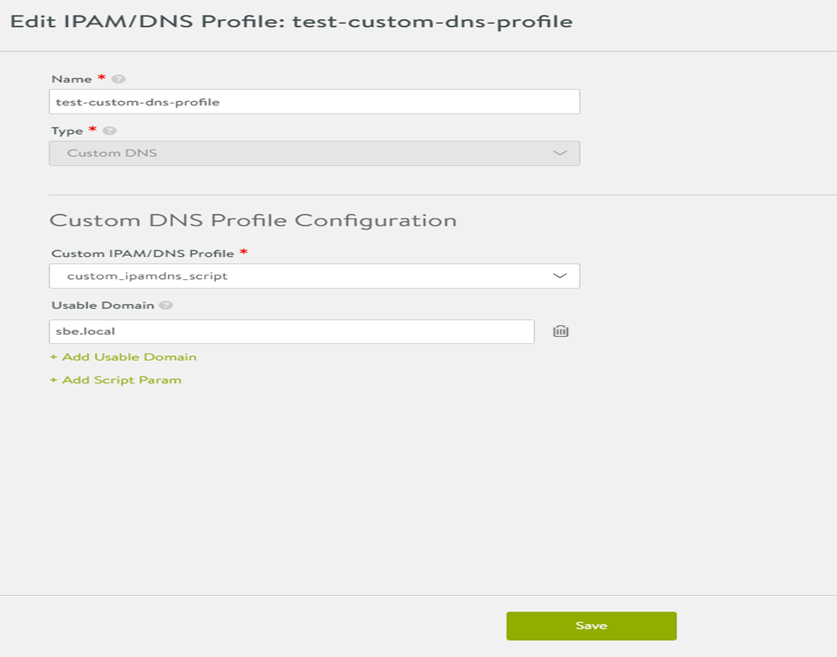
Create a DNS profile of type Custom DNS.
Attach the script object created in the Step 1.
Add
usable_domain.
Attach DNS profile to the cloud.
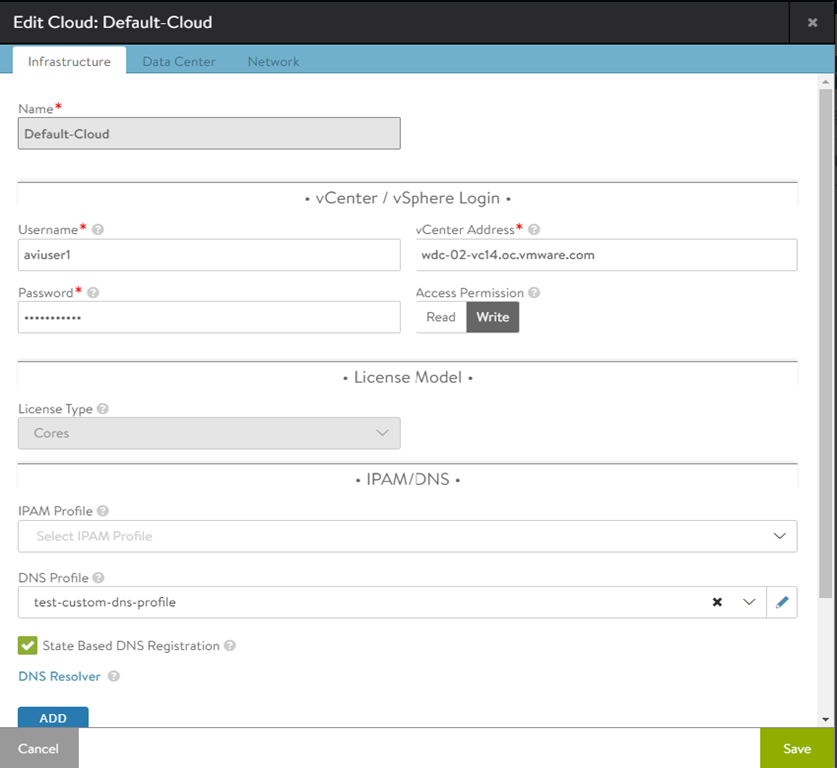
Control Script for State-based DNS Registration
Control scripts are initiated by Alert Actions, which are triggered by Events within the system.
A python script that defines functions to register or de-register DNS records based on the VIP operation status.
The control script for Infoblox defines the following functions:
register_dns_records— Registers DNS records for the VIP when theVIP_UPalert is triggered.deregister_dns_records— De-registers DNS records for the VIP when theVIP_DOWNalert is triggered.
Cloud Level Isolation for Control Script:
The default behavior of the control script is that it gets called for all virtual services defined across all the clouds.
To use a control script for a specific cloud, where the Custom DNS profile is attached, as a workaround, you can set the variable cloud_uuid defined in the control script with the specific cloud UUID as shown below:
cloud_uuid = <cloud_uuid>
For instance,
cloud_uuid = "cloud-5581b2a1-222f-4b0e-b657-2d9668091f29"
By default, cloud_uuid is None.
You can get cloud UUID through the following ways:
CLI - show_cloud
REST API - /api/cloud
There is a known delay of 90 second plus the processing time between an event generation and an alert trigger.
Control Script Workflow
The following is the workflow for the Control Script:
Upload control script
Navigate to and click Create to upload the script.
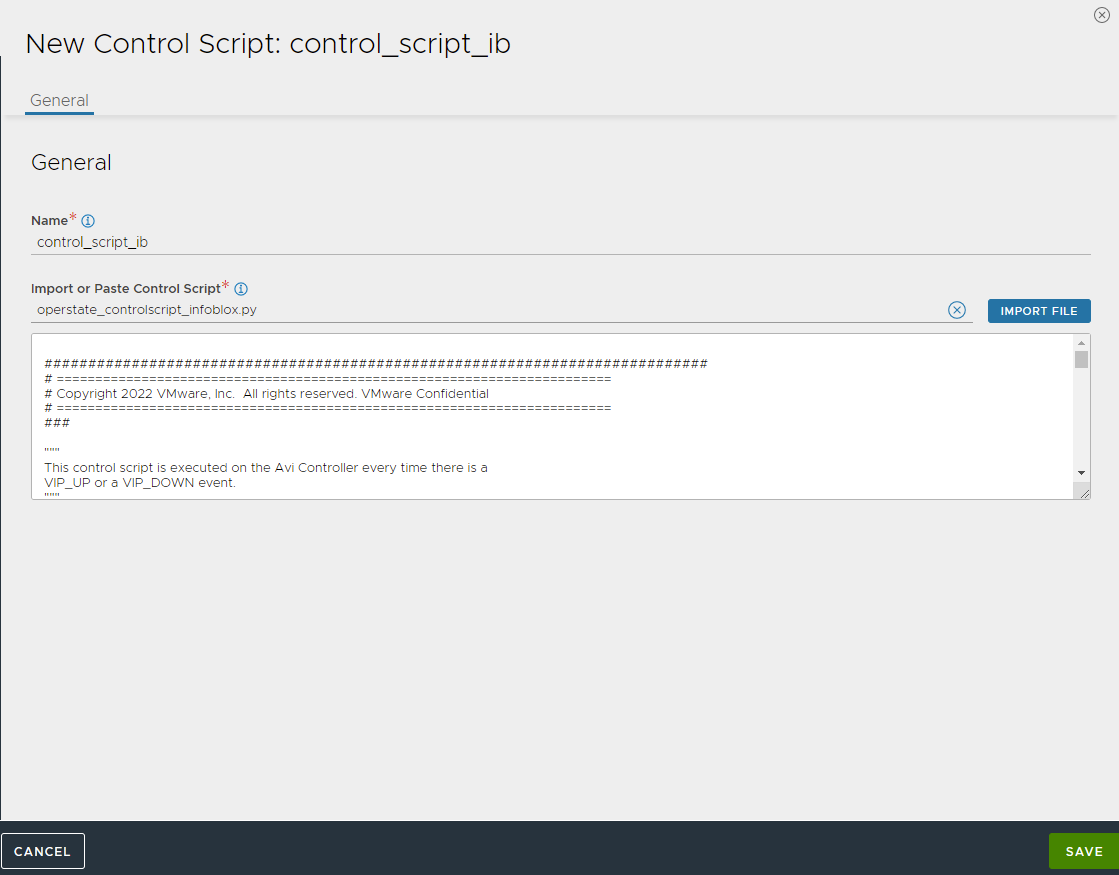
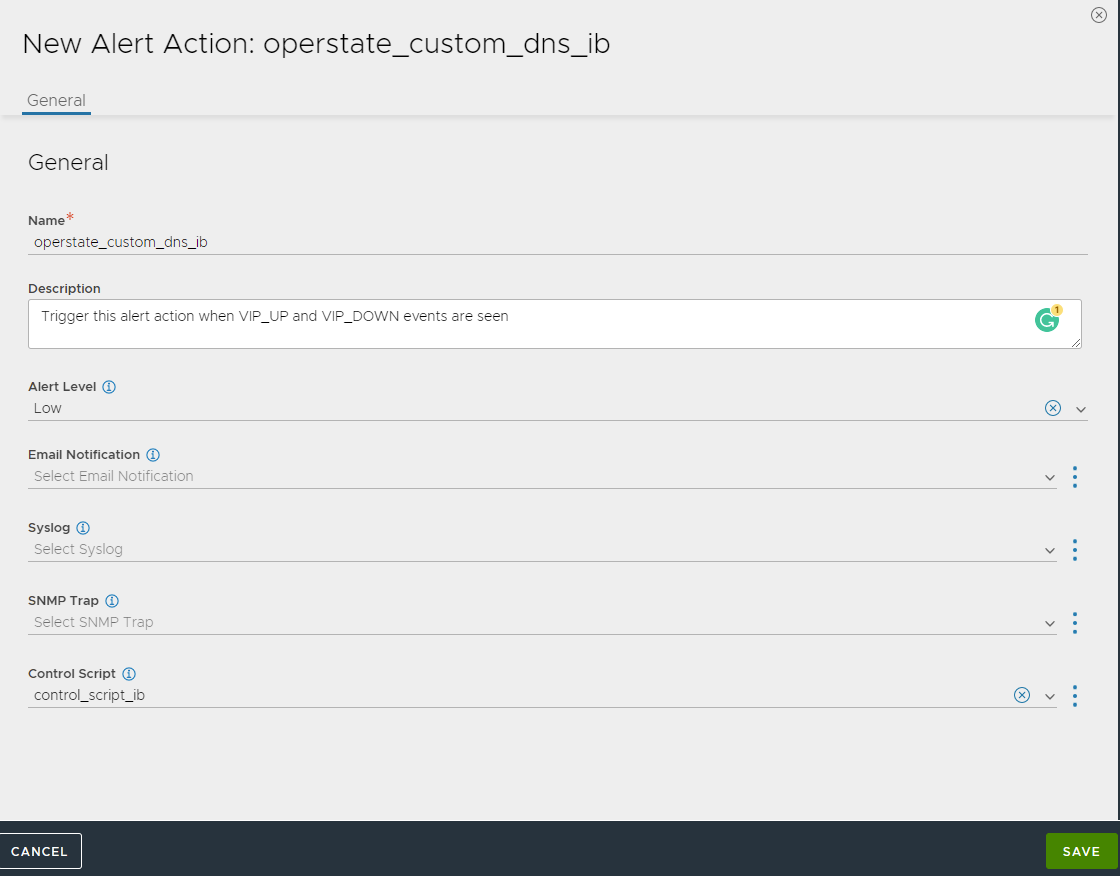
Set Alert Options
Navigate to and click Create.
Under the Control Script field, choose the script object created in Step 1.
Set Alert Config.
Navigate to and click Create.
Provide the following details:
Provide the Name of the alert configuration, for instance,
operstate_customdns_ib_vip_down.Set Throttle Alert (default is 600 seconds) to 0. The value zero indicates that there is no time-based throttling. The alert may only be triggered once within the specified time frame.
Set Event Occurs to VIP DOWN
Select alert action created in Step 2, under Alert Action.
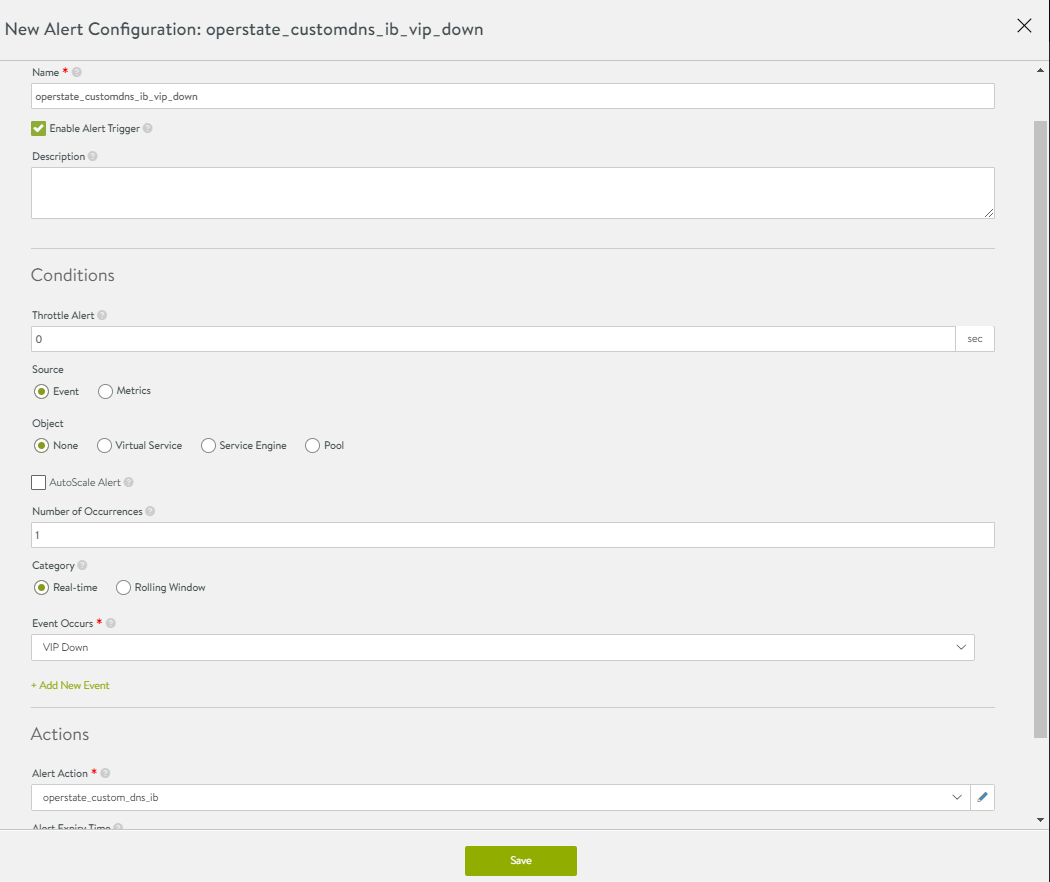
Repeat this step for the VIP UP event.
Expect a delay of 90 second before the alert action takes place after the event is generated.
Script Path
To access these files, you can use SSH or SCP to pull them from the Controller.
Script |
Workflow |
Location |
|---|---|---|
Control script for Multi-VIP and Multi FQDN Support |
Custom DNS Workflow |
/opt/avi/python/lib/custom_dns/custom_dns_script_infoblox.py |
Control Script for State-based DNS registration |
Control Script Workflow |
/opt/avi/python/lib/custom_dns/operstate_controlscript_infoblox.py |