OAuth (Open Authorization) and OIDC (OpenID Connect) are cornerstone technologies in the current day's web security and identity management. OAuth and OIDC in NSX Advanced Load Balancer function together to ensure secure access to applications, protect user identities, and enforce access control policies.
In the traditional authentication methods, the client requests a protected resource on the server by authenticating using the user name and password. To provide third-party applications access to restricted resources, the resource owner shares its credentials with the third party.
The following are the limitations:
Third-party applications store the credentials for future use, typically a password in clear text.
Servers are required to support password authentication, despite the security weaknesses inherent in passwords.
Compromise of any third-party application results in compromise of the end-user password and all of the data protected by that password.
OAuth addresses these issues by introducing an authorization layer.
OAuth
OAuth 2.0 is an authorization protocol that lets you grant your application's secure access to your resources. Your client is authorized through an Access Token. The access token has a scope that defines which resources the token can access. For more information about OAuth 2.0, see OAuth specification.
While signing up for a new application, if you have allowed to automatically source new contacts using your phone, or Facebook contacts, you are using OAuth 2.0.
OAuth provides secure delegated access where the application can take actions or access resources from a server on behalf of the user without them having to share their credentials. This is accomplished by allowing the identity provider (IdP) to issue tokens to third-party applications with the user’s approval.
OIDC
OpenID Connect 1.0 is a simple identity layer on top of the OAuth 2.0 protocol. It allows clients to verify the identity of the end user based on the authentication performed by an authorization server and to obtain basic profile information about the end user in an interoperable and REST-like manner. For more information, see Welcome to OpenID Connect.
While signing up for applications such as YouTube, Jira, shopping cart, and so on, you get the option to continue logging in with a well-known authorization server/ IdP such as Google, Facebook, and so on.
IdPs like Google use Open ID so that the users can sign in to the IdP and then access other websites and apps without having to log in or share their sign-in information.
Terminology used in OAuth and OIDC
- Resource Owner:
-
A person or system capable of granting access to a protected resource.
- Client:
-
An application making protected resource requests on behalf of the resource owner and with its authorization.
- Resource Server:
-
The server that hosts protected resources and accepts and responds to protected resource requests using access tokens after validating the access tokens.
- Authorization Server:
-
The server that issues access tokens to client apps after successfully authenticating the resource owner.
- Client_id:
-
This is a unique identifier assigned by the authorization server to the application registered with it.
- Client_secret:
-
This is a secret known only to the application and the authorization server.
- Authorization Code:
-
The authorization code is a temporary code that the authorization server issues to the client. The client will exchange it for an access token in the subsequent requests.
OAuth Roles
The following are the OAuth roles:
Resource Owner
Resource Server
Client
Authorization Server
NSX Advanced Load Balancer supports client- and-resource server roles.
However, NSX Advanced Load Balancer cannot act as a standalone client or a standalone resource server. Being a client and resource server, NSX Advanced Load Balancer will get the authorization code from the end user, exchange the authorization code with the access token, validate the access token, and allow the client to access the resource based on the token validation and authorization policies based on the claims.
OAuth Grants for obtaining Authorization
The OAuth 2.0 Authorization Framework supports several different flows (or grants). Flows are ways of retrieving an access token. To request an access token, the client obtains authorization from the resource owner. The authorization is expressed in the form of an authorization code which the client uses to request the access token.
OAuth defines the following four grant types:
Authorization Code
Implicit
Resource Owner Password Credentials
Client Credentials
NSX Advanced Load Balancer supports Authorization Code Grant Flow only.
Authorization Code Grant Flow
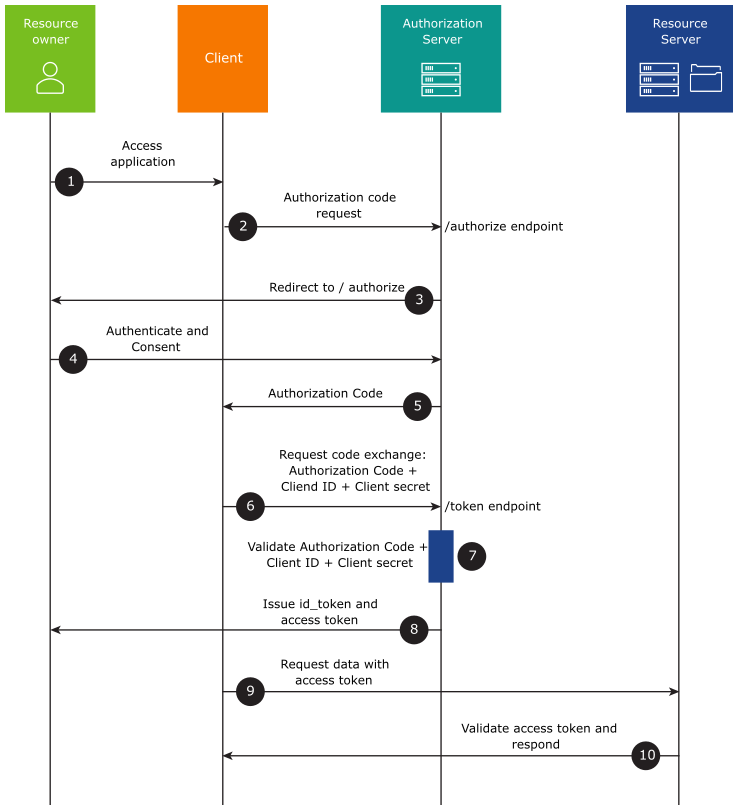
The following is the flow of the authorization code grant type:

The resource owner accesses the application/ client and triggers authentication and authorization.
The client redirects the user to the authorization server where it prompts for their user name and password. On this page, the resource owner can choose permissions to authorize the client to access resources on their behalf.
The authorization server receives the authentication and authorization grant.
After the resource owner authorizes the application, the authorization server sends an authorization code to the client using a redirect.
The client uses the authorization code to request an access token from the authorization server.
The authorization server validates the authorization code and issues an access token. If OIDC is enabled, an ID token is also issued along with access token.
The client attempts to access the resource from the resource server by presenting the access token.
If the Access Token is valid, the resource server returns the resources that the user authorized the client to receive.
Different Types of Tokens
Access Token: Access tokens are credentials used to access protected resources. An access token is a string representing an authorization issued to the client. The access token can be of two types,such as, JSON Web Token (JWT) or Opaque Tokens. In the case of JWT, the resource server can validate the access token on its own, whereas in the case of the Opaque Token, the resource server talks to the authorization server on introspection endpoint to validate the access token.
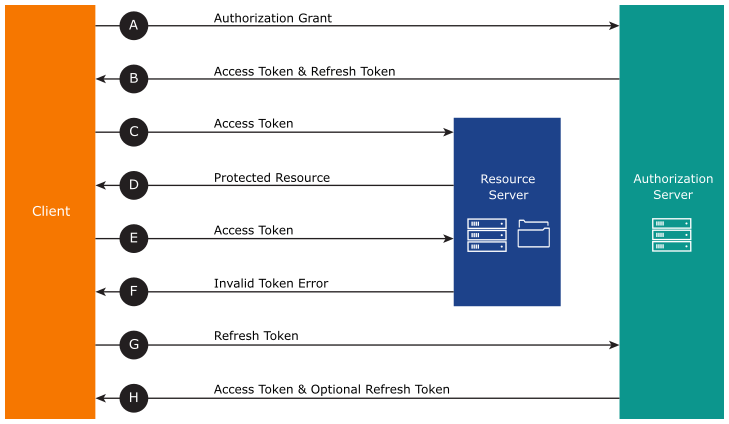
Refresh Token: Refresh tokens are issued to the client by the authorization server and are used to obtain a new access token from the authorization server when the current access token becomes invalid or expires. Below is the flow diagram explaining how the expired access token is refreshed.

ID Token: This is used if OIDC is enabled on the client. This token is returned by the authorization server, and it encodes the user’s authentication information.
Different Types of Endpoints
- Authorize/ Authorization Endpoint:
-
This endpoint is used by the client to obtain authorization from the resource owner through user-agent redirection.
- Token Endpoint:
-
This endpoint is used by the client to exchange an authorization code for an access token. The same endpoint is used to get the refresh token and the ID token,in the case of OIDC.
- Redirection endpoint/ Redirect URL/ Call back URL:
-
This is used by the authorization server to return responses containing authorization credentials to the client through the resource owner user-agent. This is most commonly known as Call back URL.
- Introspection endpoint:
-
The introspection endpoint is used for validating the opaque access tokens. For opaque access tokens, the resource server sends the request to the introspection endpoint of the authorization server to validate the access token.
- UserInfo endpoint:
-
The UserInfo endpoint can be used to retrieve identity information about a user. This is used in the case of OIDC. To obtain the requested claims about the end-user, the client requests to the UserInfo endpoint using the access token obtained.
Hide Sensitive Log Profile Configuration
The OAuth sensitive fields like Basic Authorization can be masked using the sensitive log profile.
The following are the steps to configure sensitive information in OAuth logs:
| sensitive_log_profile                  |                             |
|   header_field_rules[1]                |                             |
|     name                               | Rule 1                      |
|     index                              | 1                           |
|     enabled                            | False                       |
|     match                              |                             |
|       match_criteria                   | CONTAINS                    |
|       match_str[1]                     | Authorization               |
|     action                             | LOG_FIELD_MASKOFF           |