


This document discusses configuring NSX Advanced Load Balancer to optimize Microsoft Skype for Business 2015 deployment. The NSX Advanced Load Balancer can make intelligent load balancing decisions and improve the performance, security, reliability, and integrity of traffic in this environment.
Skype for Business
Skype for Business (formerly Microsoft Office Communicator and Microsoft Skype for Business) is an instant-messaging client used with Skype for Business Server or with Skype for Business Online (available with Microsoft Office 365). Skype for Business is an enterprise software and has distinctive features for business enterprises. Skype for Business replaces Windows Messenger, which ran with Microsoft Exchange Server. For more information on deployment and operation details, see Skype for Business Server 2015.
Topology
Skype for Business supports the following server topologies:
Standard Edition topology
This topology is recommended for small organizations and for pilot projects in large organizations. It hosts many features such as instant messaging (IM), presence, conferencing, and Enterprise Voice. It also facilitates necessary databases to run on a single server. It is made available at a lower cost but does not provide high availability.
Enterprise Edition topology
Apart from the features available in Standard Edition, this topology supports high availability by allowing multiple Front End servers to be deployed into a pool, and the SQL servers to be mirrored.
For specific information on server roles and other topology details, see Topology Basics for Skype for Business Server 2015.
Workload Protocols in Skype for Business
Skype for Business supports the following workload protocols:
Instant Messaging and Presence
Instant messaging (IM) enables users to communicate with each other in real time on their computers using text-based messages. IM supports both two-party and multi-party sessions. Presence provides information to users about the status of other users on the network. The presence icon represents the user’s current availability and willingness to communicate.
Audio and video (A/V) and Web Conferencing
Web conferencing allows users to share and collaborate on documents during meetings and conference sessions. In addition, users can share their desktop or specific application with others in real time.
Enterprise Voice
Skype for Business supports multiple Mediation servers and gateways. This uses inter-trunk routing to connect an IP PBX to a public switched telephone network (PSTN) gateway or to interconnect multiple IP PBX systems.
For specific information on workload protocols and voice solutions, see Technical diagrams for Skype for Business Server 2015.
Benefits of deploying Skype for Business 2015 with NSX Advanced Load Balancer
The NSX Advanced Load Balancer provides the following benefits for Skype for Business deployment:
Single Point of Management and Control
The NSX Advanced Load Balancer Controller provides a single point of management and control while providing traffic and resource isolation for heightened security. Typical Skype for Business deployment requires four separate load balancing units. This number is doubled to eight units when high availability is required. Unlike other ADC solutions, IT organizations can deploy an NSX Advanced Load Balancer Controller cluster for central management instead of four or eight independently managed ADC units.
Built-in TCP Security
The NSX Advanced Load Balancer inspects TCP connections and drops malicious connection attempts such as TCP SYN flooding or TCP segment with an invalid sequence number.
Skype for Business reverse proxy Service
The NSX Advanced Load Balancer supports HTTPS proxy with easy-to-use security and HTTP policies. Along with this, full visibility, and end-to-ending timing information are provided for HTTPS transactions which enables IT to detect and analyze problems quickly.
Cloud Optimized Deployment and High Availability
The NSX Advanced Load Balancer Controller automatically discovers available resources, such as networks and servers in the virtual infrastructure. Thus, IT administrators are less vulnerable to human errors. The NSX Advanced Load Balancer Controller detects a problem when its Service Engine or a hypervisor has a problem. It automatically looks for the best available hypervisor and launches a Service Engine to recover. Unlike other ADC solutions, this approach does not require a redundant device.
Deployment Architecture
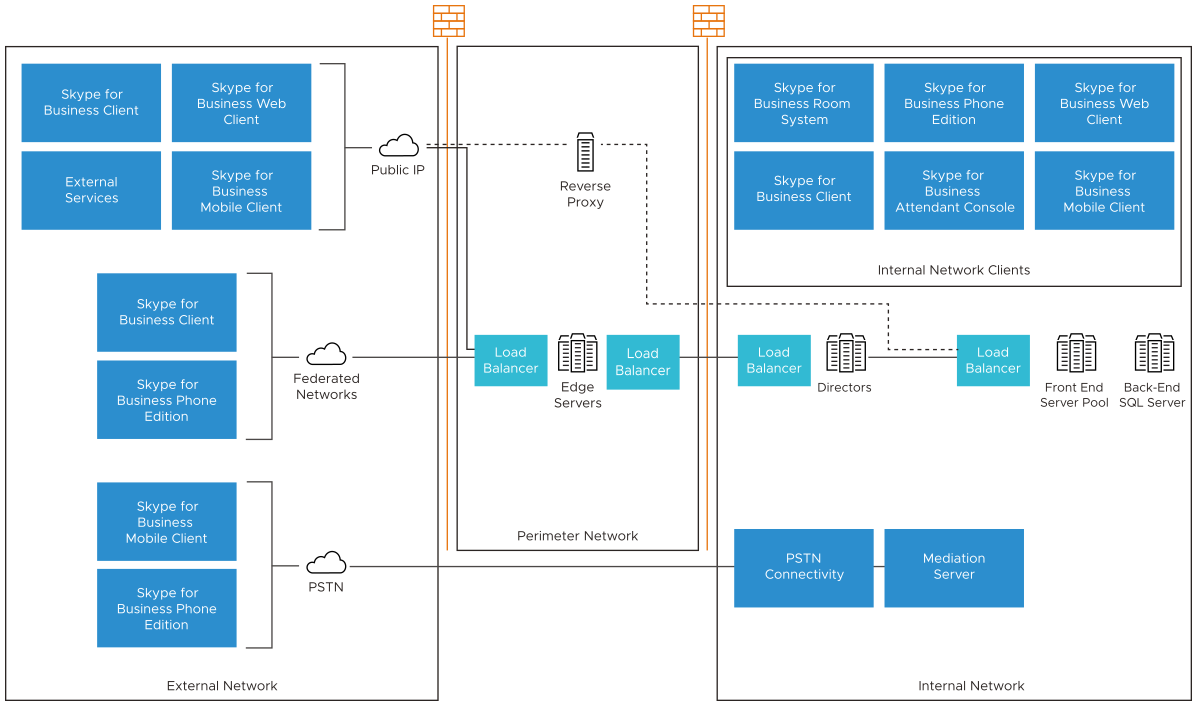
The following server types are used during the deployment of Skype for Business with NSX Advanced Load Balancer:
Front End server
Provides all core features such as authentication, instant messaging, web conferencing, A/V conferencing, address book services, and so on. These servers are recommended to host Director pool and can optionally accommodate other services such as persistent chat, monitoring, and media mediation. In this document, the Director pool is assumed to be present in the Front End pool.
Edge server
Enables on-premise users to communicate and collaborate with off-premise users. These servers do not provide any web-based services or Skype for Business discovery mechanism. To support these two functions, a reverse proxy server must be configured. Edge pool servers are not part of the active directory domain of an organization.
Reverse proxy server
Publishes web services provided by the Front End pool to the internet. These servers relay HTTP requests coming from the Internet to the Front End servers. The reverse proxy must not be configured to join the active directory domain of an organization.
Outlook Web App server
Delivers browser-based versions of Word, PowerPoint, Excel, and OneNote. A single Office Web App server farm can support users who access Office files through Skype for Business 2015, SharePoint 2013, Lync Server 2013, shared folders, and websites.
Requirements for Deployment
The following is the checklist for deploying NSX Advanced Load Balancer for Skype for Business:
Server type |
Hardware requirements |
Software requirements |
Recommended number of servers |
|---|---|---|---|
Front End server |
64-bit dual processor Eight-core CPU 32 GB RAM 100 GB disk capacity Dual-port network adapter |
Windows 2012 R2 Windows PowerShell 3.0 Microsoft .NET Framework 4.5 Windows Identity Foundation Remote Server Administration Tools Internet Information Services (IIS) Windows Media Format Runtime .NET Framework 3.5 Silverlight |
Three |
OWA server |
Eight-core CPU 8 GB RAM 100 GB disk capacity |
Windows 2012 R2 Windows PowerShell 3.0 Microsoft .NET Framework 4.5 Windows Identity Foundation Remote Server Administration Tools Internet Information Services (IIS) Windows Media Format Runtime .NET Framework 3.5 Silverlight |
One |
Exchange 2016 server |
Eight-core CPU 8 GB RAM 100 GB disk capacity Dual-port network adapter |
Windows 2012 R2 with AD, DNS, DHCP, DC Windows PowerShell 3.0 Microsoft .NET Framework 4.5 Windows Identity Foundation Remote Server Administration Tools Internet Information Services (IIS) Windows Media Format Runtime .NET Framework 3.5 Silverlight |
One |
SQL 2014 server |
Two-core CPU 1 GB RAM 6 GB disk capacity |
Windows 2012 R2 Windows PowerShell 3.0 Microsoft .NET Framework 4.5 Windows Identity Foundation Remote Server Administration Tools Internet Information Services (IIS) Windows Media Format Runtime .NET Framework 3.5 Silverlight |
Two |
Reverse proxy server |
Two-core CPU 1 GB RAM 6 GB disk capacity |
Windows 2012 R2 Windows PowerShell 3.0 Microsoft .NET Framework 4.5 Windows Identity Foundation Remote Server Administration Tools Internet Information Services (IIS) Windows Media Format Runtime .NET Framework 3.5 Silverlight |
One |
Edge server |
64-bit dual processor Eight-core CPU1 6 GB RAM 100 GB disk capacity Dual-port network adapter |
Windows 2012 R2 Windows PowerShell 3.0 Microsoft .NET Framework 4.5 Windows Identity Foundation Remote Server Administration Tools Internet Information Services (IIS) Windows Media Format Runtime .NET Framework 3.5 Silverlight |
Six |
In Windows 2012 server, the disk must be partitioned into four drives for OS, logs, database, and Exchange Install Directory.
For more information on server requirements, see Skype for Business Server 2015.
Certificates: Any Windows server can act as a certificate authority. In this document, we use Windows Server 2012 R2 as the certificate authority. For complete information on the certificate requirements, see the following figure.
Figure 1. Figure 2 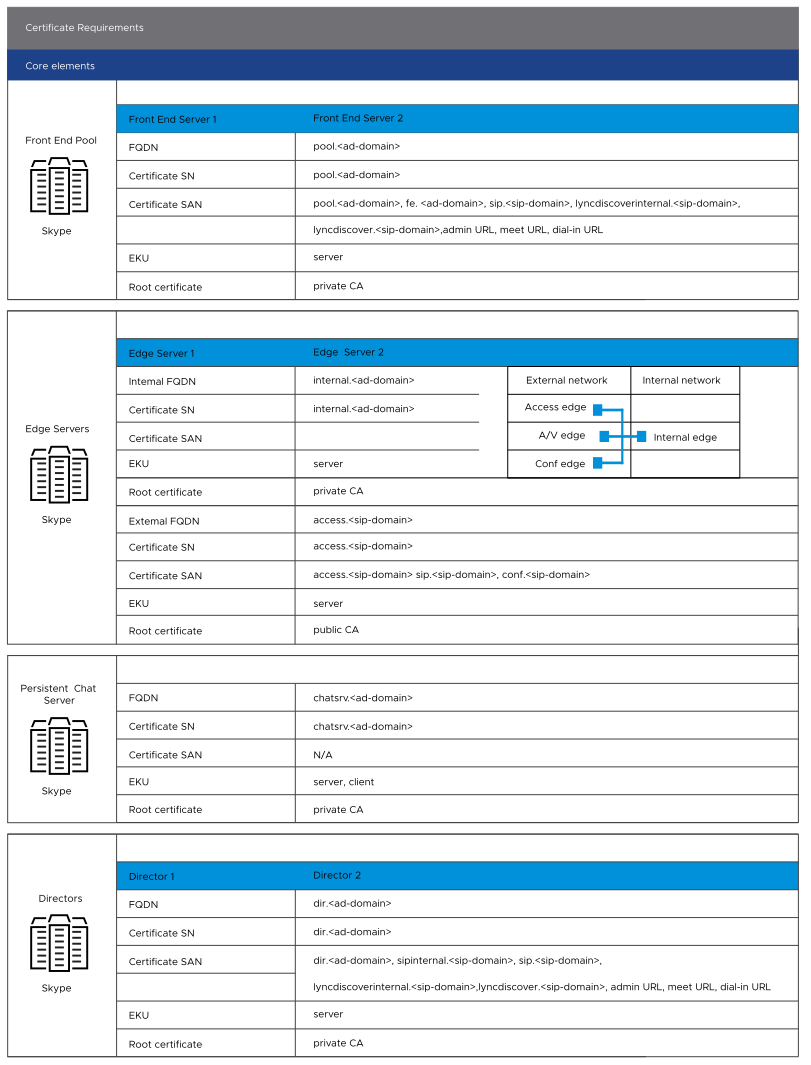

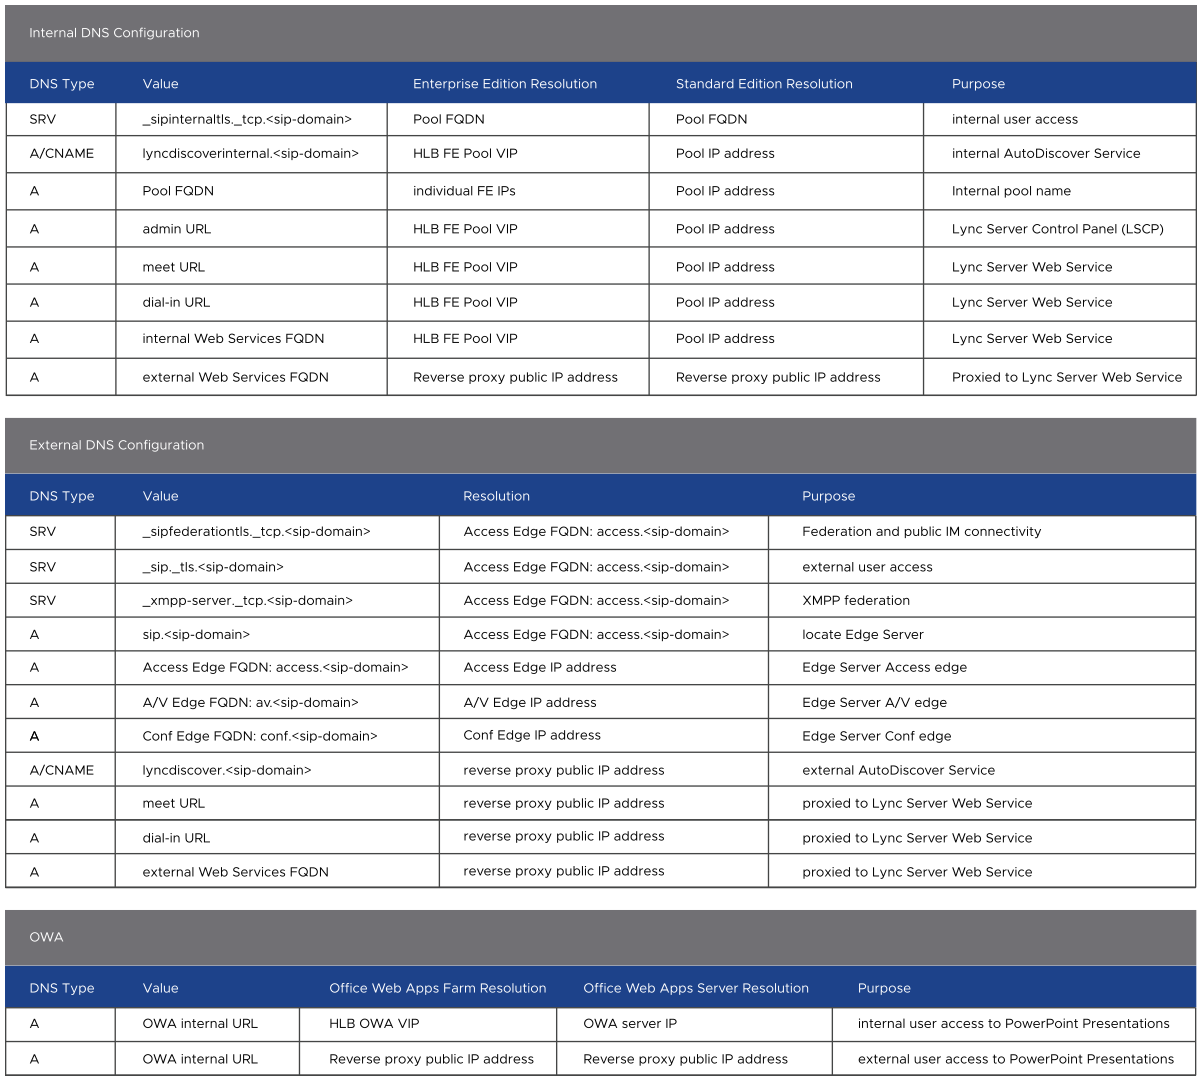
DNS: For complete DNS information, see Figure 3.
Figure 2. Figure 3
Policies for Deployment
All ports and services required for deploying load balancing are mentioned in Figure 4. In this deployment example, the Front End servers assume the role of Director server and Mediation server. Set up your active directory and DNS servers based on the information provided.
SFB Role |
FQDN of Virtual Server |
Ports on VS |
FQDN of Servers |
Ports on Servers |
|---|---|---|---|---|
FrontEnd |
SFB2015FE.avitest.com |
80, 135, 443, 444, 448, 4443, 5061, 5067, 5070, 5071, 5072, 5073, 5075, 5076, 5080, 8080 |
SFB2015FS1.avitest.com SFB2015FS2.avitest.com SFB2015FS3.avitest.com |
Same as VS ports |
External Access Edge |
SFB2015EE.avitest.com |
443, 5061 |
SFB2015EE1.avitest.com SFB2015EE2.avitest.com |
Same as VS ports |
External Web Conf Edge |
SFB2015WC.avitest.com |
443 |
SFB2015WC1.avitest.com SFB2015WC2.avitest.com |
Same as VS ports |
External AV Edge |
SFB2015AV.avitest.com |
443, 3478/UDP |
SFB2015AV1.avitest.com SFB2015AV2.avitest.com |
Same as VS ports |
Reverse Proxy |
lyncdiscover.avitest.com |
80, 4443 |
SFB2015FE.avitest.com |
8080, 4443 |
Outlook Web Access |
SFB20150WA.avitest.com |
80, 443 |
SFB2015OWA1.avitest.com SFB2015OWA2.avitest.com |
80, 443 |
It is recommended to configure source IP-based persistence and TCP idle timeout of 1800 seconds for all the load balancing virtual services.
Configuration
Initial Setup
External and Internal Edge virtual service and pool
Reverse proxy
Office Web App
Initial Setup
Virtual service placement
Create one Service Engine (SE) group each for reverse proxy (RP), External Edge, Internal Edge, and Front End server. These SE groups are created to place related Skype for Business virtual services into the same SE groups, depending on its role.
Navigate to . Click Switch to Advanced to specify the virtual service.
Under Advanced tab, navigate to Other Settings to specify the respective SE group. This step will ensure that an SE does not accommodate virtual services of different Skype for Business roles.
Import Front End server certificate
For the reverse proxy and Office Web App servers, you need to import the certificate. The SSL certificate associated with the virtual service must be the same as the one used by the Front End server. The FQDN of the reverse proxy server must be on the list of the Subject Alternate Name of the certificate.
To import a copy of the Front-end server certificate, navigate to . Choose Root/Intermediate CA Certificate.
Front End virtual service and pool
One virtual IP address is shared across all the ports. This virtual IP address must be configured as the Skype for Business Front End pool IP in the setup. This IP address is selected at the time of the virtual service creation.
In the virtual IP address section, by toggling the switch from Basic Setup to Advanced Setup, you can see the list of existing virtual services and the respective IP addresses.
Navigate to .
Configure Layer 4 Application Profile with TCP proxy for all ports except for port
80and8080as shown below. Use HTTP load balancing for port80and port8080.Navigate to . Click Edit option for System-TCP-Proxy under TCP-UDP profile. Set the Idle Duration value to 1800 as shown below. The Idle Duration value is in seconds.
Note:Use TCP health monitor for all ports. Skype for Business Front End server has an option to allow an external load balancer to perform SIP health check on unencrypted SIP port,
5060.Navigate to the . Provide the pool name, select Load Balance method as Least Connections and select Persistence as System-Persistence-Client-IP as shown below.
Navigate to . Choose the pool you created in the previous step. Click .
To add Front End server IP addresses or FQDN, navigate to . Choose the pool that you want to edit, click the edit option. Navigate to Servers and choose IP Address, Range, or DNS Name option.
Follow all the steps mentioned above for all the ports that are described in Figure 4. On completion, you will have 16 virtual services, 16 pools, and 16 health monitors configured.
External and Internal Edge Virtual Service and Pool
Three public virtual IP addresses and one private virtual IP address is required for external and internal edge pools, respectively.
The three public IP addresses must be registered as access, web conferencing, and A/V Edge service point in the Skype for Business topology builder. The internal virtual IP address must be configured as the SFB Edge pool IP address.
Navigate to .
Configure Layer 4 application profile using TCP proxy for all the required ports.
Navigate to . Provide the pool name, select Load Balance method as Least Connections and select Persistence as System-Persistence-Client-IP as shown below.
For the virtual service on port
3478, you need to select System-UDP-Fast-Path as TCP/UDP Profile.Navigate to and choose Advanced Setup.
Provide the virtual service name, select
3478as the Service Port option and System-UDP-Fast-Path as the TCP/UDP Profile.Use UDP health monitor for port
3478and TCP health monitor for the other ports. The UDP health monitor verifies if the application is listening on a given UDP port. If an ICMP port unreachable message is received, the virtual service associated with the application will be down, otherwise it shows as up.Navigate to and choose the pool that you want to edit. Click the edit option available on the right side.
Click Create Health Monitor as shown below.
Choose type UDP and set the values of the other parameters.
Follow all the steps mentioned above for all the ports that are described in Figure 4. On completion, you will have 12 virtual services, 12 pools, and 12 new health monitors configured.
Reverse Proxy
Reverse proxy requires one public IP address that is configured as a virtual service’s IP address. The connections from clients to the virtual service, and from the virtual service to the servers must all be secure or encrypted. Unlike other Skype of Business virtual servers, the reverse proxy (RP) server must translate incoming port numbers as shown in Figure 4.
In a typical deployment scenario, reverse proxy does not have any direct Layer 2 connectivity to the Front End pool. To implement a similar setup, NSX Advanced Load Balancer Controller requires additional configuration, as it assumes that the server is directly accessible by default. This additional configuration includes SSL profile on a virtual service and a pool and choosing a HTTP profile. With this configuration, HTTPS traffic is decrypted when received and re-encrypted before it is sent to the server. You can configure HTTP security policies based on your organization requirements.
SSL certificate associated with the virtual service must be the same as the one used by the Front End server. This implies that the reverse proxy FQDN must be listed on the subject alternate name of the certificate.
Click . Check SSL option and change port value to
4443. Select Service Port as SSL, the default SSL Profile (System Standard) and choose the same SSL Certificate that you created in the Import Server End Certificate section.Click . Select Least Connections as Load Balance method and System-Persistence-Client-IP as the Persistence method.
Configure the Skype for Business Front End pool virtual service IP as a member of the pool.
Navigate to and select the pool that you want to edit. Select the option Servers and add IP address of the Front End server.
Use HTTP health monitor and expect HTTP status code 403 in response for successful health check. Click and select pool for Reverse proxy. Click the edit option available on the right side and choose Edit Health Monitor option.
Follow all the steps mentioned above for the other port (Port
80) as described in Figure 4.
Office Web App
Office Web App virtual service requires one public IP address configured as virtual IP address. The connections from clients to the virtual service and from the virtual service to servers must be secure or encrypted.
Configure an SSL Profile on both virtual server and pool and choose an HTTP profile. The HTTPS traffic is decrypted when received and re-encrypted before it is sent to a server. You can configure HTTP security policies based on your organization requirements.
The SSL certificate associated with the virtual server must be the same as the one used by the Front End server.
Navigate to . Choose Load Balance option as Least Connections, Persistence as System-Persistence-HTTP Cookie, SSL Profile as System-Standard(default), and SSL Key and Certificate (Created in Import Server End Certificate section).
Navigate to and select the pool that you have created in the previous step. Select the option Servers and add IP address of the Office Web Apps server.
Click and select pool for the Office web app servers. Click the edit option available on the right side of the UI and choose Edit Health Monitor option. Click Add Active Monitor and select the type as HTTPS.
Click the HTTPS Settings in the same window pane for Health Monitor. Select SSL Profile as System-Standard(default). Choose SSL key and certificate that were created in the Import Server End Certificate section.
Follow all the steps mentioned above for the other port (Port 80) as described in Figure 4.
Verifying the Configuration
Health Monitors
Once all configuration steps are completed, navigate to to view all the health monitors.
Pools
Navigate to , to verify all the configured pools.
Virtual Services
Navigate to , to check the list of all virtual services created.
