


This section describes configuring resources in NSX Manager Policy mode.
In the NCP configuration file ncp.ini, you can specify NSX resources using their UUIDs or names.
Gateways and Segment
- Create a segment for the Kubernetes nodes, for example, ocp4-segment.
- Create a tier-0 gateway, for example, T0GW1. Set the top_tier_router option in the [nsx_v3] section of ncp.ini with the gateway's ID if you do not have a shared tier-1 topology. See below for information on configuring a shared tier-1 topology. Set the HA mode to active-standby if you plan to configure NAT rules on this gateway. Otherwise, set it to active-active. Enable route redistribution. Also configure this gateway for access to the external network.
- Create a tier-1 gateway, for example, T1GW1. Connect this gateway to the tier-0 gateway.
- Configure router advertisement for T1GW1. At the very least, NSX-connected and NAT routes should be enabled.
- Connect T1GW1 to ocp4-segment. Make sure that the gateway port's IP address does not conflict with the IP addresses of the Kubernetes nodes.
- For each node VM, make sure that the vNIC for container traffic is attached to the segment that is automatically created. You can find it in with the same name as the segment, that is, ocp4-segment).
- If you use DHCP you can provide DHCP static binding on the segment for the nodes.
Note: If a node is connected to multiple segments, only one of the segments can have NSX DHCP configured.
- tag: <cluster_name>, scope: ncp/cluster
- tag: <node_name>, scope: ncp/node_name
Note: No need to manually add the above tags. They will be automatically added by the NCP Network Operator.
IP Blocks for Kubernetes Pods
networking:
  networkType: ncp
  clusterNetwork:
  - cidr: 10.4.0.0/16
    hostPrefix: 23
  machineCIDR: 10.114.16.0/24
  serviceNetwork:
  - 172.30.0.0/16
The Openshift 4 adaptor will create a new IP block for each CIDR configured in install-config.yaml file. You must be careful if there is any existing IP block with the same CIDR. It is not recommended to use overlapping IP blocks as NCP enables connected subnet route advertisement between tier-0 and tier-1.
External IP Pools
An external IP pool is used for allocating IP addresses which will be used for translating pod IPs using SNAT rules, and for exposing Ingress controllers and LoadBalancer-type services using SNAT/DNAT rules, just like Openstack floating IPs. These IP addresses are also referred to as external IPs.
Navigate to to create an IP pool. Set the external_ip_pools option in the [nsx_v3] section of ncp.ini (part of NCP Network Operator) to the UUIDs of the IP pools. If you want NCP to automatically create IP pools, you can set the external_ip_pools option with a comma-separated list of addresses in CIDR format or IP ranges.
You can also configure external IP pools that will be used only for allocating IP addresses for the Kubernetes LoadBalancer services. You do this by setting the external_ip_pools_lb option. Note that after you set the external_ip_pools_lb option, you can add more IP pools. However, updating the IP pools is not supported. Removing IP pools is also not supported.
Multiple Kubernetes clusters use the same external IP pool. Each NCP instance uses a subset of this pool for the Kubernetes cluster that it manages. By default, the same subnet prefix for pod subnets will be used. To use a different subnet size, update the external_subnet_prefix option in the [nsx_v3] section in ncp.ini.
You can change to a different IP pool by changing the nsx-ncp-operator-config configmap in the nsx-system-operator project once the cluster is deployed.
Shared Tier-1 Topology
The following diagram illustrates a shared tier-1 topology.
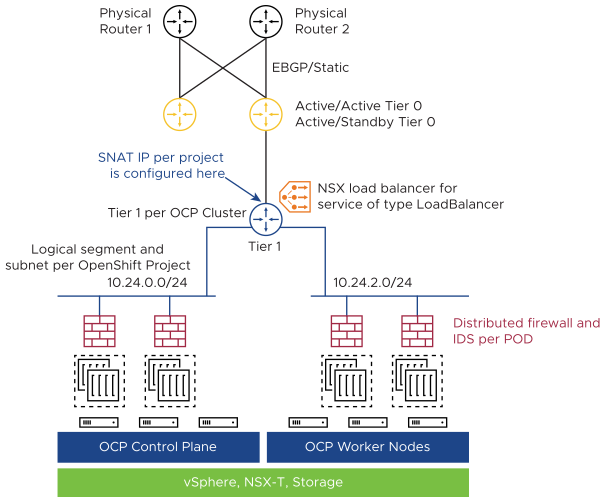
- Set the top_tier_router option to the ID of the tier-1 gateway. Connect the tier-1 gateway to a tier-0 gateway for external connections.
- Set the single_tier_topology option to True. The default value is False.
- If you want NCP to automatically configure the top tier router as a tier-1 gateway, unset the top_tier_router option and set the tier0_gateway option. NCP will create a tier-1 gateway and uplink it to the tier-0 gateway specified in the tier0_gateway option.
Distributed Firewall (DFW)
- In step 3 under Prerequisites, for the variable Services, instead of selecting DNS or DNS-UDP, create a new service with port 5353 and protocol UDP and select it.
