


This example shows how to create a new vSphere distributed switch (VDS); add port groups for management, storage, and vMotion traffic types; and migrate hosts on a standard vSwitch to the new distributed switch.
Note that this is just one example used to show the procedure. For detailed VDS physical and logical uplink considerations, see the NSX Network Virtualization Design Guide at https://communities.vmware.com/docs/DOC-27683.
Prerequisites
This example assumes that each ESX host to be connected to the vSphere distributed switch has at least one connection to a physical switch (one vmnic uplink). This uplink can be used for the distributed switch and NSX VXLAN traffic.
Procedure
- Provide at least one uplink for the distributed switch, keep IO control enabled, and provide a meaningful name for the default port group. Note that it is not mandatory to create the default port group. The port group can be manually created later.
By default, four uplinks are created. Adjust the number of uplinks to reflect your VDS design. The number of uplinks required is normally equal to the number of physical NICs you allocate to the VDS.The following screen shows example settings for management traffic on the management host cluster.
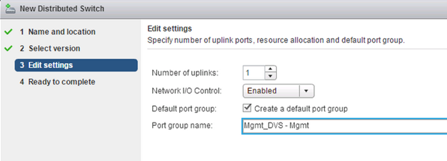
The default port group is just one of the port groups that this switch will contain. You will have an opportunity after the switch is created to add port groups for different traffic types. Optionally, you can untick Create a default port group option when creating a new VDS. This may in fact be the best practice; it's best to be explicit when creating port groups.
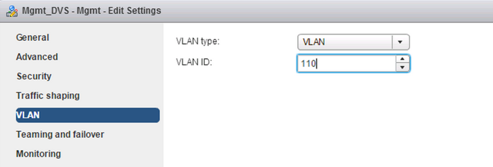
- (Optional) Upon completion of the New Distributed Switch wizard, edit the settings of the default port group to place it in the correct VLAN for management traffic.
For example, if your host management interfaces are in VLAN 110, place the default port group in VLAN 110. If your host management interfaces are not in a VLAN, skip this step.
- Upon completion of the New Distributed Switch wizard, right-click the distributed switch and select New Distributed Port Group.
Repeat this step for each traffic type, making sure to provide a meaningful name for each port group and making sure to configure the proper VLAN ID based on the traffic separation requirements of your deployment.
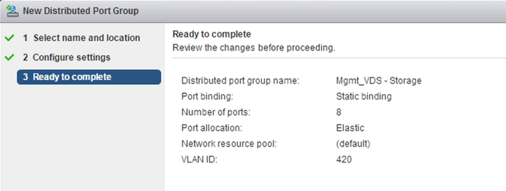
Example group settings for storage.
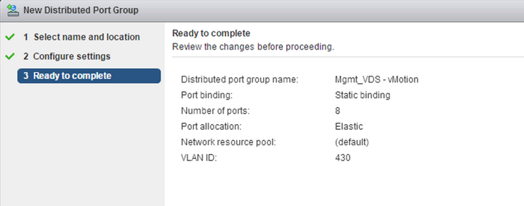
Example group settings for vMotion traffic.
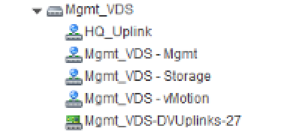
The completed distributed switch and port groups looks like this.
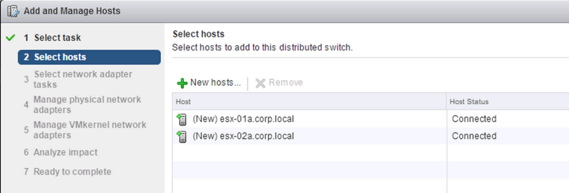
- Right-click the distributed switch, select Add and Manage Hosts, and select Add Hosts.
Attach all hosts that are in the associated cluster. For example, if the switch is for management hosts, select all of the hosts that are in the management cluster.
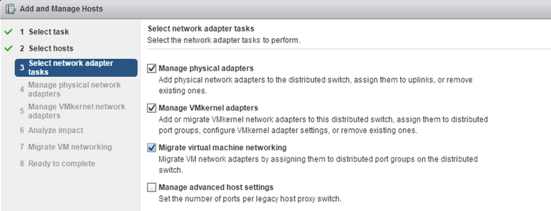
- Select the options to migrate physical adapters, VMkernel adapters, and virtual machine networking.
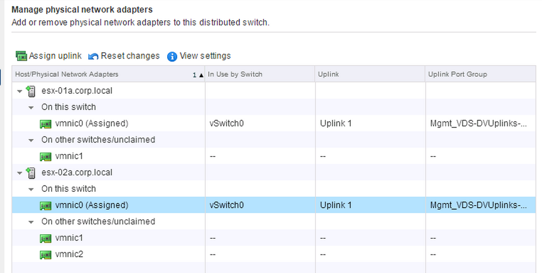
- Select a vmnic and click Assign uplink to migrate the vmnic from the standard vSwitch to the distributed switch. Repeat this step for each host that you are attaching to the distributed vSwitch.
For example, this screen shows two hosts with their vmnic0 uplinks configured to migrate from their respective standard vSwitch to the distributed Mgmt_VDS-DVUplinks port group, which is a trunk port that can carry any VLAN ID.
- Select a VMKernel network adapter and click Assign port group. Repeat this step for all network adapters on all hosts that you are attaching to the distributed vSwitch.
For example, this screen shows three vmk network adapters on two hosts configured to be migrated from the standard port groups to the new distributed port groups.

- Move any VMs that are on the hosts to a distributed port group.
For example, this screen shows two VMs on a single host configured to be migrated from the standard port group to the new distributed port group.

Results
-
~ # esxcli network vswitch dvs vmware list Mgmt_VDS Name: Mgmt_VDS VDS ID: 89 78 26 50 98 bb f5 1e-a5 07 b5 29 ff 86 e2 ac Class: etherswitch Num Ports: 1862 Used Ports: 5 Configured Ports: 512 MTU: 1600 CDP Status: listen Beacon Timeout: -1 Uplinks: vmnic0 VMware Branded: true DVPort: Client: vmnic0 DVPortgroup ID: dvportgroup-306 In Use: true Port ID: 24 Client: vmk0 DVPortgroup ID: dvportgroup-307 In Use: true Port ID: 0 Client: vmk2 DVPortgroup ID: dvportgroup-309 In Use: true Port ID: 17 Client: vmk1 DVPortgroup ID: dvportgroup-308 In Use: true Port ID: 9 -
~ # esxcli network ip interface list
vmk2
   Name: vmk2
   MAC Address: 00:50:56:6f:2f:26
   Enabled: true
   Portset: DvsPortset-0
   Portgroup: N/A
   Netstack Instance: defaultTcpipStack
   VDS Name: Mgmt_VDS
   VDS UUID: 89 78 26 50 98 bb f5 1e-a5 07 b5 29 ff 86 e2 ac
   VDS Port: 16
   VDS Connection: 1235399406
   MTU: 1500
   TSO MSS: 65535
   Port ID: 50331650

vmk0
   Name: vmk0
   MAC Address: 54:9f:35:0b:dd:1a
   Enabled: true
   Portset: DvsPortset-0
   Portgroup: N/A
   Netstack Instance: defaultTcpipStack
   VDS Name: Mgmt_VDS
   VDS UUID: 89 78 26 50 98 bb f5 1e-a5 07 b5 29 ff 86 e2 ac
   VDS Port: 2
   VDS Connection: 1235725173
   MTU: 1500
   TSO MSS: 65535
   Port ID: 50331651

vmk1
   Name: vmk1
   MAC Address: 00:50:56:6e:a4:53
   Enabled: true
   Portset: DvsPortset-0
   Portgroup: N/A
   Netstack Instance: defaultTcpipStack
   VDS Name: Mgmt_VDS
   VDS UUID: 89 78 26 50 98 bb f5 1e-a5 07 b5 29 ff 86 e2 ac
   VDS Port: 8
   VDS Connection: 1236595869
   MTU: 1500
   TSO MSS: 65535
   Port ID: 50331652
What to do next
Repeat the migration process for all vSphere distributed switches.
