You use the NSX Manager user interface (UI) to install and configure the NSX Intelligence appliance.

Before you can begin to use the NSX Intelligence features, you must install and configure the NSX Intelligence appliance to integrate the NSX Intelligence services and plugins with NSX Manager.

Important: If you are installing NSX Intelligence 1.1 or later using NSX-T Data Center 2.5.x, you must use the OVF file to complete the installation. Unpack the OVA file using the appropriate unpacking tool described in step 3 of Download and Unpack the NSX Intelligence Installer Bundle and determine the path to the extracted OVF file. To complete the installation of the NSX Intelligence 1.1 or later appliance using NSX-T Data Center 2.5.x, see Install the NSX Intelligence Appliance provided in the 1.0.x release.

Prerequisites

  • Verify that the minimum NSX Intelligence system requirements are met for the appliance size you want to install. See Preparing for NSX Intelligence Installation.
  • You must have an Enterprise Administrator role to install, configure, and use NSX Intelligence.
  • Download the NSX Intelligence installer bundle file. See Download the NSX Intelligence Installer Bundle.
  • Determine the size of the NSX Intelligence appliance to configure. Small size is for lab or proof-of-concept deployment, or small-scale production environment. Large size is for a large-scale production environment. See NSX Intelligence System Requirements.
  • Synchronize time between an NTP server, the compute cluster on which the NSX Intelligence appliance is to be deployed, and with the NSX Manager server.
  • Collect the IP addresses for the management subnet, gateway, DNS server, and NTP server that are required to configure the NSX Intelligence appliance.
  • Ensure that the certificates used for the NSX Manager Unified Appliance node or cluster are compatible with the certificate types listed in Preparing for NSX Intelligence Installation.

Procedure

  1. From your browser, log in with Enterprise Administrator privileges to an NSX Manager at https://<nsx-manager-ip-address>.
  2. In NSX Manager, select System > Appliances in the Configuration section.
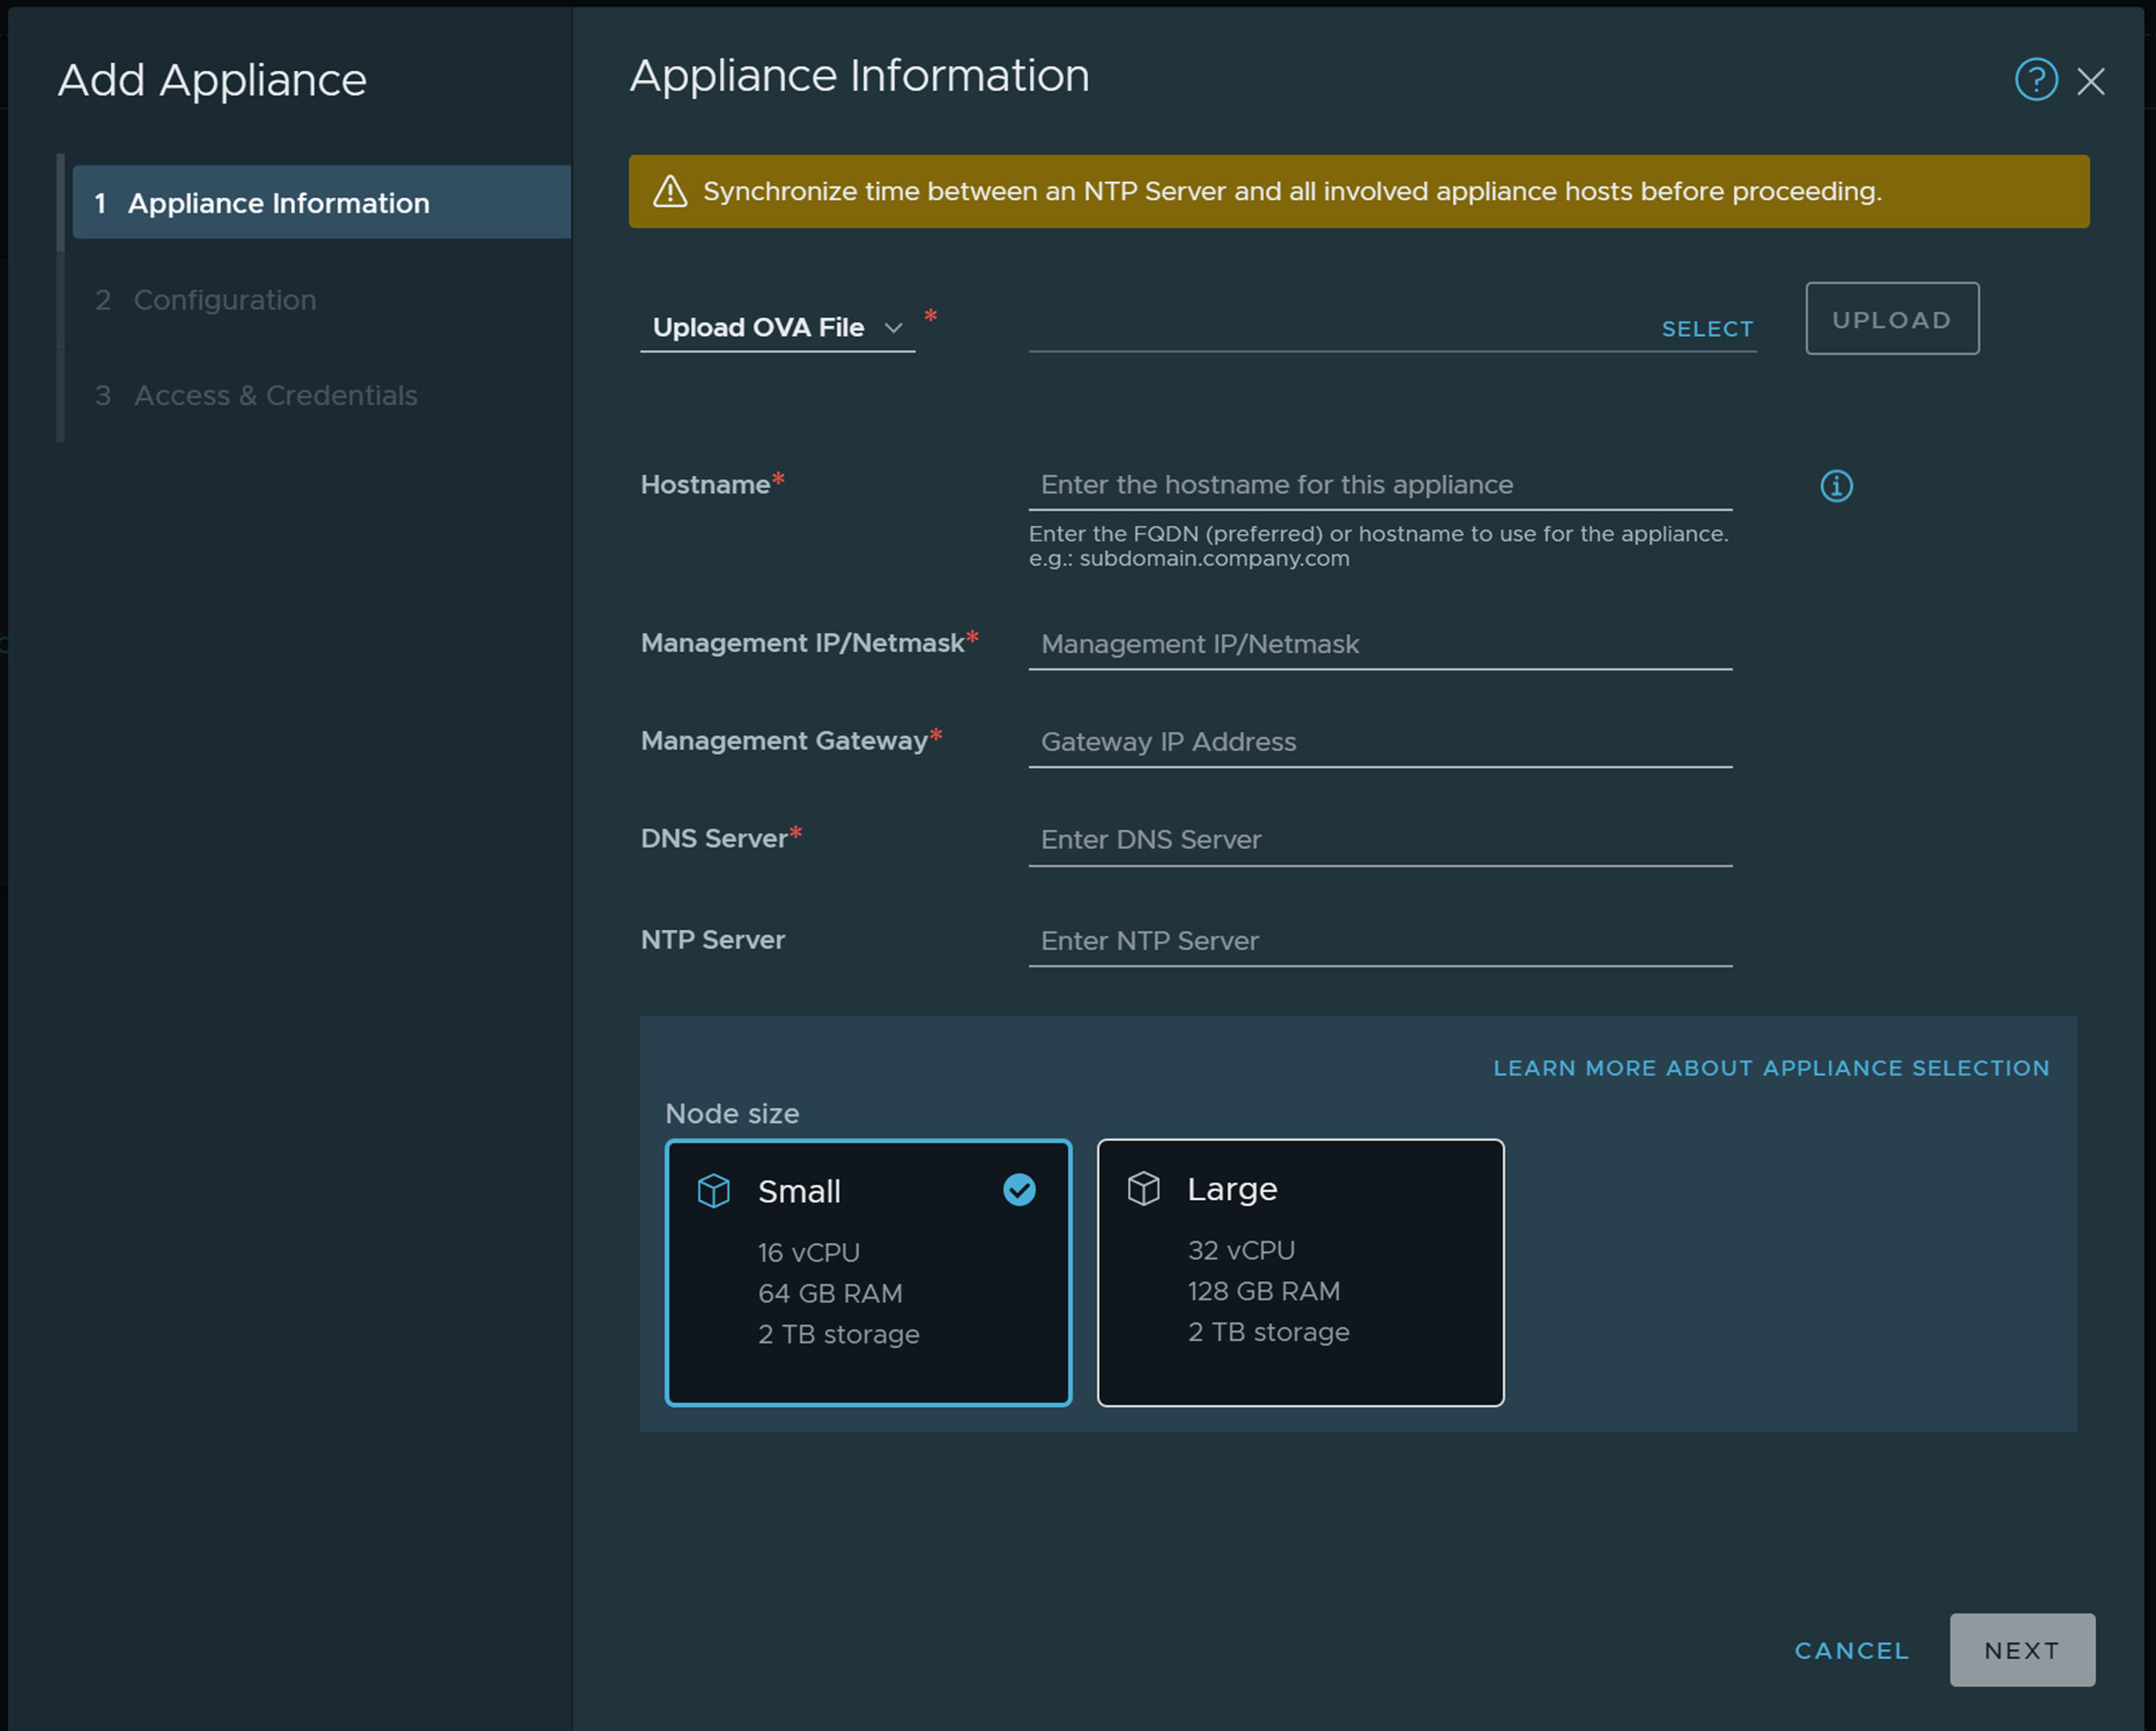
  3. Click the NSX Intelligence tab and in the NSX Intelligence Appliance section, click Add NSX Intelligence Appliance.
    If you have a cluster of NSX Manager nodes, you might receive a message asking you to log in to a specific NSX Manager node to upload the NSX Intelligence deployment bundle. Only one NSX Manager node is assigned as the orchestrator node and must be used to deploy the NSX Intelligence appliance.
    The Add Appliance wizard is displayed, as shown in the following image.
    NSX Intelligence Add Appliance wizard. The fields are described in the steps and content surrounding the image.
  4. In the Add Appliance wizard, enter the NSX Intelligence appliance information.
    Detail Item Action to Take
    OVA File

    If you had previously uploaded an NSX Intelligence OVA file, the Appliance Information pane displays the Active Bundle Version text box and the version number of the previously uploaded OVA file. If you want to use a different OVA bundle version, click Change and provide the location of the new OVA file that you want to use.

    If you have not uploaded an OVA file yet, use the following information.
    1. From the drop-down menu, select one of the following menu items.
      • Upload OVA File if you downloaded the NSX Intelligence OVA file to a locally accessible location.
      • Remote OVA Link if you downloaded the NSX Intelligence OVA file to a remote web server.

      See Download the NSX Intelligence Installer Bundle for more information.

    2. If you selected Upload OVA File, click Select to enter the filename or navigate to the file location.
    3. If you selected Remote OVA Link, enter the URL for the NSX Intelligence OVA file that you downloaded. For example, if the file is on a remote web server, http://localhost/nsx-intelligence-appliance-1.2.0.0.0.16730870.ova.
    4. Click Upload.

      The upload progress is displayed.

      You can continue to provide the rest of the appliance information as the OVA file is uploaded. When the OVA file has been successfully uploaded, a green Uploaded status is displayed.

    Hostname Enter a hostname for the NSX Intelligence appliance.

    This value can be a fully qualified domain name (preferred), such as subdomain.company.com, or a simple name, such as mytest-lab.

    Management IP/Netmask Enter the IP address, including the range, to use for the NSX Intelligence appliance. For example, 10.11.22.33/24
    Management Gateway Enter one gateway IP address for the NSX Intelligence appliance to use.
    DNS Server Any known DNS servers are listed. Enter additional DNS server IP addresses, if necessary.
    NTP Server Enter one or more NTP server IP addresses.
    Node size Select the node size for the NSX Intelligence appliance.

    A Small node size can be used for lab or proof-of-concept environment, or a small-scale production environment. A Large appliance size is for a large-scale production environment.

  5. Click Next.
  6. Enter the configuration details about where the NSX Intelligence appliance is to be deployed.
    Detail Item Action to Take
    Compute Manager From the drop-down menu, select the compute manager on which to deploy the NSX Intelligence appliance.
    Compute Cluster Use the drop-down menu to select the cluster to use.
    Resource Pool (Optional) Select the resource pool to use from the drop-down menu.
    Host (Optional) Select the host from the drop-down menu. If you are using a cluster with several transport nodes, decide which transport node to use.
    Note: Explicitly selecting a host overrides the vCPU count check. Verify that the selected host has enough vCPU count to accommodate the size of the NSX Intelligence appliance you are installing. If the host does not have enough vCPU count, the resulting NSX Intelligence appliance might have an incorrect configuration. If you are unsure, leave the text box empty and a host is selected for you.
    Datastore From the drop-down menu, select the datastore on which to store the NSX Intelligence configuration and data.
    Virtual Disk Format Select a thick or thin provision from the drop-down menu. By default the Thin Provision format is selected.
    • If you select the Thick Provision format, the datastore infrastructure must support the hardware acceleration feature. If you select Thick Provision Lazy Zeroed and hardware acceleration is not supported, the system changes your selection to the Thin Provision format.
    • If you selected vSAN in Datastore, you cannot select the virtual disk format. The storage policy assigned by VMware vCenter Server™ takes effect.
    Network Click Select Network. From the Select Network pane, select the type of network to be used from the Type drop-down menu, select the network, and click OK.
  7. Back in the Configuration pane, click Next .
  8. Configure the credentials and access to the NSX Intelligence appliance.
    Detail Item Action to Take
    Enable SSHand Enable Root Access Select whether you want to enable SSH access or root access to the NSX Intelligence appliance command-line interface (CLI).

    By default, these access methods are disabled for security reasons. You use the CLI to configure a backup file server, back up the NSX Intelligence appliance configuration, and restore a backup.

    In case SSH access is disabled, the sshd service might still be running because it is required for internal services. To enable SSH access after the NSX Intelligence appliance is installed, log in as the root user to the NSX Intelligence appliance and delete the following files.
    • /etc/hosts.allow
    • /etc/hosts.deny
    System Root Credentials If you allowed root access, in the Root Password text box, set the root password and confirm it in the Confirm Root Password text box. Use the password requirements shown on the UI.
    Admin CLI and Audit CLI Credentials Configure the Admin CLI credentials and Audit CLI credentials. If you want to use the same root password you defined earlier, select Same as root password for either the CLI password or Audit CLI password. Otherwise, enter the passwords for CLI password and Audit CLI password.
  9. Click Install Appliance.
    The installation progress is shown on the NSX Intelligence Appliance card under the System > Appliances tab . The installation can take anywhere from 5 to 30 minutes to finish. The installer deploys and registers the NSX Intelligence appliance with the NSX Manager node. The installer checks the health status of the services and plug-ins that the NSX Intelligence appliance requires.
    Note: If there is any error reported, use the information provided in the error messages to resolve the reported problem. See Troubleshooting NSX Intelligence Appliance Installation for possible hints in resolving problems you might have encountered.

    After the problem is resolved, you must uninstall the NSX Intelligence appliance first and try to reinstall it from the System > Appliances tab. See Uninstall the NSX Intelligence Appliance for information.

  10. After you receive the message that the NSX Intelligence appliance is successfully installed, click View NSX Intelligence.

    If the deployment is taking longer than 30 minutes or if you see any error messages, consult the Troubleshooting NSX Intelligence Appliance Installation topics.

    The NSX Manager UI refreshes with the NSX Intelligence features enabled in the Plan & Troubleshoot > Discover & Plan section of the UI.
    Important: You cannot access the NSX Intelligence appliance directly using the IP address assigned to the appliance. You can only access the NSX Intelligence UI and features by logging in to the NSX Manager UI and clicking the Plan & Troubleshoot tab. The Discover & Take Action or Recommendations tabs in the Discover & Plan section of the UI provide access to the NSX Intelligence features.

What to do next

Begin using the NSX Intelligence features using the Plan & Troubleshoot > Discover & Plan section of the NSX Manager UI. See "Getting Started with NSX Intelligence" in the Using VMware NSX Intelligence document.